Inventory Tabs
This is a listing of all the tabs a User might encounter in the 'Inventory' section of PCR-360. To access the Inventory section navigate to Main > Inventory.
Service Desk
Service Desk Tab
The 'Service Desk' tab provides a list of Service Desk Items created for this Inventory item. Service Desk Items will appear immediately when they are made. If there are Items to review, such as a piece of Equipment being used in a Service Desk Order or an Incident, then the User can view that Order.
From this tab, a User is also able to view the Assigned Workers, Completed Workers, Assigned Workgroups, and Completed Workgroups related to the piece of Equipment.
Viewing/Editing Service Desk Items
Select the Service Desk record to review in the Service Desk grid.
Click the
 button.
The associated Service Desk entry will open in a new form. The User can view and edit the Service Desk item and Save it all from this form.
Archived Service Desk Items
When a related Service Desk Item to the Equipment becomes Archived, the
Add Remark
Remarks are useful for making notes about a Return Order that might need to be recalled in the future. To add a Remark, follow these steps:
Click the
button.
This will open the 'Add New Remark' form.
Enter the Remarks desired into the field.
Click the 'Save New'
The Remark will be added to the list along with a User ID and time stamp for tracking.
View/Edit Remarks
Double-click or select the

The form will open so the User can read all the content of a given Remark.
Click the
UNKNOWN ATTACHMENT
button to commit any changes made to the Remark.
Delete Selected
Clicking the

Attachments
Equipment Attachments Tab
The 'Attachments' tab allows Users to attach file(s) (including .pdf, .jpg, .doc, and more) of interest or relevance to the Inventory item by uploading the file(s) into PCR-360. There is a file size limit of 10 Mb on attached files. This can help track documents related to a specific piece of Equipment like a repair order, scanned notes, or CAD diagrams.
Uploading a File
To attach one or more files, navigate to the 'Attachments' tab and click the Upload File(s)'

Download File
Allows a User to download a file to their local machine. To download the file, select the file to download, and click the 'Download File'

Open File
This will open the file, if possible, for viewing by the User. To open the file, select the file to view and click the 'Open File'

Edit Selected
Allows the name of the file to be modified within PCR-360. To edit the name select the file to be edited and click the 'Edit Selected' button.

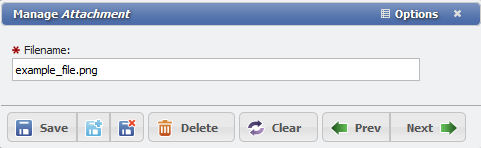
If a User modifies the name of the file, that is the new name that will be used when downloading the file. To edit simply modify the filename in the 'Filename:' field and click the 'Save' button.

Delete Selected
The 'Delete Selected' button

Billing
Equipment Billing Tab
The 'Billing' tab provides a listing of every Bill on which this Inventory item has appeared and the MRC, NRC, and Usage Totals that were Billed. To view a previous Bill, select the Bill from the grid and click the

The Bill will open in a new tab and can be viewed, printed, or saved as a .pdf document.
Charges
Equipment Charges Tab
The 'Charges' tab provides the User access to manually control how each Inventory item is billed. A Charge that is added to an Inventory item will be automatically added to any Bill that the item is associated with. There are four functions that can be used to control these charges: Add, Edit, Delete, and Stop. These functions are ONLY made available on Equipment with a status of 'Assigned'.
For the buttons to be made available on the 'Charges' tab, the Equipment must first be both 'Assigned' AND ' Billable'.
Add
After clicking the

Future Start Dates
When a Start Date is set to be in the future, on a new Charge, the Charge will not take effect until that Date. Also, Service Desk Actions will ignore any Future Charges, so that the Charges will take effect on the desired Date.
Editing
The

Note: A default Expense GLA must be supplied on the Expense GLAs tab before Charges can be added.
When a Charge is edited, the User is prompted to select when that Change should apply. Selecting the 'Effective Today' button will apply the change immediately while selecting 'Date to Last Billed' will begin as of the date of the last Bill Run. An example of the prompt is displayed below.

Effective Date prompt dialogue example
Deleting/Stopping
It is sometimes necessary to manually delete or stop a Charge. There are certain restrictions in place to prevent deleting Charges that have been billed. After clicking the

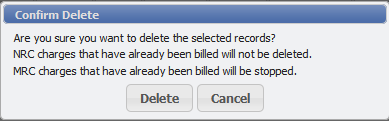
Confirm Delete dialogue example
A User can stop a recurring Charge from continuing to be charged with the

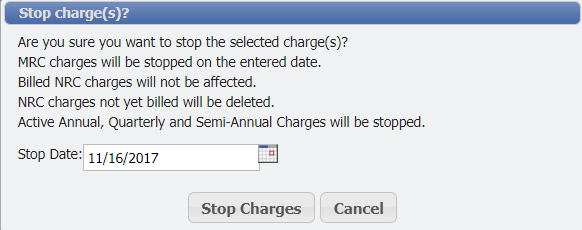
Stop Charges Form dialogue example
Applying an Alternate Recurring Charge
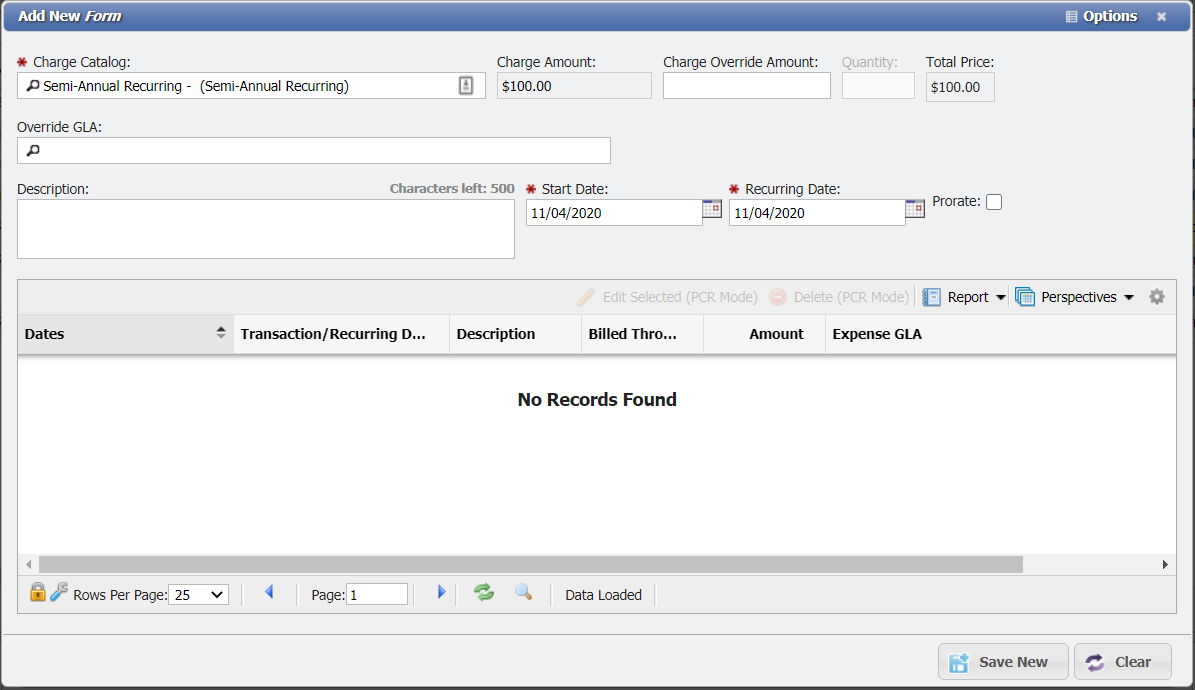
Alternate Recurring Charge Example
When an Alternate Recurring Charge is selected as the Charge Catalog (Quarterly, Semi-Annual and Annual Charges) for a new Charge, the form gains the addition of a Recurring Date field. This is the date that will be used by the Billing Process to determine which Bills the Charge should display on. The Recurring Date can not occur after the Start Date.
Contacts
Equipment Charges Tab
The 'Contacts' tab provides the User the ability to manually associate Contacts with each Inventory item. These associated Contacts represent people who may be associated with the Inventory in some way. These Contacts are separate entries in the Workers/Contacts section of the application that is associated with this Inventory for tracking purposes. The User can manually manage these associations by using the 'Add', 'Add Existing', 'Edit Selected', and 'Delete Selected' functionality available on the Contacts tab.
Adding New Contacts
After clicking on the

Adding Existing Contacts
After clicking the


Edit Selected
Sometimes it can be necessary to alter the existing information on an Inventory item. In order to do this PCR-360 has the

Delete Selected
Selecting the

Warehouse Contacts
The 'Contacts' tab provides the User the ability to manually associate Contacts with the Warehouse. These associated Contacts represent people who may be associated with the Warehouse in some way. These Contacts are separate entries in the Workers/Contacts section of the application that is associated with this Warehouse for management purposes. The User can manually update these associations by using the 'Add', 'Add Existing', 'Edit Selected', and 'Delete Selected' functionality available on the Contacts tab.
Adding New Contacts
After clicking on the

Adding Existing Contacts
After clicking the


Edit Selected
Sometimes it can be necessary to alter the existing information on an Inventory item. In order to do this PCR-360 has the

Delete Selected
Selecting the

Equipment Children
Equipment Children Tab Example
The 'Equipment Children' will open another Manage Equipment form. This will add Equipment in a parent-child relationship similar to the Trees. When Equipment is added in this manner it will be able associated with the Parent Equipment.
Adding a Child Equipment
To add 'Equipment Children' a User can either create a new piece of Equipment or can add an existing piece of Equipment.
Add New Equipment
To add a new piece of Equipment, click the

Add New Child Equipment From example
The only difference from the standard 'Add New Equipment' form when a User is creating new Equipment, is that the 'Parent Equipment' picker will automatically be associated with the 'Parent Equipment' that the User started from.

The User can then fill in the form just like any other Equipment form. After clicking the
Add Existing Equipment
To add a new piece of Equipment, click the
Add New Existing Equipment Form example
The grid will only display Equipment that is not already associated with another piece of Equipment. After clicking the
Expense GLAs
This tab is of particular importance to the User organization's financial team in that it allows Users to set GLAs for new Equipment and edit those of existing Equipment.
Equipment Expense GLA Tab
To set a Default GLA for Equipment, click the Search Icon in the 'Set Default GLA' field (see above) and select a GLA from the list. This field will add the selected GLA at 100% and will replace any 'Default' type existing GLAs in the grid above.
Managing GLA Entries
Users can also specify GLAs by clicking

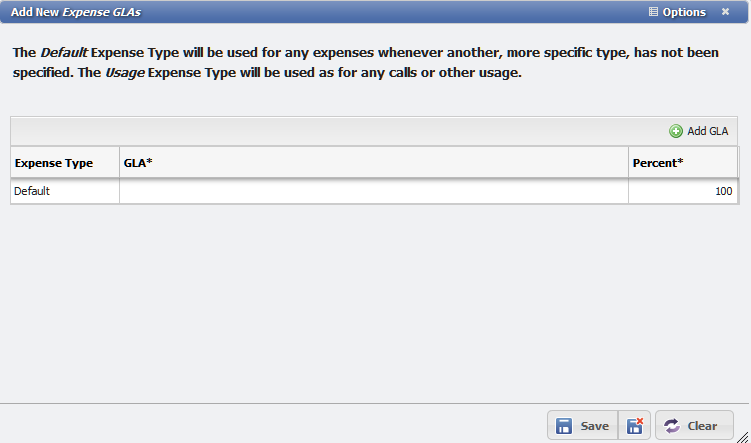
Add New Expense GLAs Form example
From this new form, the User can set a single GLA or Multiple GLAs quickly and without having to re-open the form multiple times unlike in previous versions. There are three fields that can be edited on the table whether the User is Adding a Single GLA or Multiple GLAs.
Expense Type - This drop down allows the User to select the Expense Type of the GLA.

Expense Type dropdown field example
GLA - This picker allows the User to select the GLA to associate with the Expense Type.

GLA picker field example
Percent - The number selector allows the User to specify the percent of the Expense Type to apply to the GLA.

Percent field example
The first row of the table is added to the 'Add New Expense GLA' form by default. The User only needs to select the 'Expense Type', 'GLA', and 'Percent' and click .
.
Single GLA
Multiple GLAs
To add multiple GLAs on the 'Add New Expense GLA' form the User can follow these steps:
Click
This will add a row to the table.
Repeat to add as many rows as are required.
When adding multiple GLAs, the percentages of a given 'Expense Type' must equal 100% as in the following example:

GLA percentage sum example of add to 100
If the Percentages are not enough to equal 100%, or exceed 100% the User will receive a notice as in the following example:

GLA percentage sum example of add to over 100
Once the User has added all the desired GLAs, the form can be saved by clicking
.
The GLAs will have been added to grid on the 'Expense GLA' tab.
To delete a single GLA record the User must follow these steps:
From the 'Add New Expense GLA' form chose the row to delete.
In this example the 'Equipment' Expense Type is being deleted.

Manage GLA example
Right-click the 'Equipment' row. This will open the table context menu.

Delete a GLA from selection example
Click the 'Delete Row' menu option.
The row will have been deleted.
Click
.
The grid will update and the GLA will have been removed.
Changing GLAs
When a GLA is changed for a different one, the User is prompted to select when that change should apply. Selecting "Effective Today" will apply the change immediately, while selecting "Date to Last Billed" will begin as of the date of the last Bill Run. An example of the prompt is displayed below.

Effective Date dialogue example
Inventory
The 'Inventory' tab is explained in full detail on the Warehouse grid.
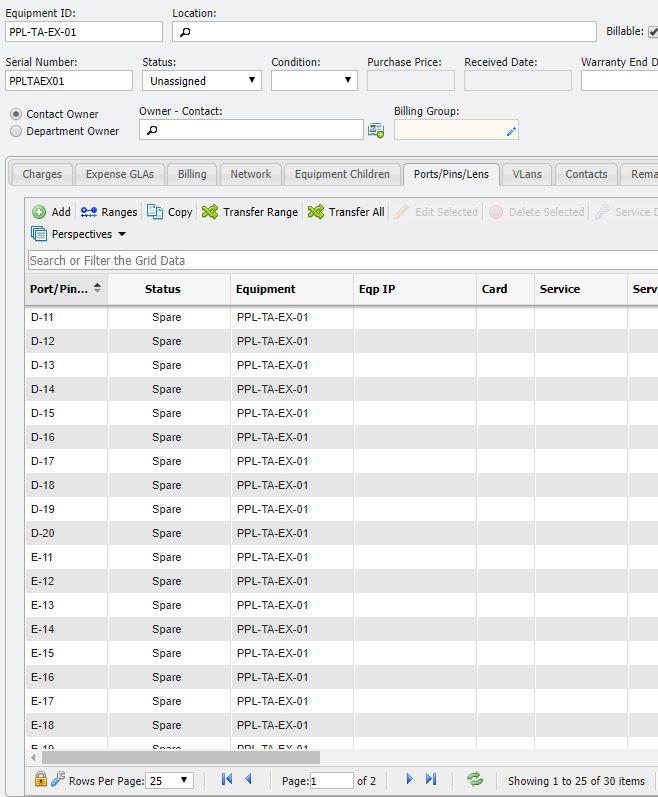
Ports/Pins/Lens Equipment Grid
Users can navigate to the 'Ports/Pins/Lens (PPL) Equipment grid' by following this path: Main > Inventory > Equipment > Ports/Pins/Lens. If a piece of Equipment has an Equipment Catalog that has the Cabling Equipment flag checked, then it will also have a tab labelled Ports/Pins/Lens. This shows all PPL originating from the equipment and to the equipment (if any) to which each PPL is connected. From this tab new PPLs may be added, edited, or removed. PCR-360 provides functionality for bulk PPL creation, editing, removal, copying, and transferring of PPL. PPL records can be directly modified on a specific Cabling Equipment record. These modifications will be consistent with the other rules of editing PPL records.
Equipment PPL Tab
Add
More information on the
Ranges
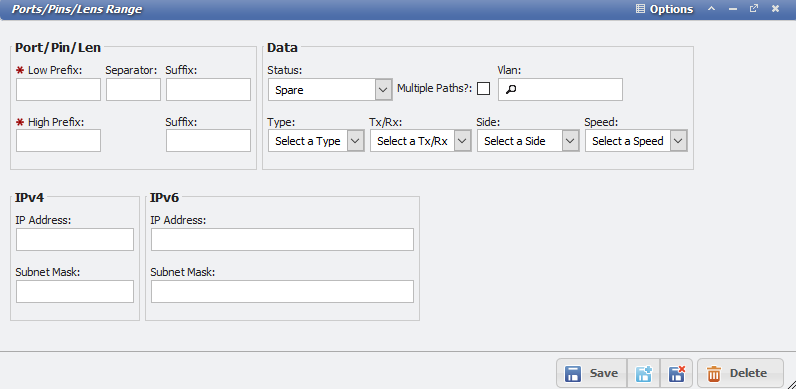
Ports/Pins/Lens Range Form
The

Assuming a prefix Range of 1-3, a separator of " - ", and a low to high suffix of 1-5 the User would be adding 15 records with the
Example Ports/Pins/Lens | Suffix of '1' | Suffix of '2' | Suffix of '3' | Suffix of '4' | Suffix of '5' |
|---|---|---|---|---|---|
Prefix of '1' | 1-1 | 1-2 | 1-3 | 1-4 | 1-5 |
Prefix of '2' | 2-1 | 2-2 | 2-3 | 2-4 | 2-5 |
Prefix of '3' | 3-1 | 3-2 | 3-3 | 3-4 | 3-5 |
The 'Ranges' is more than a simple Add form, however, and will allow the User to edit multiple PPL. If after adding the above table the User were to click the Ranges button again and enter a prefix of 2-3, and a suffix of 1-1 they would select the 2-1 and 3-1 PPL for editing. This functionality allows the User to quickly Add and assign status' to multiple PPL.
Back Connect Ranges
The PPL Range form allows for Back-Connect Ranges. Below is the add new "Ranges" form from the Port/Pins/Lens grid on any Cabling Equipment. To use this feature, the user just needs to enter the Destination Equipment and designate a low prefix to a low suffix range to be added. This functionality allows the User to quickly connect multiple pieces of Equipment together, without having the connection appear in the Cable Path. When ports are transferred, any back connects are transferred along with the port.
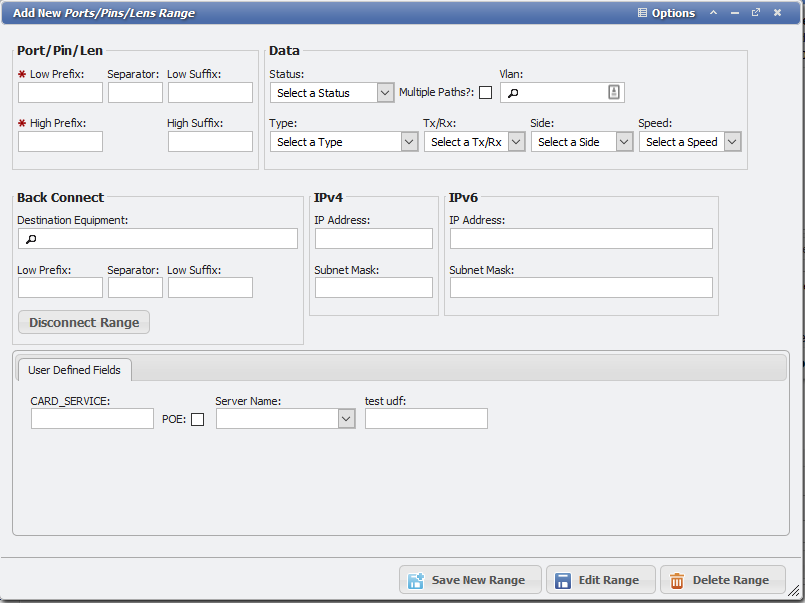
Add new, ports, pins, lens range form
Copy
The

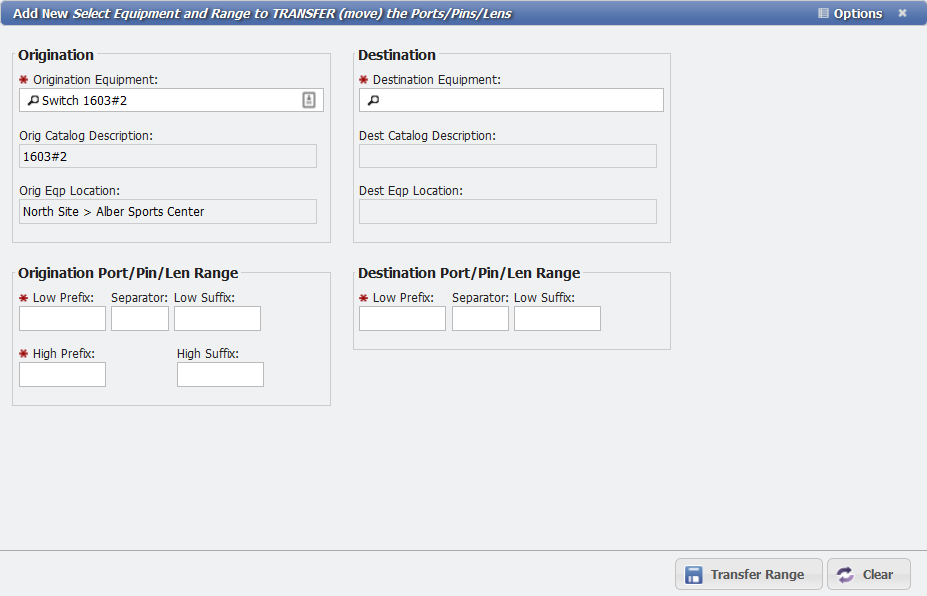
Transfer Range
The

To Transfer a PPL Range, follow these steps:
Click the
button.This will open the 'Add New Select Equipment and Range to TRANSFER (move) the Ports/Pins/Lens' form. (PPL Range Transfer Form for short.)
Transfer PPL Range Form
The Origination Equipment picker will automatically fill in with the Equipment from the open Equipment form.
Click the Destination Equipment picker and select the Equipment that the PPL need to be transferred to.
Be sure to select a Destination piece of Equipment that is different from the Origination Equipment.
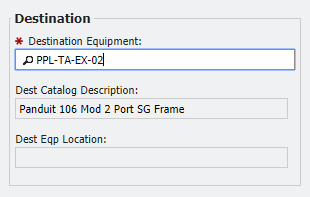
Destination Fields
Select the Origination Port/Pin/Len Range.
Enter (at minimum) Low Prefix and High Prefix of the PPL records that should be selected to Transfer.
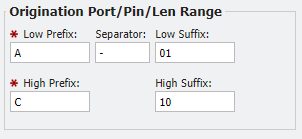
Origination fields
Separator, Low Suffix, and High Suffix are optional fields that increase the flexibility of ranges.
This needs to specify the proper format for the PP. Generally, this format is based on the organization's naming conventions.
For example, the range shown above represents Low PPL named A-01 with a range of 30 ports ending on C-10.
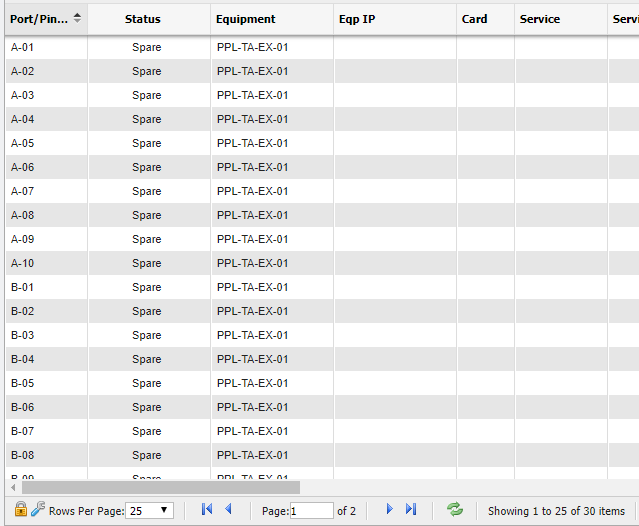
PPL Grid example
Select the Destination Port/Pin/Len (PPL) Range.
Enter (at minimum) the Low Prefix of the port range the newly transferred PPLs will start at.

Destination PPL Range fields
Separator and Low Suffix are optional fields that increase the flexibility of ranges.
This needs to specify the proper format for the PP. Generally, this format is based on the organization's naming conventions.
For example, the range is shown above (in conjunction with the Origination Range) represents Low PPL named D-11 with a range of 30 ports ending on F-20.
Click the Transfer Range button to complete the transfer.
The selected range will be transferred to the Destination Equipment with the specified new starting port.
Transfer All
The

To transfer all PPLs on Equipment, use the following steps.
Click the
button.The Origination Equipment picker will automatically fill in with the Equipment from the open Equipment form.
Select the Destination Equipment Using the picker
Click the
 button to complete the transfer
 All PPLs will be transferred, as is, to the Destination Equipment.
Equipment Form example
If a User has attempted to Transfer Child Equipment PPL during the
Child Equipment PPL warning message
Edit Selected
The

Delete Selected
The

Service Desk
The

View Path
The
 button will open up the Cable: View Path report that the given Ports/Pins/Lens record appears on.
For a Ports/Pins/Lens record to have a Path associated with it it must first have a Status of Assigned.
More Information about Paths and the report is available here.
Renumber
Users can quickly renumber Ports/Pins/Lens (PPL) with the Transfer form.
Click the
button.This will open the 'Add new Select Equipment and Range to Transfer (move) the Ports/Pins/Lens' form. (Transfer PPL form for short.)
Transfer Range Form example
The 'Origination Equipment' picker will automatically fill in with the Equipment from the open Equipment form.
Click the 'Destination Equipment' picker and select the Equipment that the PPL has to transfer to.
Select a Destination piece of Equipment that is the same Equipment as the Origination Equipment.
Select the Origination Port/Pin/Len Range.
Enter the Low PPL of the PPL records that should be selected to Transfer. This needs to include the proper format for the PPL based on the organizations naming conventions. For example, if the Low PPL is named "123-ABC" where "-" is the separator, then the formatting should look like this: Low Separator: "123", Separator: "-", Low Suffix: "ABC".

Low PPL fields
Enter the High PPL of the PPL records that should be selected to Transfer. This needs to include the proper format for the PPL based on the organizations naming conventions. For example, if the High PPL is named "124-ABZ" where "-" is the separator, then the formatting should look like this: High Separator: "124", and High Suffix: "ABZ".
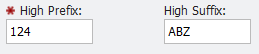
High PPL fields
Click the
 button.
The selected Range will be renumbered and remain on the original Equipment record since the Origination Equipment and Destination Equipment fields match.
Network
Equipment Network Tab
The 'Network' tab will assign specific Network settings for the Equipment. The User can set the 'Host Name', 'LAN Name', 'MAC Address', and the IP settings.
Of the fields on the Network tab for Equipment, the MAC Address field has special validations within PCR-360. Similar to Asset Tags, the MAC Address for a piece of Equipment is expected to be unique for each piece of Equipment.
Note: When a MAC Address is saved, PCR-360 will apply standard formatting to it, and allow Users to search for them in the 360 Search.
User Defined Fields
The 'User Defined Fields' tab provides access to any extra fields that have been defined for the Equipment Catalog specified on each Equipment record. See Adding User Defined Fields for more information. These fields are added by Admin Users to store extra information that is not provided by default on Equipment records.
VLANs
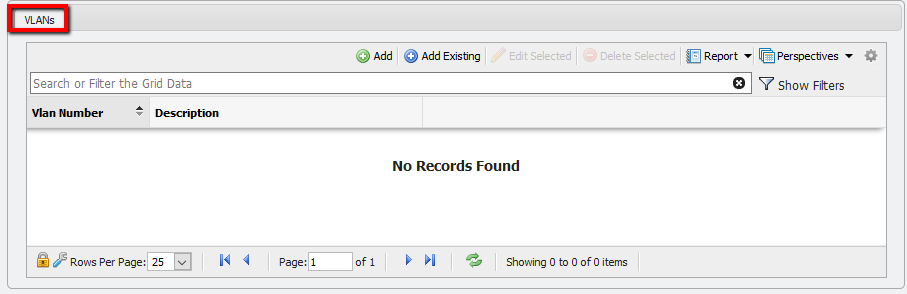
The 'VLANs' tab allows the User to Add new VLANs to the Ports/Pins/Lens of a piece of Equipment or Add Existing VLANs.