The Workers/Contacts grid lists the Contact information for all the people that are associated with the User's organization. The Workers/Contacts grid is essentially a directory of all the people who have interacted with the User organization over a period of time. This includes Service Reps, standard Workers, new Customers, and other categories.
Note: In many cases, Worker/Contacts is populated through an automatic process with a feed from the organization's Human Resources department.
Adding a New Worker/Contact
Navigate to Main > People > Workers/Contacts.
Click the button located immediately above the Workers/Contacts Grid.
Add New Contact form example
In the Contact data entry form, there are two Required fields: First and Last Name.
By checking the Directory check box, gives the option for the Contact to appear in the Directory in the CustomerCenter. The Phone Number of the Contact must also have the Directory flag set. Whether the Phone Number will appear along with the Contact in the Directory will depend on the Phone Service having its Directory flag set to false. This allows the Contact to appear in the Directory independent of the Service.
Next, select one or more Type of Contact from the drop-down list of available types. Keep in mind that based on the User's choice of Type of Contact some previously optional fields may become required. Additional tabs may also become available and may have their own required fields. For example, if the User selects the Customer type, a new Customer tab containing required fields appears in the Contact data entry form.
Create a New Owner/Customer:
Navigate to Main > People > Workers / Contacts.
Click the button to open the 'Add New Contact' form.
Add New Contact form example
Enter the Owner's 'First Name' and 'Last Name' into their respective fields.
Make sure "Customer" is populated on the 'Type' selection box.
Type Field example
Go to the tab.
Enter a unique customer number. Most organizations have a unique employee number of some kind and use that as the unique identifier in PCR-360. If the number isn't available at this time we recommend, designing a temporary naming convention. For example, they might all start with 5000 (an example unique number). This way, it is easy to go back at a later date and find all the Customer numbers that need to be updated to their current/valid value.
Choose the appropriate 'Billing Group' for this customer.
Billing Group field example
Click the button.
Worker / Contact tabs
The tabs that appear in the Workers/Contacts form can be used to input as much contact information as the User desires.
If a tab is marked as having a Required field, open that tab enter information in the field.
Once all required fields have been filled, click the
button at the bottom of the Workers/Contacts form. The new Worker/Contact appears on the Workers/Contacts Grid and elsewhere in the application when a User is prompted to define a Worker/Contact.
Remarks tab
Remarks
Manage Contact Form
Add Remark
Remarks are useful for making notes about a Return Order that might need to be recalled in the future. To add a Remark, follow these steps:
Click the button.
This will open the 'Add New Remark' form.
Enter the Remarks desired into the field.
Click the 'Save New' button.
The Remark will be added to the list along with a User ID and time stamp for tracking.
View/Edit Remarks
Double-click or select the
button to open the Remark.
The form will open so the User can read all the content of a given Remark.
Click the
UNKNOWN ATTACHMENT
button to commit any changes made to the Remark.
Delete Selected
Clicking the
button will delete any existing Remark.
Note: Remember that depending on the system configuration Remarks may not be editable once added.
Use of HTML Tags
Some fields within PCR-360 allow Users to input HTML tags to make displaying that information a richer experience for those that are expected to consume it. For more information on HTML tag usage, please see the wiki entry for it.
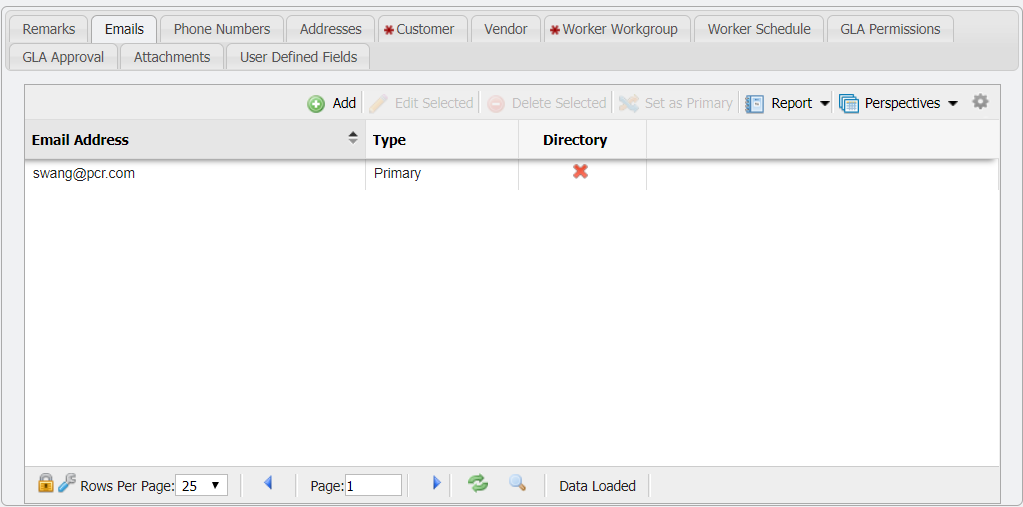
Emails tab
Emails
Emails tab
The 'Emails' tab will associate an email address to a Contact record. Multiple email addresses can be saved in PCR-360 with the option to set an Email Address as the primary for the Contact. To add an email association, use the following steps:
Click the button.
This will open the 'Add New Contact Email Address' form.
Add New Contact Email Address form
Enter the Email Address and select if the Email is intended as a Primary contact or as an alternate email.
If the Email Address should show in the Directory select the 'Directory' checkbox.
Click the button.
The Email Address for the Contact will be added to the grid.
Set as Primary
The
button will allow a User to quickly change the status of the Primary Email Address without having to open a sub form. Simply click the Email Address to set, and click the button. The 'Type' on the selected record should change to Primary and unset on the original record.
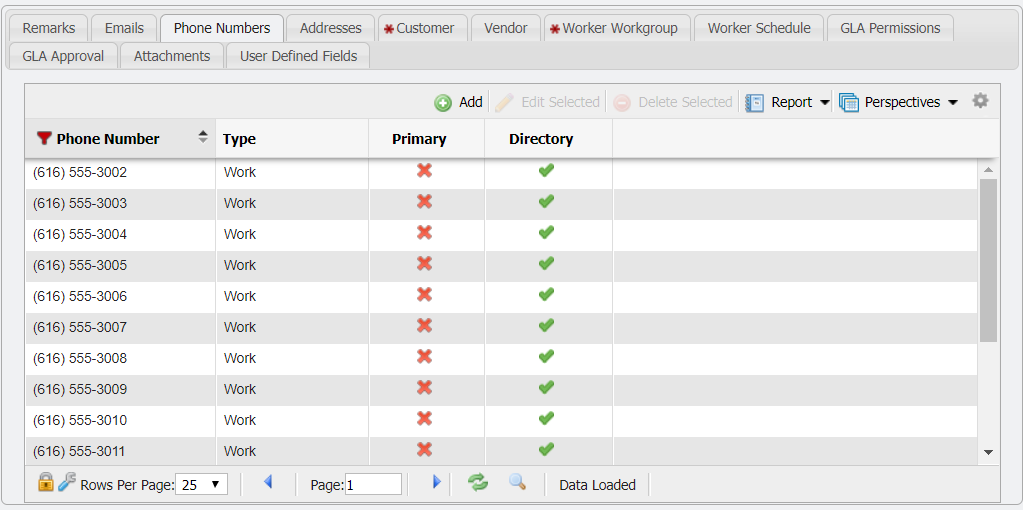
Phones Numbers tab
Phone Numbers
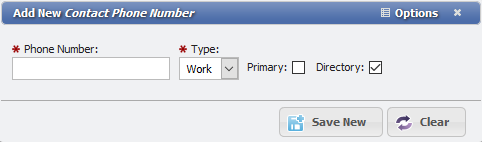
The 'Phone Numbers' tab will allow the association of a Phone Number or numbers with a Contact record. These numbers can be set as primary or allowed to appear in the directory. To add the Phone Number association follow these steps:
Click the button.
This will open the 'Add New Contact Phone Number' form.
Enter the 'Phone Number' and select the 'Type' of number that it is; work, home etc.
If the Phone Number is the Primary number for the Contact, click the 'Primary' checkbox.
If the Phone Number should show in the Directory select the 'Directory' checkbox.
Click the button.
The Phone Number will be added to the grid.
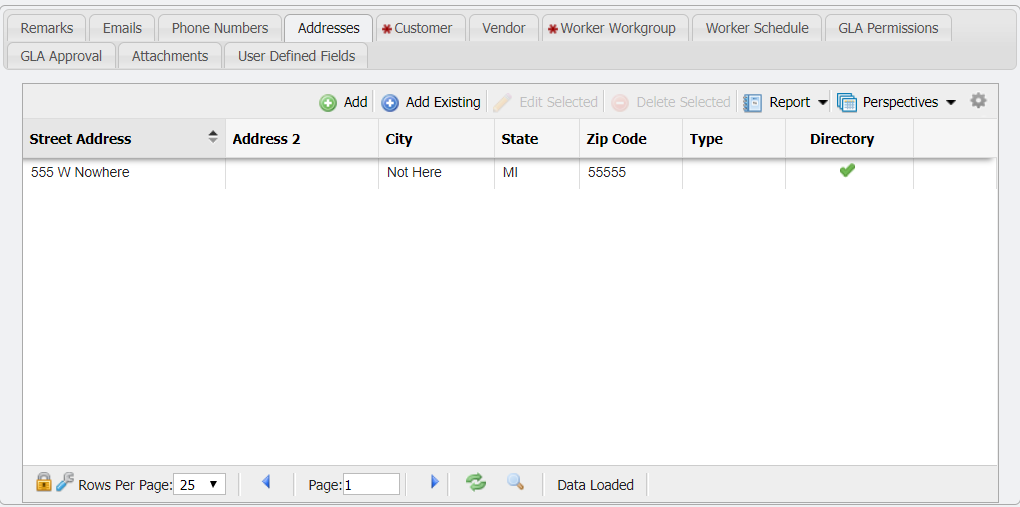
Addresses tab
Address/Addresses
Addresses tab
The 'Addresses' tab will associate an Address to the Contact record.
Click the button.
This will open the 'Add New Address' form.
Add New Address form
Enter the 'Street Address', 'Country', 'City', 'State', and 'Zip'. Each of these fields are required.
Select the 'Type' if one is desired.
If the Address should show in the Directory select the 'Directory' checkbox.
Click the button.
The Address will now reflect in the grid on the Addresses tab.
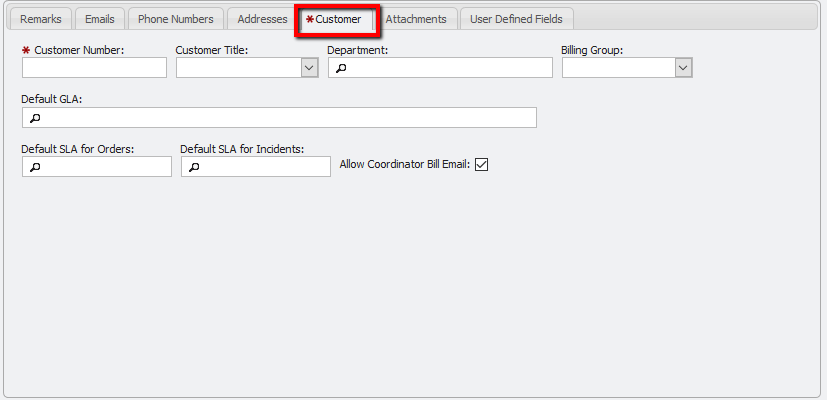
Customer tab
Customer
Customer Tab
When a 'Contact' is set with a 'Type' of 'Customer' the 'Customer' tab will be made available and become required. There are two required fields in the 'Customer' tab, 'Customer Number' and the 'Billing Group'. The Customer Number will import from your Shibboleth or LDAP feed. Additional information related to the Customer can be added here.
The 'Default GLA' can be set to always associate the Customer with a given GLA.
The 'Default SLA for Orders' will automatically set the SLA whenever the Customer makes an Order.
The 'Default SLA for Incidents' will set the SLA for when the Customer reports an Incident.
The 'Allow Coordinator Bill Email' flag allows Coordinators to opt out of the Coordinator emails sent using the Coordinator email processes like on the Bills grid.
Contacts and Billing Groups
When creating a new Contact, Billing Group is not defaulted, however, the Contact will inherit the Billing Group associated Department Billing Group value. When first landing on the Customer Tab of the New Contact Form, Billing Group is marked as Required.
Customer Tab example
Once the Department value is selected, Billing Group no longer becomes required. This indicates no Billing Group needs to be selected, unless a different value is desired. No value is need because the Contact will automatically inherit the Billing Group of the selected Department.
Customer Tab example
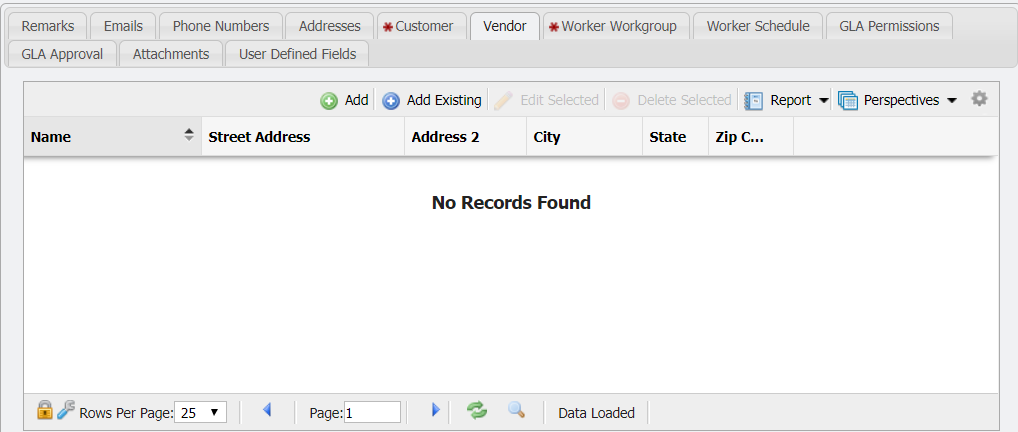
Vendor tab
Vendor
Vendor tab
The 'Vendor' tab is another way to add a Vendor to a Contact and visa versa. When a Vendor is added here, that Vendor becomes associated with the Contact so that the Contact will appear in that Vendors 'Contact' tab.
Add New Vendor
This will add a Vendor to the Vendors grid. To add a Vendor follow these steps:
Click the button.
This will open the 'Add New Vendor' form
Add New Vendor form
Fill in the 'Name' of the Vendor along with the Address.
When all desired information is entered, click button.
The new Vendor will be added to the Vendor grid and will be able to have 'Vendor Details' entered.
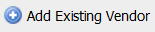
Add Existing Vendor
To use a Vendor that was previously set up, click the button.
This will open the 'Add Existing Vendor' form.
Manage Existing Vendors form
3. Select the Vendor(s) desired from the form and click the
button. The Vendor will have been added.
Delete Selected
To remove a Vendor association from a given Contact just select the Vendor to remove and click the
button. This will only remove the Vendor association and not any Vendors from the Vendors grid.
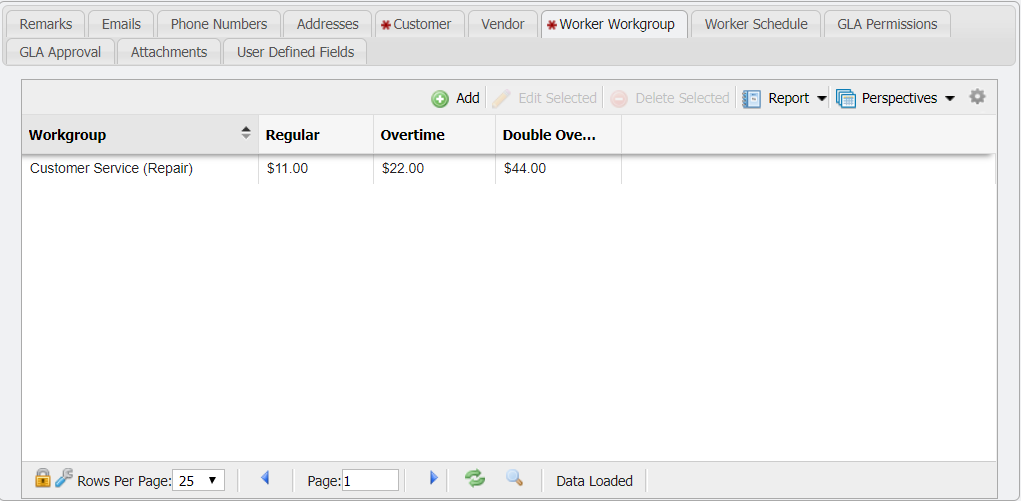
Worker Workgroup tab
Worker Workgroup
Worker Workgroup tab
The 'Worker Workgroup' tab will be made available when a Contact is assigned a 'Type' of 'Worker'. Adding a Contact here will associate the Worker with the chosen Workgroup. The 'Hourly Rate' here is what the organization will charge for the Worker's labor, not necessarily what the Worker makes. The association will also show up in the Workers & Rates tab. To add follow these steps:
Click the button.
This will open the 'Add New Worker Rates' form.
Add New Worker Rates form
Set the 'Workgroup' assignment for the Worker.
Enter values for the 'Hourly Rates'. All three fields, 'Regular', 'Overtime', and 'Double Overtime' are required fields.
Click the button.
The Workgroup will now have the defined Worker associated with the Workgroup.
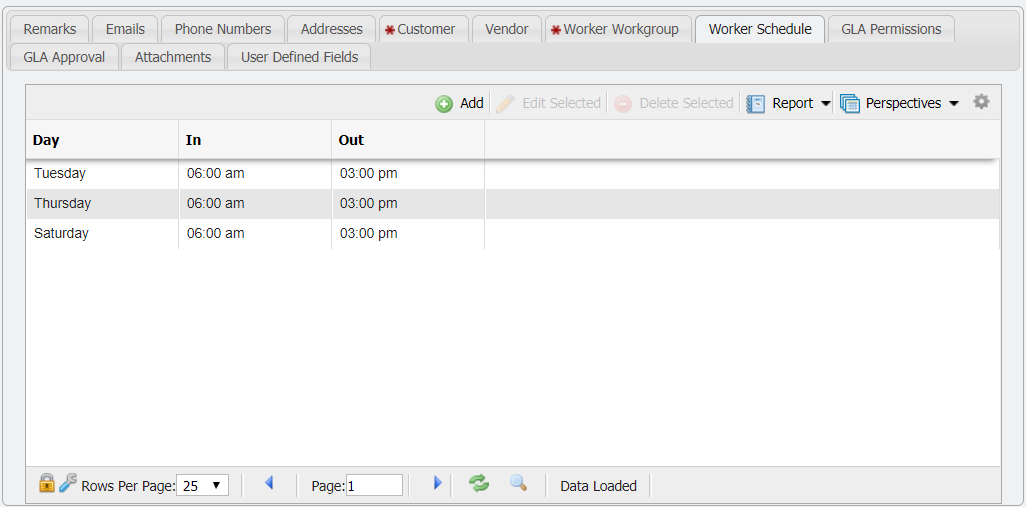
Worker Schedule tab
Worker Schedule
Worker Schedule tab
The 'Worker Schedule' will allow the User to define the 'Days' and 'Time Range' availability of a Worker. The schedule is used by PCR-360 to 'Auto-Schedule' Workflow. To add a schedule follow these steps:
Click the button.
This will open the 'Add New Schedule' form.
Add New Schedule form
Select the 'Days' desired, and add the 'Time Range' of the Worker's availability. Use the regular availability for the Worker here, ignoring breaks in the time like a vacation, holidays, breaks, or lunches. This gives PCR-360 a baseline for scheduling that can then be altered by the User in the Time Entry as needed.
Select the time using the Time Range inputs according to rules in the tool-tip.
Click the button.
The Schedule should be added to the grid. Repeat as necessary for individual days if the Worker has an irregular schedule.
GLA Permissions tab
GLA Permissions
GLA Permissions tab
The 'GLA Permissions' tab will allow a User to limit a Contact to be associated with specific GLAs for greater administrative control. Whatever GLA Permissions are set here are the GLA(s) that the Contact will have access to via the CustomerCenter.
When a Contact is assigned as a Coordinator for a Department the Contact inherits the Department's GLA Permissions.
The Contact GLA Permissions are the ones used, even for Coordinators. If no Contact Permissions are present, then the Coordinator's Departments' GLA Permissions will be used.
Add
To limit a Contact to a GLA(s) follow these steps:
Click the button.
This will open the 'Add New GLA Permission' form.
Add New GLA Permission form
Select the GLA or GLAs that are desired to associate from the grid. Filters and Search can be used to sort to the GLA(s) that are desired.
Click the button.
The GLA Permissions will be added to the Contact record. Any time Users attempt to assign a GLA through the CustomerCenter for this Contact record, the GLA(s) available will be limited to the ones in this list.
Permit None
If the Contact should never be allowed to be associated with a GLA simply click the
button. Any previously associated GLA(s) will be removed and a message will appear in the grid that says 'No GLA entries may be used with this Contacts entry.' By default, when a new Contact is created the Permit None option is automatically added.
To remove the 'Permit None' restriction, simply select the message in the grid, and then click the
button.
Coordinator GLA Permissions Inheritance
Any GLA Permissions that the Coordinaror inherits from their Department will be displayed on the 'GLA Permissions' tab by pressing the
button.
View Inherited Permissions example
GLA Approval tab
Attachments tab
Attachments
Attachments tab
The Attachments tab allows Users to attach files (including .pdf, .jpg, .doc, and more) of interest or relevance to the service by upload.
Uploading a File
To attach one or more files, navigate to the 'Attachments' tab and click the
button located on the Grid Toolbar above the 'Attachments' grid. The User will be prompted to select the file(s) from their hard drive to upload. Upon selection of a file(s), the upload will begin automatically.
Download File
Allows a User to download a file to their local machine. Useful to make modifications to a file, which can then be re-uploaded. To download a file click the
button. The download should begin and allow the User to define where they would like to save the file.
Open File
This will open the file, if possible, for viewing by the User. No modifications of the original file can be made when opened in this manner. To use this functionality select the file to view and click the
button. The file should open for viewing.
Edit Selected
Allows the name of the file to be modified within PCR-360. If a User modifies the name of the file, that is the new name that will be used when downloading the file.
1. Select the file to modify and click the
button.
2. This will open the 'Manage Attachment' form.
Manage Attachment form
From here the filename can be modified as desired.
Note:Care should be taken NOT to change the extension of the file name or unexpected behaviors or lose of the file are possible.
Delete Selected
This will remove the file from PCR-360. Select the file to remove and click the
button. The File will have been removed from PCR-360.
User-Defined Fields tab
User-Defined Fields
Workers/Contacts User-Defined Fields Tab example
The User Defined Fields tab provides access to any extra fields that have been defined for the given grid. See Adding User Defined Fields for more information.
In PCR-360, the types assigned to each Contact determine how the contact functions in the system and how it can be assigned by the system. The default Contact Types installed with the system are outlined below. The System Administrator can create additional types at any time for informational purposes.
Customer
This type is used to classify a Contact as a Customer in the system. Customer contacts have a Customer Number and some other specialized fields on the Contacts Customer tab. Only Customer type contacts can own services and equipment. Customers can also be assigned to a Departmental Hierarchy (or department). Selecting this type automatically enters a GLA Permission as "Permit None" if nothing else is selected.
Coordinator
This is a specialized iteration of the Customer contact type which oversees a Departmental Hierarchy unit. In PCR-360, Departmental Hierarchies are departments – and those departments contain Customers. Coordinators are required to be Customers themselves, and the application enforces this requirement when the types are manually added. Any Coordinator that is assigned to a Departmental Hierarchy has the privileges to submit Service Requests in the CustomerCenter for other Customers of that Departmental Hierarchy. The Coordinator can also view bills for other Customers in their Departmental Hierarchy. Additionally, when a Departmental Hierarchy is specified as the owner of any service or equipment, all communications (notifications) regarding that service or equipment is sent to the Coordinators. See Setting up Coordinators for more details.
Guest
This type is used whenever PCR-360 cannot determine a type to assign to a Contact. As the application processes incoming emails, a Contact is created for each unknown email address coming into the system. These new Contacts are assigned as the Guest type.
Service Rep
This type allows the Contact to be assigned to Service Desk items as the Service Rep (CSR). Only Contacts with the Service Rep type can be assigned to items in Service Desk. Service Reps must also be assigned as the Worker type. The application enforces this requirement when types are manually added.
For the steps to create a Service Rep, please see our How-To article.
User
This type is assigned to any Contact that is also a User in the system. The system creates an internal User record for everyone who accesses the application, and this User record must be associated with one Contact record. Personal details for each User (First Name, Last Name, Email, Phone, etc.) are stored in the associated Contact. This Contact must be a User type.
Vendor
This type is assigned to any Contact of a system Vendor. Vendors of Equipment and Services are tracked by the system, and these Vendors have associated Contacts. Only Contacts of the Vendor type can be associated with a Vendor record.
VIP
This type is used to classify a Contact as a VIP. When a Service Desk Incident is received from a VIP Contact, it assigns the appropriate 'Urgency' to that Incident based on the Tenant's default 'VIP Urgency' setting.
Worker
This type specifies that the Contact is a Worker (or Technician). Workers are utilized by the system when assigning Workflow and labor. Each Worker must be assigned to at least one Workgroup.
Default Workgroup Rates
When a Workgroup is added, either by selecting a Worker or adding the Workgroup, the Rate will automatically populate based off the value defined by the Workgroup.
Editing a Worker/Contact
Users can edit any item on the Workers/Contacts grid by double-clicking the item or highlighting it and clicking the button immediately above the grid. This action opens the Contact's data entry form at which point edits can be made and saved.
Setting a Primary Phone Number
If there is only one Phone Number associated with a Contact record, it is set to Primary by default. The Primary Number is the one that appears along with the rest of the Contact information in searches elsewhere in PCR-360.
If there are multiple Phone Numbers associated with a Contact, use the following steps to select one as Primary.
Select the phone number desired by double clicking or single clicking the phone number and clicking the
Edit Selected
button.
Click the
Primary
check box to set the number as Primary.
Click the
Save
button.
The Phone Number is set as Primary.
Setting a Primary Email Address
If there is only one Email associated with a Contact record, it is set to Primary by default. The Primary Email is the on that appears along with the rest of the Contact information in searches elsewhere in PCR-360.
If there are multiple Emails associated with a Contact, use the following steps select one as Primary.
Select the Email desired.
Click the
Set as Primary
button to set the number as Primary.
Toggle Status
Sometimes a User might wish to make another User inaccessible to other portions of PCR-360. This is the function of the button. Changing a Worker/Contact to Inactive makes the User hidden from selectors elsewhere in PCR-360 without removing the User's information.
Deleting a Worker/Contact
Users can delete any item on the Workers/Contacts Grid by double-clicking the item or highlighting it and clicking the button above the grid.
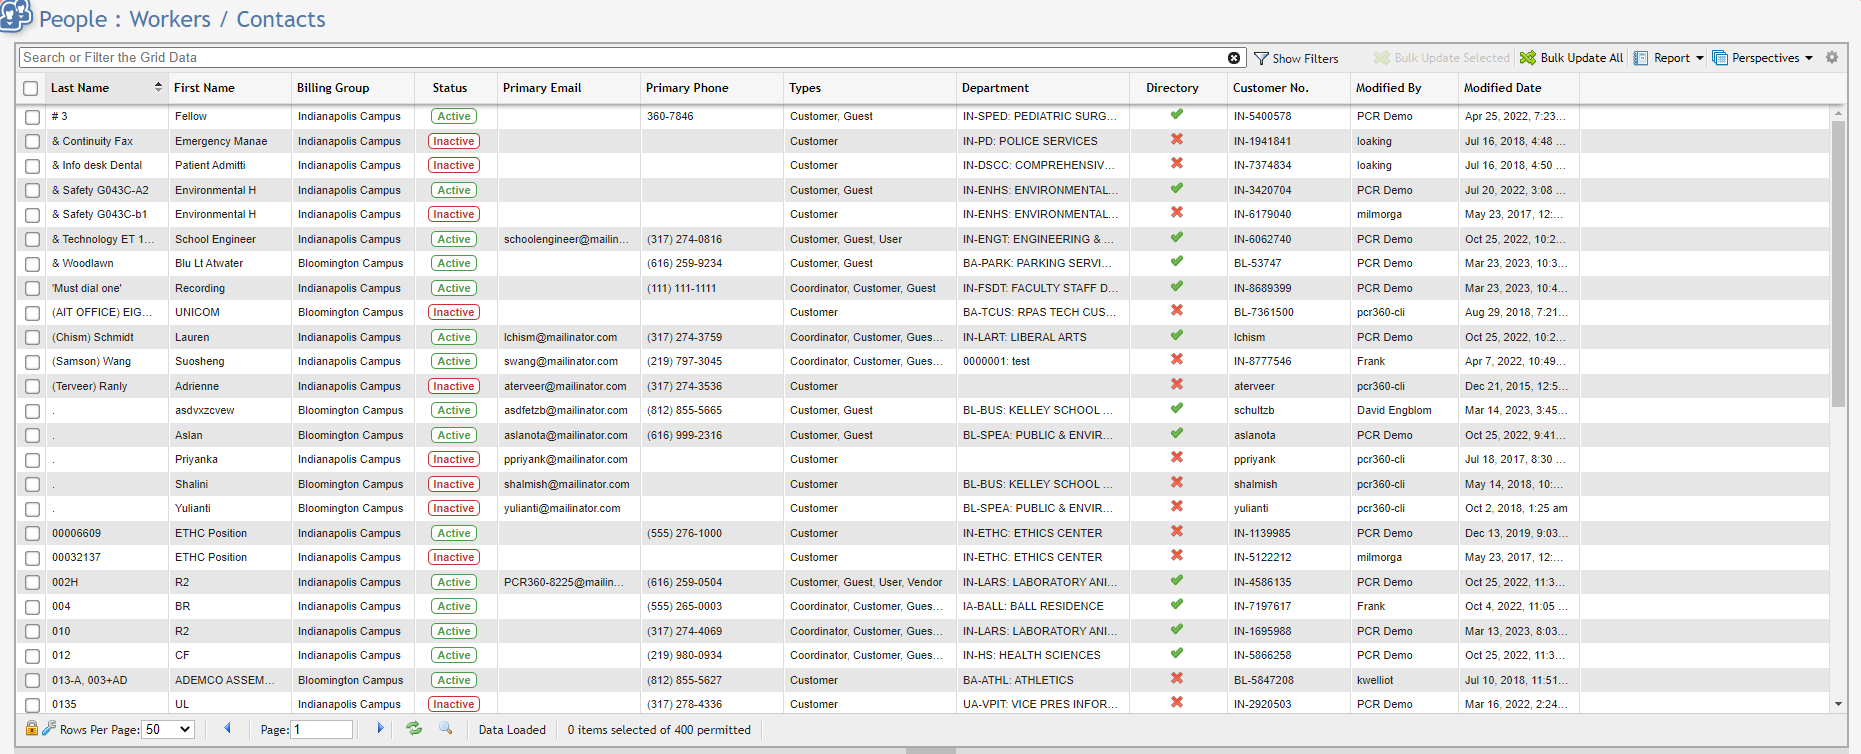
Bulk Updates
Workers/Contacts Bulk Update Grid example
Making a Bulk Update
Users can perform a Bulk Update by either clicking on the
button or select the desired records and click on the button. This will open the Bulk Update form and allow the User to make the desired change to all of the desired records. Bulk Update All is not recommended for general use as it may have unintended consequences that the User did not consider.
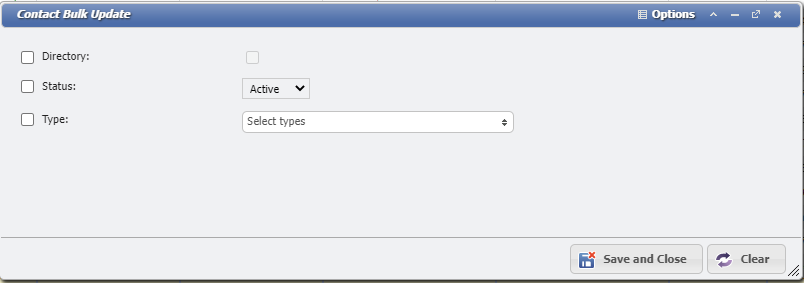
Contact Bulk Update Form example
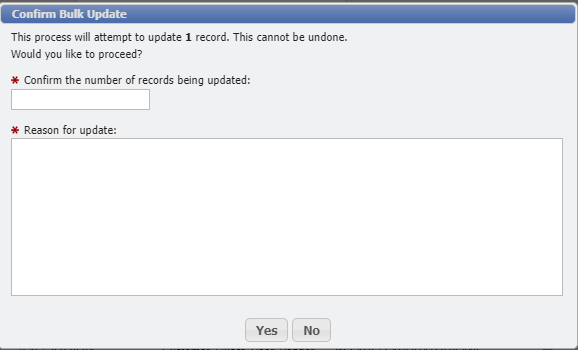
After the User clicks on the UNKNOWN ATTACHMENT button, the User will need to confirm the number of records that will be Updated.
Confirm Bulk Update form example
Replacing a Contact
This button replaces all instances of a Contact with another Contact. To use Replace, select a Contact and click the button. The Contact is replaced by any Service Order/Action, Service, Equipment, Workflow, Vendor, Coordinator, GLA, Location, or Purchase Order where that Contact appears.
To use, select a Contact to replace and click the button. The Select Replacement Contact dialog opens.
Select Replacement Contact Dialogue example
Click on the checkbox in the grid to select the Contact that should replace the old Contact. Click the button on the form. The Event is sent and a Notification alerts the User when all the replacements have been made.
The Contact is replaced on any Service Order, Service, or Equipment where that Contact appears. Because the Replace function can change LARGE volumes of data is highly recommended that this button is permissioned where only authorized Users can access it. For more information on securing the Replace button, see the Permissions and Best Practices sections.
Confirm Bulk Update Dialogue example
The Delete Contact checkbox serves a dual purpose. The default behavior leaves the checkbox unchecked. This makes the Replace function leave the Replaced Contact Active and simply replace it anywhere it has been previously associated if it can. If the User selects the Delete Contact checkbox, the Replace functionality tries to delete the existing Contact. If the Contact cannot be deleted because of any lingering associations, the Replaced Contact record is set to Inactive instead.
The following are special circumstances related to using Replace:
Service Desk and Service Desk Action: We can only update the Owner if the Status of the Order/Action is not Finalized, Void or Billed.
If the Billing Group of the new Contact does not match the billing group of the old Contact, the Contact is NOT replaced.
The Service Rep field is NOT replaced.
The Requestor field is NOT replaced.
Service Desk tabs: Equipment, Contact, Labor, and Workflow: All of these require a Service Desk Order/Action which does NOT have a status of Complete, Finalized, Billed, or Void.
Services: The Billing Group of the new Contact must match the Billing Group of the old Contact.
If the Billing Group of the new Contact does not match the Billing Group of the old Contact, the Billing Group Override is set to the new Billing Group.
If the Contact in the Contacts tab is also the Owner of the Service, the Contact on the Contacts tab is NOT changed otherwise it is changed.
Equipment: If the Billing Group of the new Contact does not match the Billing Group of the old Contact, the Contact is NOT replaced.
Purchase Order: The “Approved By” Contact is only replaced if the Purchase Order has a Pending Status. The "Attn" is always replaced.
Vendor: If the Contact is on the Contact tab, it is always replaced.
Departmental Hierarchy: If the Contact is on the Coordinators tab, it is always replaced.
Workgroup: The Worker on the Workers & Rates tab is replaced. The Manager is NOT replaced.
Contact Type: If the Contact type that is replacing another Contact does not have the Type 'Coordinator' and the one being replaced does, the 'Coordinator' type is added to the replacing Contact.
How do I set up a Coordinator?
Before setting up a Coordinator, we need to define their meaning in PCR-360. In PCR-360, a Coordinator is the person or persons responsible for the Bill for a particular Department. Coordinators see the Services, Equipment and Billing for the whole Department. If Services and Equipment are Owned by individual Contacts, the Coordinator sees all the Services and Equipment owned by the Contacts if the Contacts have a Department set in the Customer tab of the Worker / Contact. The Coordinator sees the Billing for the whole Department.
There are three separate components to properly set up a Coordinator.
Edit Coordinator Permissions for the Contact record as needed.
Set Contact as a Coordinator
Before a User can be a Coordinator, they must have the Coordinator Type added to the Worker / Contact record.
Manage Contact form example
Navigate to Main > People > Worker / Contact.
Locate the record that should be a Coordinator.
Open the record.
Click the Type multi-select and make sure the Coordinator checkbox is selected.
This requires the Customer Type and adds automatically if it is not already set.
Select the Customer tab and make sure the required field Customer Number is filled.
The Department picker sets the Contact as a member of the Department. Any Services and Equipment owned by the Contact is visible to the Coordinator of that Department. This picker does not set the Contact as the Coordinator.
If the Coordinator should receive the Bill email, make sure the Allow Coordinator Bill Email checkbox is selected. If you do not see the Allow Coordinator Bill Email checkbox, please double check to make sure Coordinator is selected in the Type field.
Save the Worker / Contact record.
Add Coordinators to Department Hierarchy
Once the Worker / Contact is set as a Coordinator, it can be selected as a Coordinator in the Department Hierarchy. Multiple Worker / Contacts can be set as Coordinator for a given Department.
Manage Departmental Hierarchy form example
Navigate to Main > People > Department Hierarchy.
Select the Coordinators tab.
Click the button.
The Add New Existing Coordinators form opens a list of all the Worker / Contact records with Coordinator type set.
Find the Contact that needs to be a Coordinator for the Department, select them, and click the button.
Save the Department Hierarchy record.
Repeat this step for every Department Hierarchy that should have a Coordinator.
Setting Coordinator Permissions
The Coordinator is set. When they navigate to the CustomerCenter, they are able to view the Services and Equipment for their Department. This is a multi-step process. There is a default Role called CustomerCenter installed that can either be used as a starting point or as an example of the kinds of Permissions needed for a Coordinator.
Create a Permission for the Coordinators
PCR recommends creating dedicated Permission Sets just for Coordinators.
Navigate to Admin > User Management > Permission Sets.
In the Name field, enter a name for the Role that makes sense for your organization.
Add a Description that makes sense for this Role.
Save the Role by clicking the button.
Select the Permissions Sets tab.
Click the button.
Select the Permission that was previously set up for Coordinators and click the button.
Click the button to save the Role.
Assign Role to User/Contact
Finally, the Role must be assigned to the User. The User record should be associated with the Worker / Contact that was made a Coordinator in the first step of this FAQ. There are two ways to assign Users to Roles.
From the Role
This is the fastest method for assigning multiple Coordinators to a Role.
Select the Users tab from the Role setup in the last step.
Click the button.
Select all the Users that should have the Coordinator Role assigned to them.
The grid can be searched and filtered to quickly find additional Users to select.
Make sure to click the checkbox in the grid to select multiple Users at a time.
Once all the Users desired are selected, click the button.
The User has the Coordinator Role assigned to them.
From the User
Navigate to Admin > User Management > Users.
Search or filter the grid for the User record that is the Coordinator.
Open the User record.
Add the Coordinator Role in the Roles select list.
Save the User record by clicking the button.
The User has the Coordinator Role assigned to them, and this method has to be repeated for every Coordinator.
 button to open the 'Add New Contact' form.
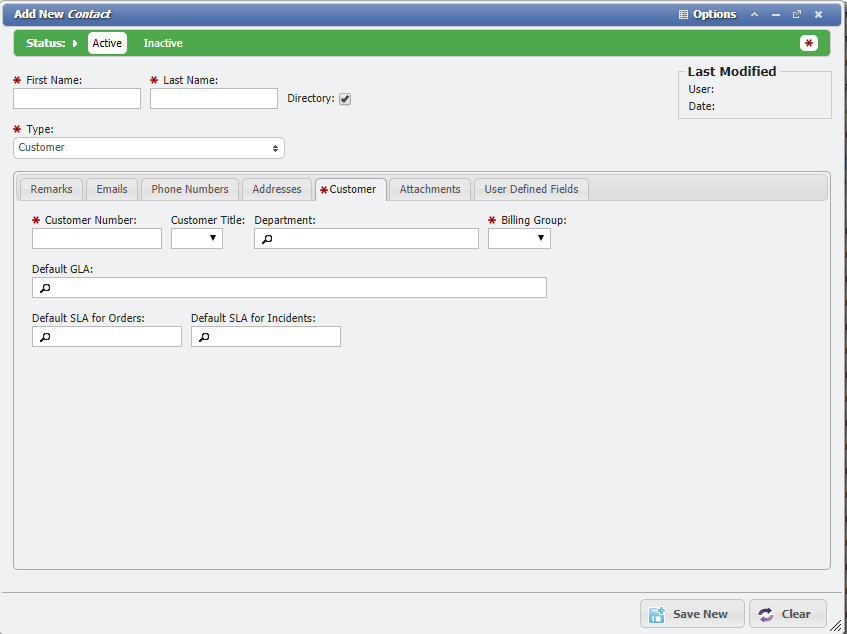

 tab.
tab.
button.
button.


 button.
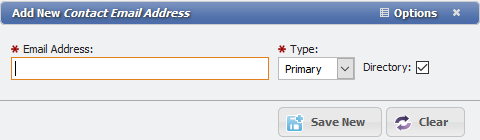
button.


 button.
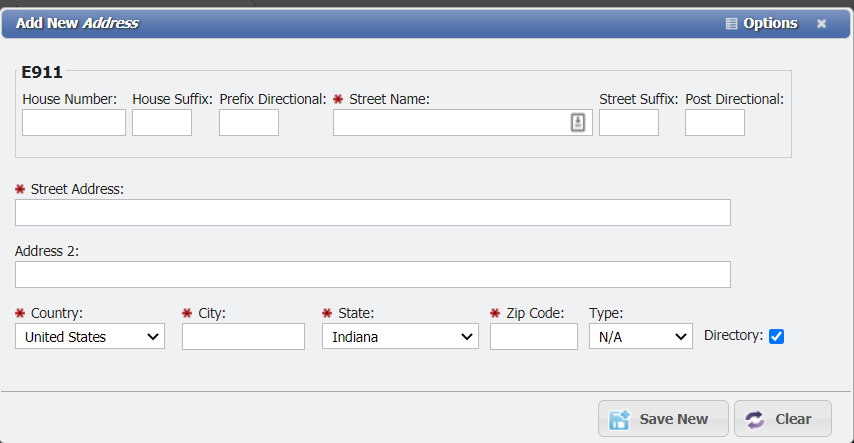
button.
 button.
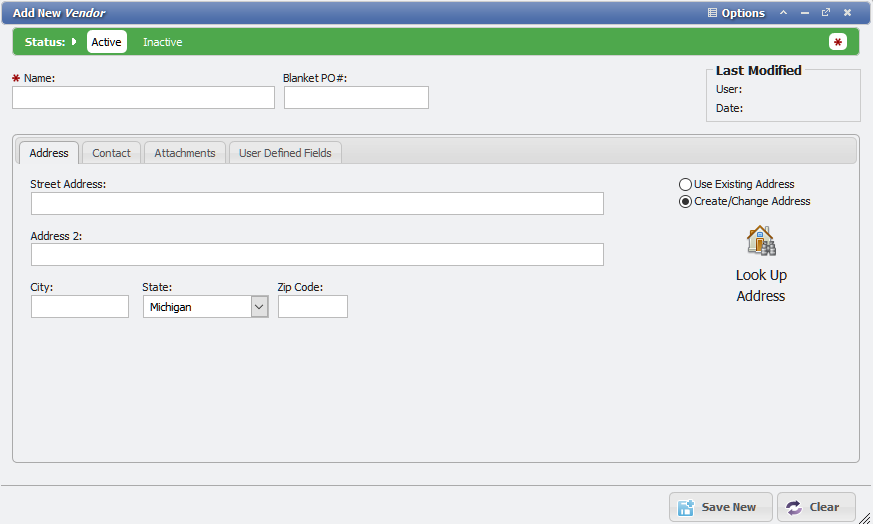
button.
 button.
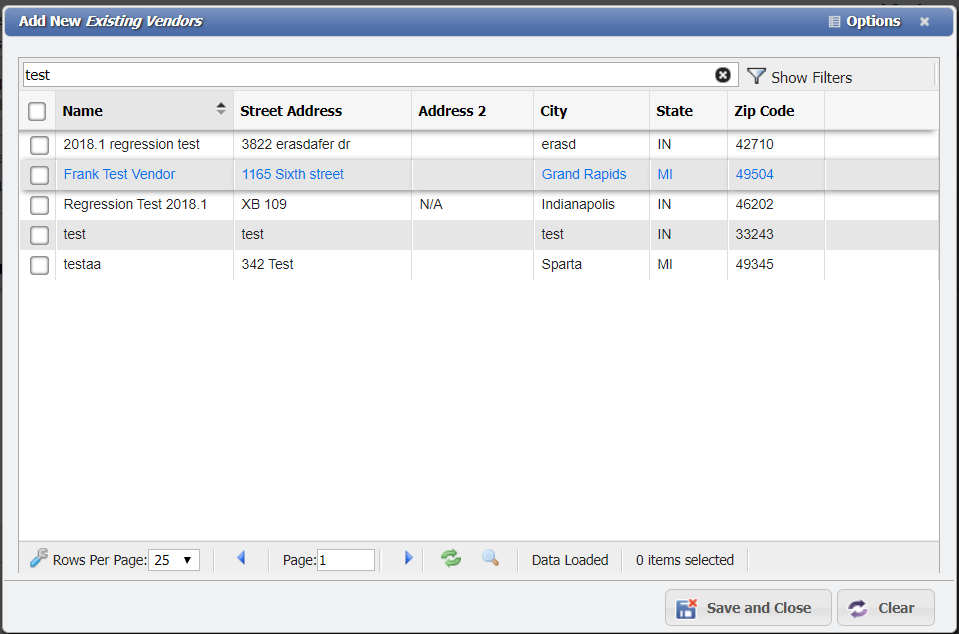


 button.
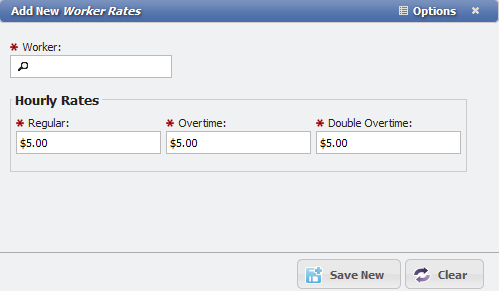
button.
 button.
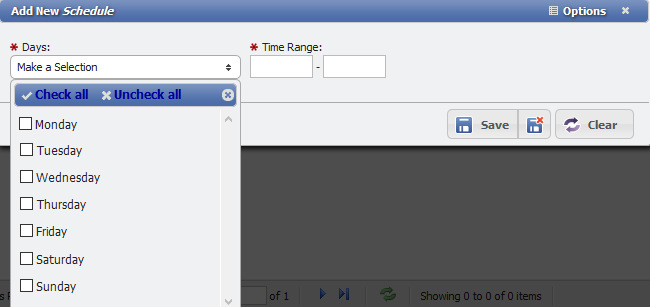

 button.
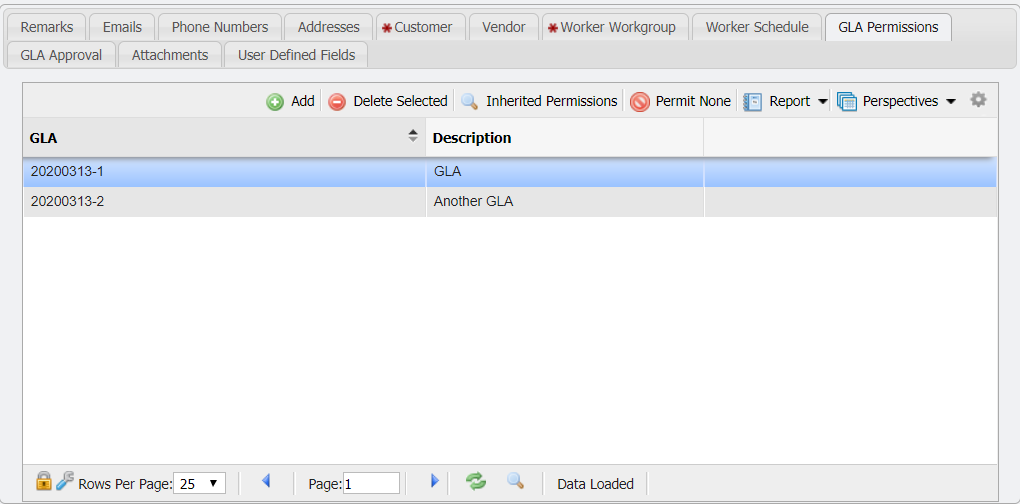
 button.
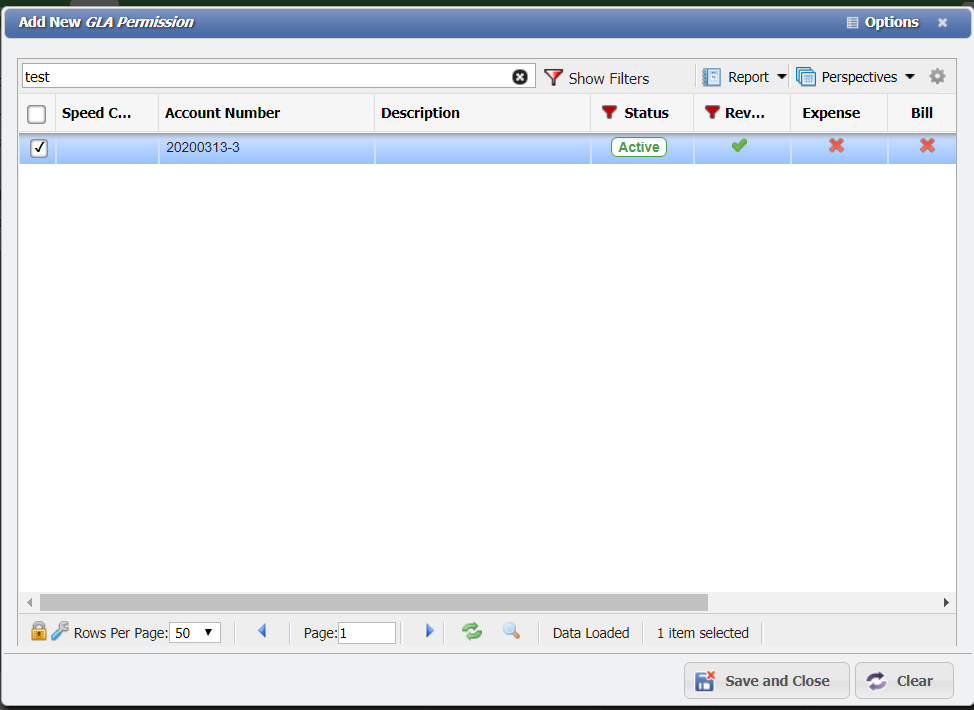
 button.


 button.