Warehouse
The Inventory Warehouse serves as a one-stop shop for managing all of the Equipment in your organization in a precisely controlled manner. With the Warehouse feature, you can set up multiple Warehouses, see the Location of the Warehouse, what Equipment it houses, and even access a list of all the contacts associated with the facility or its Equipment. A Warehouse must be a physical Location but can be associated with a mobile unit, like a technical repair truck. This provides enormous flexibility for tracking of Equipment when storing or moving it between Locations.
Any Warehouse can have a number of actions associated with the inventory in the Warehouse. An easy way to manage these is through the Warehouse Actions .
Basic Warehouse video
Adding a Warehouse
This functionality is completed through the Locations section. This can be accessed by navigating to Main > Catalog > Locations.
Menu Location for Locations
Click the
 button.
 This opens the 'Add New Location' form.
Add New Location Form
Enter the 'Name' and 'Type' of the new Warehouse as well as any other information required by the User's organization.
Click the 'Warehouse' checkbox.
Click the
button and close the form.
Note: Users must click the 'Warehouse' check box to flag the new Location as a Warehouse. Once flagged as a Warehouse, the new location appears on the Warehouse Grid. See Inventory > Warehouses. Existing Locations can also be made into a Warehouse in this manner.
Accessing a Warehouse
First, we need to navigate to the Warehouses grid.
Go to Main > Inventory > Warehouses. This will bring up the Warehouse grid. From here, a User can manage their Warehouses.
Menu Location for Warehouses
Double-click any Warehouse, and see its exact Location and type. This will bring up the Manage Warehouse form.
Manage Warehouse Example
Here, Users find each piece of Equipment in Inventory that a Warehouse has associated with it
Managing Warehouses
Far more than a simple monitoring tool, the Inventory function also encourages users to interact with their Equipment. Users can order new Equipment to a Warehouse, initiate Bulk Transfers of Equipment between storage facilities, create and manage returns or Purchase Orders, select the Service Desk to handle those tasks, and even set default Reorder Points to ensure a fully-stocked Inventory across a large network of Locations. The following sections will assist in those tasks.
Set Threshold
This will set a reorder threshold for Equipment in the Warehouse. Dropping below the limit can trigger Escalations and Notifications . This number should be the minimum number of Inventory items on hand desired before ordering more is necessary.
Click the
button. This will open the 'Set Inventory Specification' form.
Set Inventory Specification form
Enter the 'Warehouse' from the picker that the Threshold should be set for.
Enter the 'Reorder Threshold'.
Create New Equipment to a Warehouse
This functionality assigns received equipment to a Warehouse.
Click the
button to add to the currently selected warehouse. This opens the "Warehouse Equipment Bulk Add" dialog.
The first option is to select the UNKNOWN_ATTACHMENT. A new dialog opens with a list of all the records in the equipment catalog. Adding additional equipment should be handled through Catalog:Equipment .
Double click the Equipment to be added to the Warehouse. This will load the number, description, and unit amount into the catalog part number field.
Example
Enter how many units the part comes in.
Note: that this is separate from the quantity that can be ordered. Example: If a single roll of phone cable is 500 feet, you should enter 500 in the units field.For now, leave the status unassigned and the condition new.
Select the quantity of the parts you are selecting. If you need 10 rolls of phone cable, that is the number you enter here.
Select the price per quantity of the part. If a single roll is $95.00, enter that here.
If the Equipment being added has User-Defined Fields, the User can add those values on the User Defined Fields Tab.
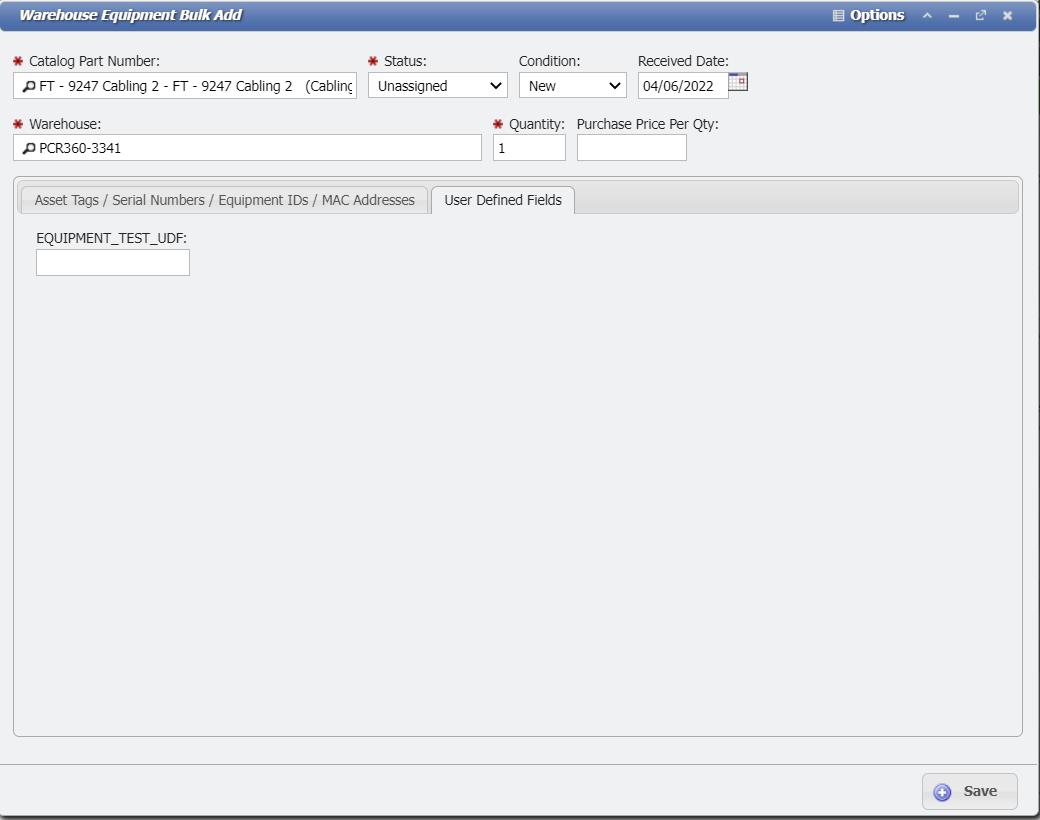
UDF Tab example
Click
The dialog will load, and a tool tip saying "Data Saved Successfully" should appear. Close the dialog and view the part in the inventory of the warehouse.
To Bulk Add Equipment, please see Inventory:Managing Equipment in a Warehouse > Inventory Overview:Bulk Add
Initiate a Bulk Transfer between Warehouses
Double click the Warehouse from which you are moving the parts.
Example
Single click the part that is to be moved in order to select it.
Example
Click the
 button. A "Bulk Transfer" dialog will open.
Enter the quantity of items to be transferred.
This is the number of individual units of the item. If we are looking to transfer 1000 feet of phone cable, this number should be 1000.
Click the Picker in the "Transfer To Location" field to select from a list of all Warehouses.
Single click to select a Warehouse
Click
The dialog will load, and a tool tip saying, "Data Saved Successfully" should appear. Close the dialog and note that the "On Hand" column will have updated by the amount of the transferred quantity.
Set default re-order point
With the Warehouse function, a User can set an automatic reorder threshold to notify the User when a part is in need of reordering.
Double click on a part listed in the inventory tab.
Example
Enter an amount in the reorder threshold. This is the amount below which a reorder alert will trigger.
Click Save
Create Purchase Order (PO)
Select the Warehouse for which you need inventory ordered.
Click the
 button.
 Select the Vendor from the Vendor drop-down.
If there is an invoice or order number, enter into the Vendor order field.
Enter the units that are to be ordered. This is the smallest number of units a User can order. Example: If a roll of phone cable comes in 500ft increments, the units would be 500.
Select the price per unit of the part.
Note: The price per quantity field will autocomplete based on the unit price.Enter the ordered date. For this, you can type in the date or use the calendar selector.
Enter the quantity of items ordered. If you need 10 rolls of phone cable, that is the number you enter here.
Manage Purchase Order (PO) and Vendors
Once a Purchase Order has been created, there are several options to view or edit it. An Order is automatically assigned a "Pending" status when it is created. This allows for a verification process allowing for authorization of the PO, reporting by a vendor, and reporting by Purchase Order.
Editing a Purchase Order
Sometimes it is necessary to modify a PO after it has been created. This is handled in the Purchase Order - Editing section.
Authorization
All Authorizations for Purchase Orders are handled through the Purchase Order screen. Navigate to Main > Inventory > Purchase Orders
Purchase Order Menu Location
Reporting by Vendor
First, click the
 button.
This brings up the Purchase history unique to this Warehouse.
In the By Vendor tab, select the Vendor you need a report on.
Example
Click the
 Button. This brings up the Generate Report dialog.
Enter a
 for the report.
 Select the output

File Type
you desire.
From the
 drop-down, select the information you want in the report.
 In the
 drop-down, choose how you want items grouped on the report.
 Click
Note that a CSV report will generate a file you can save.
Reporting by Purchase Order
First, click the
button. This brings up the Purchase history unique this Warehouse.
In the By Purchase Order tab, select the Purchase Order you need a report on.
Example
Click the
button. This brings up the Generate Report dialog.Enter a
 for the report.
 Select the output file type you desire.

Example
From the
drop-down, select the information you want in the report. In the
 drop-down, choose how you want items grouped on the report.
 Click
 , and your report will generate into a new tab in the desired format.
Note that a CSV report will generate a file you can save.
Create return order from a vendor
Sometimes it is necessary to return a piece of equipment to a vendor. This is handled in the Return Order screen. This can be found be navigating to Main > Inventory > Return Order
Return Order Menu Location
Warehouse Status
A User is able to set a Warehouse status between either an "Active" or an "Inactive" state. This allows shutting off a Warehouse without having to get rid of the data associated with it. This is provided as a simple alternative to deletion.
Select the Warehouse to be toggled from one status to another.
Click the
The status should now be updated.
Deleting a Warehouse
This will permanently remove a Warehouse from the database and is only recommended if you are positive that changing the "Warehouse Status" is not a viable option. You cannot delete a Warehouse if there is any Equipment still associated with the Warehouse. This prevents the deletion of any Equipment still associated with the Warehouse.
Move all Equipment out of the Warehouse.
Navigate to the Locations grid since Locations can only be deleted there.
Locate and single click to select the Warehouse.
Example
Click the
 button.
 A "Confirm Delete Selected" dialog will open. Click on the Delete Selected option to confirm the Delete.
The Warehouse should now be removed from the database.
Point In Time
The 'Point In Time' creates a "snap-shot" of all the Equipment in a given Warehouse for a particular instance in time. This functionality can be useful for tracking consumption over time and for getting an instant readout of all the Equipment in a given Warehouse at that moment in time. The information can be seen by navigating to Main > Inventory > View / Report > Warehouse Point In Time
Select the Warehouse to get information for.
Click the 'Point In Time' button.
The 'Point in Time' dialog should appear.
The 'Warehouse Point In Time' Grid will be updated with all the current inventory in that Warehouse.
The information will be available on the Grid now.