The Return Order screen allows the User to create and manage Inventory Return Orders. Return Orders require a Vendor and a Warehouse, Equipment from the Warehouse can then be added to the Return Order. A Return authorization number for the Order may be specified.
The Basics
Required Fields:
Status - The status of the Return Order will allow Inventory Managers to sort Return Orders more easily.
Pending - The Pending status is meant to be used when building a Return Order, but before it is has been sent to the Vendor. This Status allows for internal processes like Approvals from internal organizational business practices to go through. If the Return Order or Equipment on it is declined at any point before the Return Order is sent to the Vendor, they can be edited by the Inventory Manager.
Open - The Open Status is meant to be used to Process Inventory on the Return Order and assign an action to the Equipment depending on how the User wants the Equipment to be returned. When clicking the button, Users can choose to Edit, Repair, Replace, or process One Way the selected line of Equipment.
Closed - The Closed status can only be set once all the Inventory is processed. This status lets Users know that the Return Order has been addressed and no longer requires work to be done.
Created Date - The Created Date field will let Users know when the Return Order is created.
Warehouse - The Warehouse on the Return Order Form Header is only a placeholder, a default value. It is used for the Warehouse Picker on the Return Order Process form. Users can change that Warehouse selection to an alternate and the Repair/Replace Equipment will be stored to that Warehouse. There is no additional logic behind this field.
Vendor - The Vendor selection filters which Equipment Catalogs can be added to the Return Order. It is not possible to return something to a Vendor that can't be ordered from that Vendor.
Return Order basics video
Adding a new Return Order
To create a new Return Order click the button on the grid.
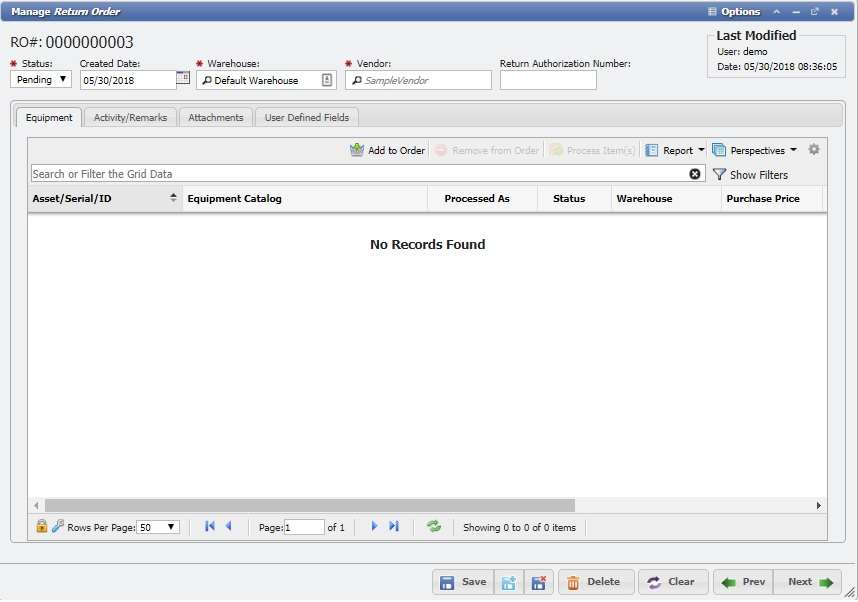
The Add New Return Order form
When the Return Order form opens, add the Warehouse the Equipment will be returned to and the Vendor as well. If there is a Master Default Return Warehouse set, the Warehouse field will automatically populate with that value. Users may also specify a 'Return Authorization Number' if applicable.
Closing The Order
The User can close the Return Order at any point after it is Open. Once all anticipated items on the Return Order are processed, closing finalizes the Order, and it cannot be reopened. Sometimes Users may be returning items with no expectation of repair or replacement. The Return Order keeps track of when and where "Returned" Equipment was sent back. The last visible record would be left out of Inventory because it was Returned with no further action taken. This is made explicit with the requirement to click the One Way button.
button the Return Order must be at a 'Pending' Status.
Click the button.
This will open the 'Add New Existing Equipment' form.
Add New Existing Equipment Form example
Select the Equipment from the grid to be Returned.
Click the button.
The Equipment will now be added to the grid on the Equipment tab. The Return Order can be advanced when all Equipment has been added.
Remove from Order
To use the
button the Return Order must be at a 'Pending' Status and there must already be some Equipment in the grid.
Select the Equipment from the grid to remove from the order.
Click the button. Note:This will only remove the association of the Equipment from the Return Order and will not delete the Equipment or the Return Order.
Process Items(s)
To use the
button the Return Order must be at an 'Open' Status.
Select the Equipment to be processed.
Click the button.
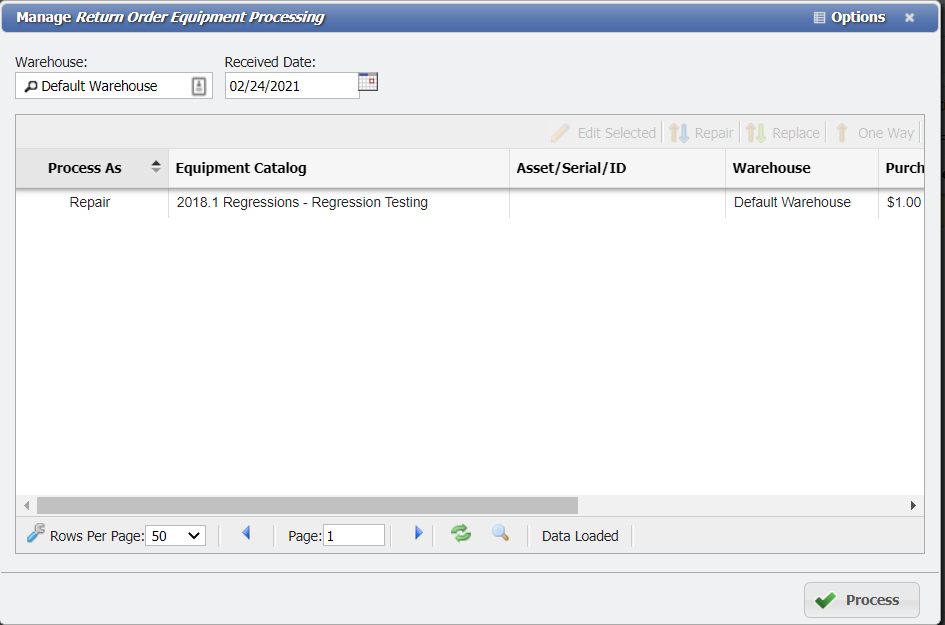
This will open the 'Manage Return Order Equipment Processing' form.
Manage Return Order Equipment Processing form example
From this form, the User can adjust some key options before receiving an item for tracking reasons. The User can assign incoming repaired/replaced Equipment to any Warehouse. If an item was received on a different date then the current date, the User can edit the 'Received Date' here as well. Selected items from the Order cannot be processed here with individual Warehouse and Date assignment. All items selected for this form will be processed with the set values. To set different Warehouses or Dates, select appropriate items separately.
Edit Selected
The User can modify the 'Action', 'Asset Tag', 'Serial Number', 'Equipment ID', and 'Condition' by following these steps:
Click the button.
This will open the 'Manage Return Order Equipment Received' sub-form.
Select the Action using the drop-down, either Repair or Replace. The difference is explained on the Return Order wiki.
If desired change the Asset Tag, Serial Number, and Equipment ID.
Select the 'Condition' with the drop-down, either 'New', 'Used', or 'Refurbished'.
Click the button.
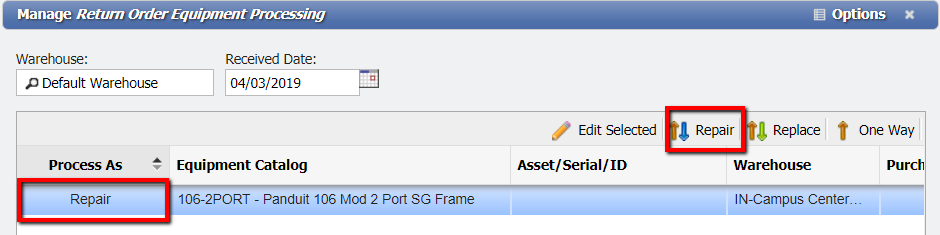
Repair
When the User clicks the
button, it processes the Equipment as the same physical inventory, updating the record to reflect that the Inventory was edited.
The User can add the 'Repair' option to the 'Process As' Field by following these steps:
Click the button.
This will insert 'Repair' into the 'Processed As' Column.
3. When the
button is selected this states that the same Equipment must come back after the Equipment it has been returned.
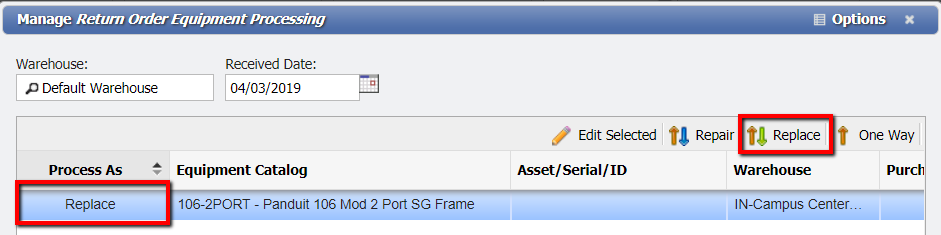
Replace
When the User clicks the
button, PCR-360 generates a NEW Equipment record whereas Repair updates the original Equipment record.
The User can add the 'Replace' option to the 'Process As" Field by following these steps:
Click the button.
This will insert 'Replace' into the 'Processed As' Column.
When the button is selected this states that different Equipment is expected back after the original Equipment has been returned.
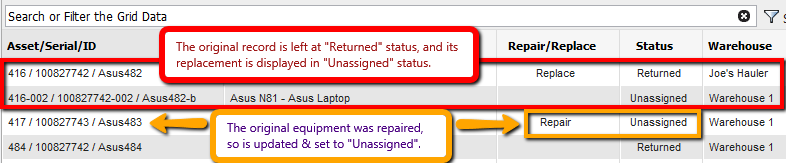
In the data sample below, one item was Replaced while the other Repaired. The Return Order keeps track of all outgoing and incoming Equipment records related to that particular Order, so replacements are also listed on the Order.
Return Order Equipment Grid
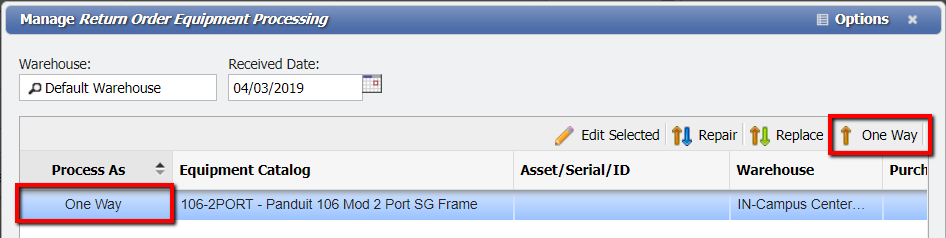
One Way
The
button appears on the Return Order form. Processing a Return Order item as One Way tells PCR-360 that an item is being returned completely and there is no expectation of that item being placed back into Inventory. This sets the Equipment record to Returned.
The User can add the 'One Way' option to the 'Process As" Field by following these steps:
Click the button.
This will insert 'One Way' into the 'Processed As' Column.
When the button is selected this states that no Equipment is expected back after the Equipment has been returned.
When finished click the
button. Confirm this is the action desired at the prompt. Once the Equipment is 'Processed' the status will be set to 'Unassigned'. When all the Equipment has been Processed, the Status of the Return Order
can be set to 'Closed'.
Remarks
JavaScript errors detected
Please note, these errors can depend on your browser setup.
If this problem persists, please contact our support.
_Button.png?inst-v=2f167854-1570-467e-89db-79ab3da936fb)


 button.
 button.
 button.
_Button.png?inst-v=2f167854-1570-467e-89db-79ab3da936fb)
 button.
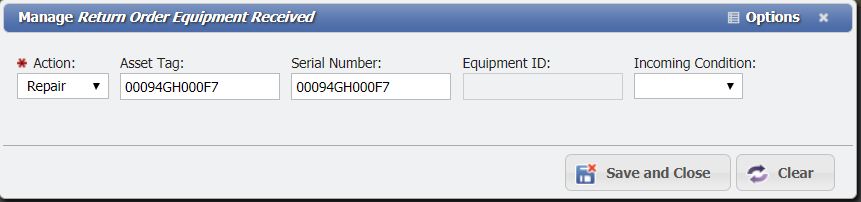


button is selected this states that different Equipment is expected back after the original Equipment has been returned.