The Purchase Order screen allows the user to create and manage Inventory. Purchase Orders require a Vendor and a Warehouse, Equipment from the Warehouse can then be added to the Purchase Order. The Purchase Order number can be configured with the ALLOW_CUSTOM_PO_NUMBER.
The Basics
Required Fields:
Status - The status of the Purchase Order will allow Inventory Managers to sort Purchase Orders more easily. The Workflow Rules will give the User some more insight into how the Statuses control the Purchase Order process.
Pending - The Pending status is meant to be used when a Purchase Order is being built, but before it sent to the Vendor. This status allows for internal processes like approvals from internal organizational business practices to go through. If the Purchase Order or Equipment on it is declined at any point before the Purchase Order is sent to the Vendor, they can be edited by the Inventory Manager.
Open - The Open status is meant to be used once the Purchase Order has been sent to a Vendor and the User is waiting on the Equipment to be shipped. Once the Equipment is received it can be brought into Inventory from the Purchase Order.
Closed - The Closed status can only be set once all the Inventory is received on the Purchase Order. This status lets Users know that the Purchase Order has been addressed and all the Inventory is received.
Created Date - The Created Date field will let Users know when the Purchase Order is created.
Warehouse - The Warehouse field will auto-populate with the Master Default Warehouse. Once the Purchase Order is created this field becomes read-only.
Vendor - The Vendor is required because the Purchase Order will be limited to only valid Equipment Catalogs associated with the Vendor.
Other Fields:
Vendor Order Number- This field can be used to match up an Order Number from the Vendor onto the Purchase Order so the Order Number can be quickly found. If a Vendor uses a Blanket Order Number, then a User can click the icon below to apply the order number defined by the Vendor.
Apply Blanket Purchase Order Number example
Atten(Attention)- This field allows the User to select a Contact associated with the Vendor.
Approved By - This field allows for the current User to mark that they have approved the Purchase Order. Your Organization can incorporate this into its individualized Workflow if desired and impose Custom Logic to ensure that Workflow is followed.
Purchase Order video
Introduction to the basics of Purchase Orders.
Adding a new Purchase Order
To create a new Purchase Order click the on the grid. When the Purchase Order form opens, select the Warehouse where the ordered Equipment will be located and select the Vendor. Before more Equipment can be added, the new Purchase Order must be saved to allow the Equipment grid to know which Vendor has been chosen and can show the correct list of Equipment for that Vendor.
New Purchase Order Form
Editing
A Purchase Order (PO) can only be edited while it is in a 'Pending' status. Once the status has been set to 'Open' and approved, the Purchase Order is locked, and an additional PO will have to be submitted instead of modifying the current one. The steps to edit a PO are as follows:
Locate a PO in the grid with a 'Pending' status to modify.
Single click to select the PO, and click the . Alternatively, double-click the PO. This will bring up the Manage Purchase Order Dialog. From here the User can select the Equipment to edit, add to the current order, or delete items that were ordered in excess.
Workflow Rules
A brand new Purchase (PO) has a status of "Pending", which means the PO is still under construction, not finalized or ready to send to the Vendor. At this point, Equipment can be added, edited, and removed from the PO. However, Users cannot yet Receive or Cancel lines because the Vendor hasn't seen the Purchase Order yet.
A "Pending" PO can only be changed to "Open" status. However, the PO can be deleted from the system if a User needs to kill the order completely, even if it's been Approved.
A "Pending" PO can be Approved, at which point the ability to add/edit/delete Equipment is locked. However, since the order is not yet "Open" (the Vendor hasn't received it yet), the User can't Receive or Cancel lines, either.
There are a couple of optional settings for "Open" POs that affect how it can be edited. Typically, once a PO is "Open", the ability to Add/Edit/Delete Equipment is locked, and the PO is switched to the Receiving phase where Users either Receive the Equipment or Cancel it. Once "Open", the Equipment can be processed through Receive/Cancel actions.
An "Open" PO can only be changed to "Closed". It can no longer be deleted from the system. However, once Users begin Receiving/Canceling line items, then they must finish before closing the order. If no such activity has occurred yet, then Users can close the untouched Purchase Order. If a User needs to close a partially-complete PO because it receives any further Equipment on it, Cancel the remainder of each line before closing the Purchase Order.
Once a PO is "Closed", no further action can be taken on it. It can only open to review the information on it.
Purchase Order Form Buttons
Add to Order
To use the
Purchase Order must be at a 'Pending' Status.
Click the
.
This will open the 'Add New Purchase Order Equipment' form.
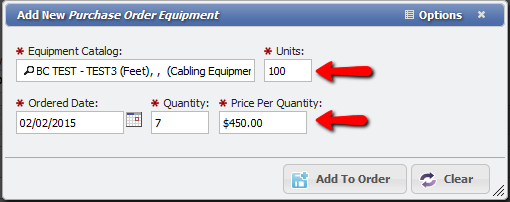
Add New Purchase Order Equipment form
3. Select the 'Equipment Catalog' to be purchased, the 'Ordered Date', input the 'Quantity' of the Equipment and 'Price Per Quantity.'
Note: In the figure above, note the Units and Price Per Quantity fields (indicated with arrows). The Equipment grid will group similar selections together as much as possible. If the Equipment is a "Has Units" item, the Units field will show and that field can be used to set the Unit count. The Quantity is how many each of that Unit count that is being ordered. For example, the User can order 10 boxes of pencils, but how many are in each box: 25, 50, 100? Quantity is the 10, Units is the 25/50/100. When a Units value on a Purchase Order that is different from another record of the same Equipment is set, this tells the system the User wants some boxes of 25 pencils and some other boxes of 50 pencils. This generates separate line items for "boxes of pencils".
As with Units, Price Per Quantity acts the same way. Maybe the Vendor only has 15 boxes of pencils in stock at their normal price, but can special order the additional 30 that is needed, at a different price. The User can enter the 15 at one price, and create another line item for the other 30 at the other price, which results in separate line items. PCR-360 can be configured to use the last received cost for Equipment by setting the PO_EQP_USE_LAST_COST configuration to TRUE.
4. Click the
.
The Equipment will now be added to the grid on the Equipment tab. The Purchase Order can be advanced when all Equipment has been added.
Note: Once a User begins receiving Equipment from a Purchase Order, Equipment may still be added to accommodate any changes to the Purchase Order while it is being fulfilled.
Edit Line
To use the
Purchase Order must be at a 'Pending' or 'Open' Status and there must already be some Equipment in the grid.
Single-click to select the Equipment to edit, and click the
or double click the Equipment to edit.
This will open the 'Manage Purchase Order Equipment' form.
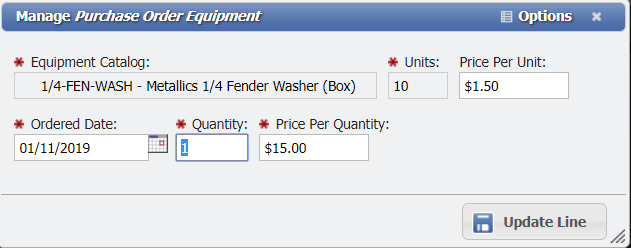
Manage Purchase Order Equipment form
3. The Manage Purchase Order Equipment dialog will open and the User can edit three fields.
, , and .
Note: The 'Equipment Catalog' field will be greyed out.
4. Make the necessary modifications in the appropriate fields. Please note that following changes to the line item management form, the form will add additional quantity to all matching lines, it does not adjust the quantity.
5. Click on the
.
The Equipment Catalog will now be updated with the information that was selected.
Delete
To use the
Purchase order must be at a 'Pending' Status and there must already be some Equipment in the grid.
Select the Equipment from the grid to remove from the order.
Click the
.
This will open the 'Confirm Delete' dialog.
Delete Equipment Catalog on PO
4. Click the
to confirm.
5. The 'Equipment Catalog' item is deleted from the order.
Receive Item(s)
To use the
the Purchase Order must be at an 'Open' Status and there must already be some Equipment in the grid in the 'Pending' Column.
Select the Equipment from the grid to receive on the Purchase Order.
Click the
.
This will open the 'Receive Purchase Order Equipment' form.
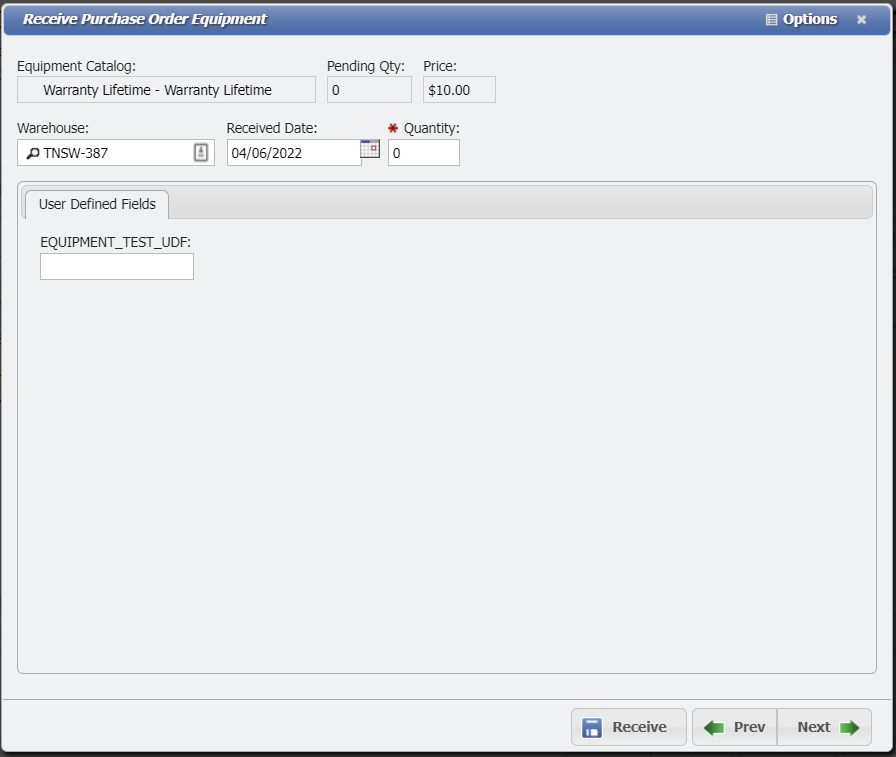
Receive Purchase Order Equipment form
4. Select the 'Warehouse' to receive the Equipment to, the 'Received Date' to receive the Equipment and the 'Quantity' of the Equipment that is to be received.
Note: If the amount in the Quantity field is greater than the amount in the Pending Quantity field, when the User clicks the
the User will get an error window stating: "The received quantity X is more than x still Pending for this item." If your organization desires to be able to receive surplus Equipment, then the PO_RECEIVE_ALLOW_SURPLUS configuration must be set to TRUE.
5. Click the
.
The Equipment will now be added to the Warehouse the User selected at the Date and at the Quantity the User selected.
If a User accidentally received more Equipment within PCR-360 than actually received (for example, receiving 5 of 10, instead of 3 of 10), a User can "receive" a negative value of that Equipment to correct the error (in the example's case, 'receiving -2).
Once a User begins receiving Equipment on a Purchase Order, new Items can still be added to that Purchase Order. This enables Organizations the ability to receive an item mistakenly sent by a Vendor, decide to keep it, and add it to the current Purchase Order.
When Cabling Equipment or Assets are received on a Purchase Order, the User can specify their Equipment ID/Asset Tag value but is not required to at that time.
User-Defined Fields on Receiving Equipment
If there are User-Defined Fields setup for the Equipment being Received, a User is able to define those values on the UDF Tab.
UDF Tab example
Cancel Items(s)
To use the
the Purchase Order but be at an 'Open' Status and there must already be some Equipment in the grid in the 'Pending'Column
Select the Equipment from the grid to cancel on the Purchase Order.
Click the
.
This will open the 'Cancel Purchase Order Equipment' form.
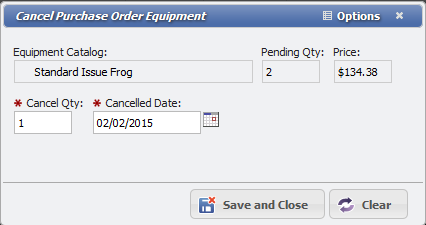
Cancel Purchase Order Equipment form
4. Fill in the 'Cancel Qty' for the number of items to canceled and select the 'Cancelled Date' for the date be used to cancel the items.
5. Click the
.
The Equipment will be removed from the Purchase Order based on the number of items that were selected. The number of items in the Pending Column will be reduced by the number of items that were selected and the Canceled Column will be increased by the number of items that were selected.
Remarks
JavaScript errors detected
Please note, these errors can depend on your browser setup.
If this problem persists, please contact our support.
. Alternatively, double-click the PO. This will bring up the Manage Purchase Order Dialog. From here the User can select the Equipment to edit, add to the current order, or delete items that were ordered in excess.