360 View
360 View Overview
The application's namesake tool allows Users to locate an item (be it a Contact, Location, piece of Equipment, Service, etc.) and view a comprehensive representation of how the item relates to the other items in the system. 360 View is much more than a typical search engine. It's a powerful tool that helps Users understand precisely how their data and resources interact within their organization.
For example, Users can search for a person and see their Contact information and status as well as any Services with which they are associated, any Equipment they own or are responsible for, a summary of their Billing information, their Service Desk history, and more. Search for a piece of Equipment and see a detailed description of the physical unit, associated charges, associated Contacts, associated Services, a relevant Service Desk history, and more.
The ![]() button is available at the top of the page no matter where the User is in the application. After searching for a value Users can access 360 View by clicking on the
button is available at the top of the page no matter where the User is in the application. After searching for a value Users can access 360 View by clicking on the ![]() button at the top of the grid of search results.
button at the top of the grid of search results.
360 Search
The 360 View search brings up all related records in the tab appropriate to the data type. Valid data types are 'Contacts', 'Dept. Hierarchy', 'Equipment', 'Locations', 'Cables', 'Phone Services', 'Data Services', 'Backbone Services', 'Auth Code Services', 'Trunk Services', and 'Other Services' and looks like the following image:
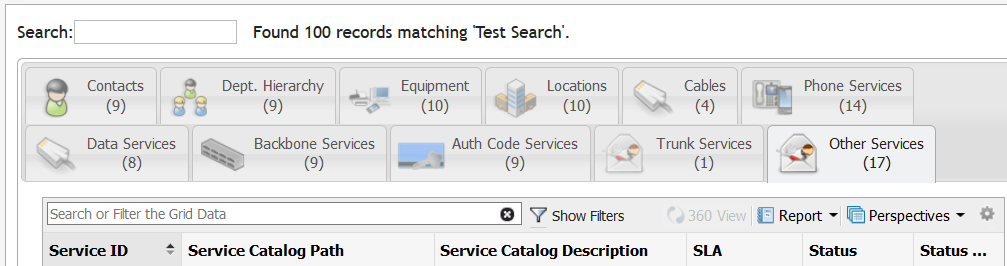
360 Search results
If a search matches, a tab appears with a label to indicate how many records of a given data type matched the search. A User can then click a tab to see a Grid with all matching records. Records that are searched are data type specific. The following is a list of what records match by data type:
Data Type | Columns Searched |
|---|---|
Contacts | Last Name, First Name, Primary Phone, Primary Email, and Customer Number |
Dept. Hierarchy | Name, and Code |
Equipment | Asset Tag, Serial Number, Equipment ID, Catalog Part Number, and Catalog Description |
Locations | Location Name, and Location Building ID (not the parent building) |
Cables | Cable Name, From Location Path and Equipment ID, and To Location Path and Equipment ID |
Phone Services | Formatted Service ID, and List of Formatted Soft Numbers, Owner, Reference |
Data Services | Formatted Service ID, Owner, Reference |
Backbone Services | Formatted Service ID, Owner, Reference |
Auth Code Services | Formatted Service ID, Owner, Reference |
Trunk Services | Formatted Service ID, Owner, Reference |
Other Services | Formatted Service ID, Owner, Reference |
Service Desk Quick Search
When the User types in an exact match for any Service Desk item, the 360 Search will automatically open the Service Desk item. For example, if the User were to type in 'SO201812345' then the Service Order form will open. This is true of all Service Desk items including Requests (either IR, IQ, or SR), Incidents, Estimates, Service Orders, Incidents, Projects, Problems, or Quick Ticks.
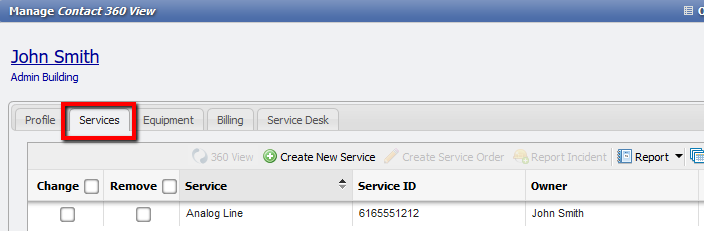
Viewing '360 View' Items
To view a found record in the 360 View, select the tab and double-click the item in the 360 View grid or select it and click the ![]() button immediately above the grid. Each data type opens a '360 View' form with a number of tabs. What is displayed in the tabs is the relationships between various pieces of data in PCR-360. For example, from the 'Contact 360 View' form, a User can see the Profile of a Contact, Services, Equipment, related Billing, and Service Desk items that are associated with the Contact.
button immediately above the grid. Each data type opens a '360 View' form with a number of tabs. What is displayed in the tabs is the relationships between various pieces of data in PCR-360. For example, from the 'Contact 360 View' form, a User can see the Profile of a Contact, Services, Equipment, related Billing, and Service Desk items that are associated with the Contact.
Navigating 360 Views
When a 360 View form is opened a User can move between records by closing the record and opening a new one. However, an easier option might be the ![]() button or the
button or the ![]() button. Clicking either button steps the currently viewed record by one so the User doesn't need to individually close and open every record they wish to view. The following is an example of the 'Service 360 View' form:
button. Clicking either button steps the currently viewed record by one so the User doesn't need to individually close and open every record they wish to view. The following is an example of the 'Service 360 View' form:

Service 360 View
Change Order
If a User is viewing a Service Data type in the 360 View, it can be convenient to modify a Service from the search without having to locate it elsewhere in PCR-360. For this, the ![]() button is provided which opens a 'Add New Service Order' form.
button is provided which opens a 'Add New Service Order' form.
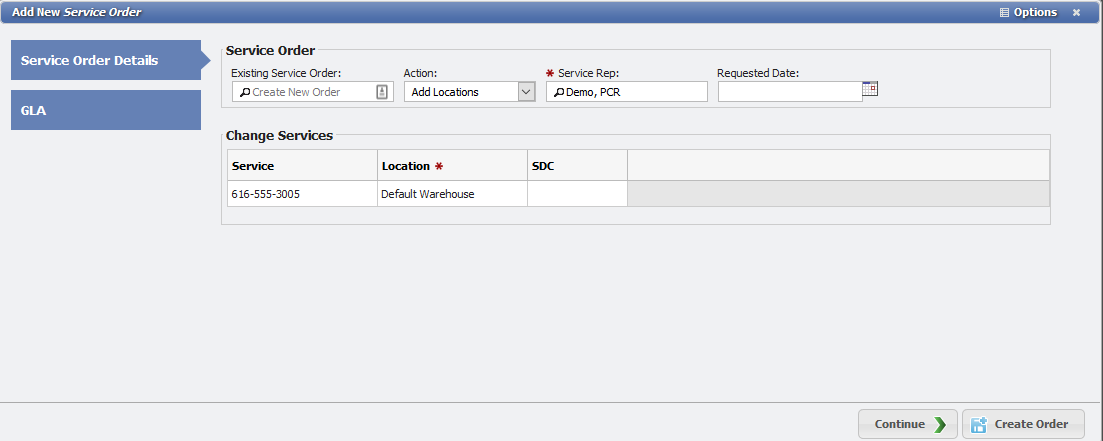
Add New Service Order Form
The 'Change Order' button can be found on 360 Views for the following data types: 'Phone Services', 'Data Services', 'Backbone Services', 'Auth Code Services', 'Trunk Services', and 'Other Services'.
Remove Order
The ![]() button opens an 'Add New Service Order' form. The only Action on this form is the Remove action. The 'Remove Order' button can be found on 360 Views for the following data types: 'Phone Services', 'Data Services', 'Backbone Services', 'Auth Code Services', 'Trunk Services', and 'Other Services'.
button opens an 'Add New Service Order' form. The only Action on this form is the Remove action. The 'Remove Order' button can be found on 360 Views for the following data types: 'Phone Services', 'Data Services', 'Backbone Services', 'Auth Code Services', 'Trunk Services', and 'Other Services'.
Report Incident/Incident
A quick search of an item can sometimes be the quickest way to locate it for Incident reporting to the Service Desk. The ![]() button opens a 'Add New Incident' form. The Incident button can be found on 360 Views for the following data types: 'Phone Services', 'Data Services', 'Backbone Services', 'Auth Code Services', 'Trunk Services', and 'Other Services'.
button opens a 'Add New Incident' form. The Incident button can be found on 360 Views for the following data types: 'Phone Services', 'Data Services', 'Backbone Services', 'Auth Code Services', 'Trunk Services', and 'Other Services'.
The ![]() button is found on the Equipment Data type and has the same functionality as the 'Incident' button.
button is found on the Equipment Data type and has the same functionality as the 'Incident' button.
Add Remark
A User can add a 'Remark' to almost all the individual 360 View items. The only exception to this is the 'Cables' items. To add a Remark first open the 360 View of the item. An ![]() button is available in the lower right corner of the 360 View form. Click the 'Add Remark' button and add the text/remark to the dialog box that opened. Click the
button is available in the lower right corner of the 360 View form. Click the 'Add Remark' button and add the text/remark to the dialog box that opened. Click the ![]() button and the remark is now attached to that record.
button and the remark is now attached to that record.
How to template 360 Wizard Actions like a Package
PCR has received a couple of questions recently about selecting Packages on an Order to quickly add multiple Actions. There is already functionality that does this built into the application and this “How to” explains this process.
To set up Form Perspectives to accomplish similar work to the Packages functionality Users will need to first set up an example 'Add 360 Wizard', then save a Form Perspective, and finally apply the Perspective whenever that set of Actions are desired. The following steps will help to clarify how to accomplish using Form Perspectives on the Add 360 Wizard.
In order for Users to set up Form Perspectives to use as Packages, there first must be SDCs set up for the Services and Actions that are desired. To do this please see the SDC video wiki .
Setup Example Add Wizard
Open 360 Wizard
The first step is to open the Wizard.
First open the 'Add 360 Wizard' form.
Add New Service Order form
To open this form search for a Location or Owner, (Contact or Department Hierarchy ) with the search bar

360 Search field
Select any matched Contact, Department Hierarchy, or Location in the 360 Search results.
360 View form
Click the
 button to open the previously selected record or double-click the record in the grid.
Go to the Services tab on the opened 360 View form.
Manage 360 Contact View form
Click the
 button.
This will open the 360 Wizard for Add Actions . At this time only Add Actions can be templated in this manner. This is because the Change and Remove Wizards must be able to reference a specific Service ID and cannot be added in bulk in this manner. With the form now open the next step is to create the template desired.
Create a Template
With the 360 Wizard already open a User can begin to create a template for the Form Perspective.
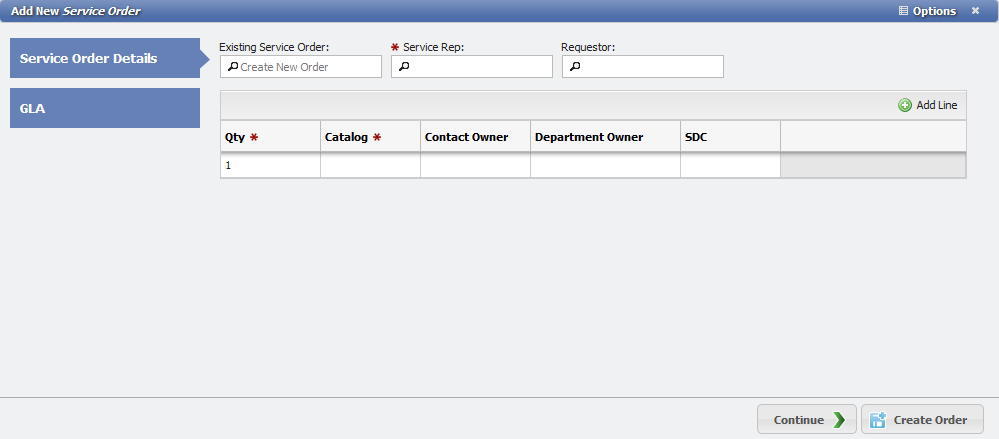
Since this is intended to be used for templating groups of Actions leave the Existing Service Order picker blank. It can be filled in later in the process if desired.
2. Click the picker to add a Service Rep for the Order.
3. If a Requestor is desired, add them with the picker.
4. Users can add multiple lines to the 360 Wizard with the ![]() button. In the (2024.1) Using 360 Wizard Actions like a Package#example, the Add Line button was clicked twice to make a Wizard with three lines.
button. In the (2024.1) Using 360 Wizard Actions like a Package#example, the Add Line button was clicked twice to make a Wizard with three lines.
5. In the 'Qty' column select the number of Actions that are desired for a given Service Catalog. In the example image , there are two Add Actions selected for the first Service Catalog and just one Action for the other two Service Catalogs.
6. In the 'Catalog' column select each Service Catalog that is desired. In the (2024.1) Using 360 Wizard Actions like a Package#example, there are three different Service Catalogs selected; Voice Line, Authorization Code, and Cable Television.
7. For each row an Owner should be selected. These can be either a 'Contact Owner' or a 'Department Owner' and in the (2024.1) Using 360 Wizard Actions like a Package#example, the first and third row is set as a Contact, while the second row is set as a Department.
8. The SDC' column can be set for each of the Service Catalogs rows.
If different SDCs are desired for the same Service Catalogs, simply add multiple rows with the same Service Catalogs, but assign different SDCs to the different rows.
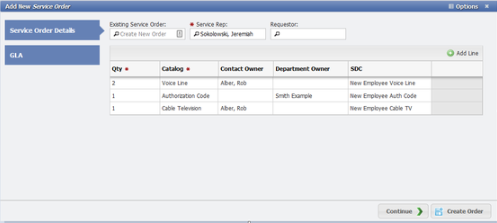
Example Image
Save the Form Perspective
Once the 360 Wizard form has been filled in with the desired values a User can start to build the Form Perspective.
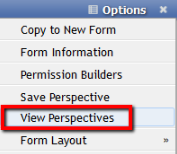
At the upper right part of the form click the Options > Save Perspective link.

Select a 'Name' for the Perspective. The Name should make sense to the Perspective desired.

Click the
 button.
Use the Perspective like a Package
The Perspective is now saved and ready to go whenever a User would like to quickly add the Actions that are saved in the Perspective.
Open the 360 Wizard for Add Actions. The steps to do this are the same as the ones in the Open 360 Wizard section of this "How To".
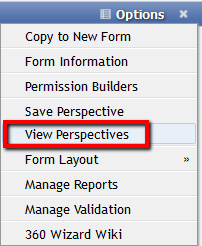
2. When the Wizard is open click the Options > View Perspective link.
3. Select the New Employee Package Perspective that was previously set up.
4. Switch to this Perspective by double-clicking it, or selecting it and clicking the
5. The form's fields fill in automatically based on the template previously set up.
6. Users can set the wizard to create a new Service Order by leaving the picker blank.
7. Selecting an Order with the Existing Service Order picker will append the Actions to that Order.
8. To set the GLA for the Actions a User can now select the GLA button on the wizard and set whatever GLA information is required.
9. Click the ![]() button.
button.
This will trigger the Add Wizard to build the Add Actions that were specified. As many different Form Perspectives that are needed can be created to allow Users to rapidly build Orders moving forward.
Note: These Form Perspectives can be Shared with other Users to allow a single User to create these Form Perspectives, and for other Users to use these Perspectives without having to have built the Perspective manually.
360 Search to see all Services at a Location
Sometimes it can be difficult to find all the Service records that are installed or assigned to a given Location. PCR-360 makes it easy to find everything related to given Location with the 360 Search. In this example, the Services in Desmet Hall are unknown. To find them the User should follow these steps:
In the upper right navigation select the
button.
This will expand the 360 Search bar.
360 Search Bar example
Type in the text "Desmet Hall" (or the name of the Location that needs to be searched) and hit enter.
Example of Search
The search will begin and when it is finished will have returned a set of all the results where the string "Desmet Hall" was matched.
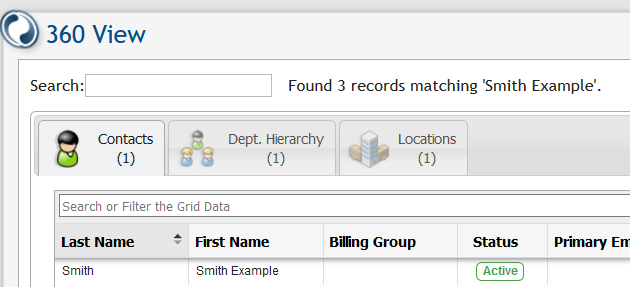
For this example select the 'Location' tab, (if there are multiple tabs returned) and double click the Desmet Hall record.
Example Search Result
This will open the 'Manage Location 360 View' form. Select the 'Services' tab.
Example Manage Location 360 View form
This tab will now display all the Services that are assigned to this Location. The Services will display here regardless of if they are Active or Inactive, and all Service Types will appear as well.