Equipment Tabs
This is a listing of all the tabs a User might encounter in the 'Equipment' Catalogs. To access the 'Equipment' Catalog, navigate to Main > Catalog > Equipment. The tabs found in the Equipment Catalog are similar to those found in the Service and Locations Catalogs.
Catalog
The 'Catalog' tab is specific to Equipment and Services and allows the User to provide a catalog description and images for the CustomerCenter .
The 'Catalog Description' field populates the Description in the origination's CustomerCenter. There are a number of simple text editing functions provided to make descriptions appear with specific formatting.
To provide an image of the Equipment in the CustomerCenter, click the 'Upload Equipment Images'
Note: before an image can be uploaded, the Catalog must first be saved. Trying to Upload an image before saving the Catalog will result in PCR-360 being unable to store that image anywhere, because the Catalog that will use it does not exist yet.
Use of HTML Tags
Some fields within PCR-360 allow Users to input HTML tags to make displaying that information a richer experience for those that are expected to consume it. For more information on HTML tag usage, please see the wiki entry for it.
Vendor
The 'Vendor' tab is specific to Equipment Catalogs. When a Vendor is added to the Equipment Catalog, Equipment can be ordered using Purchase Orders .
Add New Vendor
This adds a Vendor to the Vendors Grid. To add a Vendor, follow these steps:
Click the 'Add New Vendor' UNKNOWN_ATTACHMENT button.
This opens the 'Add New Vendor' form.
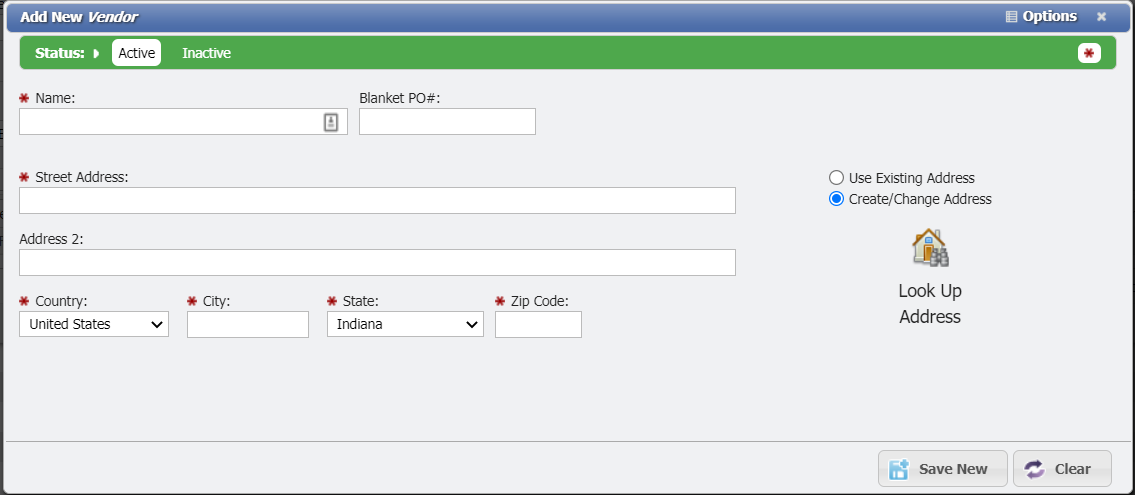
Add New Vendor Form
Fill in the 'Name' of the Vendor and any other optional field.
When all desired information is entered, click the 'Save New' button. UNKNOWN_ATTACHMENT
The new Vendor is added to the Vendor Grid and is able to have 'Vendor Details' entered.
Add Existing Vendor
To use an existing Vendor, click the 'Add Existing Vendor' button.
Select the Vendor(s) and click the 'Save and Close'
Vendor Details
To add the Part number and Cost for a Vendor, follow these steps:
Select the Vendor to add details.
Click the 'Vendor Details'
button.
This opens the 'Manage Vendor Part Number and Units' form.
Manage Vendor Part Number and Units Button
Fill in the 'Vendor Part Number' and 'Cost' fields.
If the Equipment 'Has Units ', enter the units.
Click the Save New button. UNKNOWN_ATTACHMENT
The Parts information is now associated with the Vendor for this piece of Equipment.
Delete Selected
To remove a Vendor association from a piece of Equipment, select the Vendor to remove and click the 'Delete Selected' button.
Default Charges
The 'Default Charges' appears on the Equipment and Services Catalogs. This tab allows the User to add any relevant Default Charges to the given Catalog item.
Click the 'Add' button.
The 'Add New Default Charges' tab opens.
Add New Default Charges Button
Select a Charge from the Charge Catalog picker.
Enter the Charge Override Amount if desired.
Enter the Quantity if desired.
Click the 'Save New' button.
The form closes, and the Default Charge is applied to the current Catalog item. Repeat as necessary to add additional Default Charges.
If a Default Charge is made 'Inactive''
Expense Type
Equipment Catalogs have the option to add an 'Expense Type' on the Default Charges tab. This can be used to specify different Charges based on the Expense Type. An example use case for this would be to specify the difference between purchasing the Equipment or leasing the Equipment.
The Expense Type is set in the Charge Catalog when creating a Charge Catalog. When the User adds the relevant charge to the Equipment Catalog's Default Charges tab the Expense Type will populate in the Expense Type Column. Multiple Charges can be added to the Equipment Catalog regardless of the Expense Type, or charge type. If there are multiple Expense Types, when the Equipment is selected on the Service Desk Equipment form, the User will see a new field labeled Expense Type appear. This field is a drop-down that the User can then select. The options in the drop-down will be limited to only the related Default Charges on the Equipment Catalog.
This will allow the User to select different Charges, with Non-recurring / Recurring types or even different charge amounts.
Location Permissions
The 'Location Permissions' tab is specific to the Services and Equipment Catalogs. This tab allows an Admin to limit the Locations that can be assigned to a given Service/Equipment.
Location Permissions Tab
Add
Using the 'Add' functionality a User can associate a Location Permission with a given Service/Equipment. This association allows the Location Permission to be assigned to the given Service/Equipment and any Children records.
Click the 'Add' button.
This opens the 'Add New Location Permissions' form.
Add New Location Permission Form
Select the Location(s) that are desired to associate with the given Service/Equipment.
Click the 'Save and Close' button. UNKNOWN_ATTACHMENT
The Location(s) is (are) associated with the given Service/Equipment and are the only Location(s) that can be assigned to the given Service/Equipment elsewhere in PCR-360.
Delete Selected
This removes a Location from the given Service/Equipment record.
Select the Location Permission to remove from the Grid.
Click the 'Delete Selected' button.
The Location Permission on the current given Service/Equipment record is removed.
Note: Removing the Permissions on a Parent record removes it on all Children records as well. If a Permission is desired on a Child record, it needs to be added manually to the desired record after removing it from the Parent.
Inherited Permissions
This functionality looks up the Tree and shows any Location Permissions that are associated with a given Service/Equipment through Inheritance.
Click the 'Inherited Permissions' button.
This opens the 'View Inherited Permissions' dialog.
Inherited Permissions Dialogue
Click the 'OK button UNKNOWN_ATTACHMENT when finished viewing.
Permit None
This button removes any associated Location Permissions from a given Service/Equipment. This does NOT remove any Inherited Permissions from the Parent record. To use, click the 'Permit None'
Note: If 'Permit None' is set on a Parent record, the Children records are similarly limited.
To remove the 'Permit None' Status, follow these steps:
Select the line in the Grid that says: "No Contacts entries may be used with this Locations entry."
Click the 'Delete Selected' button. UNKNOWN_ATTACHMENT
The Permit None restriction is removed and it is possible to associate Location(s) with the given Service/Location again.
Billing Group Permissions
When Billing Group Permissions are set, the Catalog item is limited to the listed Billing Group(s). This limitation ensures sensitive Catalog items are only associated with the Billing Group(s) without limiting any other Catalog items.
The 'Billing Group Permissions' tab is specific to the Equipment and Services Catalog. The functionality of this tab allows an Admin to limit what Billing Groups can be assigned to a given Service/Equipment.
Bill Group Permissions Tab
Add
Using the 'Add' functionality, a User can associate a Billing Group Permission with a given Service/Equipment. This Permission allows the Billing Group to be assigned to the given Equipment and any Children records.
Click the 'Add' button. UNKNOWN_ATTACHMENT
This opens the 'Add New Billing Groups' form.
Add New Bill Group Form
Select the Billing Group(s) that are desired to associate with the given Equipment.
Click the 'Save and Close' button. UNKNOWN_ATTACHMENT
The Billing Group(s) are now associated with the Service/Equipment and are the only Billing Group(s) that can be assigned to the Service/Equipment elsewhere in PCR-360.
Delete Selected
This removes a Billing Group from the given Service/Equipment record.
Select the Billing Group Permission to remove from the Grid.
Click the 'Delete Selected' button. UNKNOWN_ATTACHMENT
The Permission on the current Service/Equipment record is removed.
Note: Removing the Permission on a Parent record removes it on all Children records as well. If a Permission is desired on a Child record, it needs to be added manually to the desired record after removing it from the Parent.
Inherited Permissions
This functionality looks up the Tree and shows any Billing Group Permissions which are associated with a given Service/Equipment through Inheritance.
Click the 'Inherited Permissions' button.
This opens the 'View Inherited Permissions' dialog.
Inherited Permissions Dialogue
Click the 'OK button UNKNOWN_ATTACHMENT when finished viewing.
Permit None
This button removes any associated Billing Group Permissions from a given Service/Equipment. This does NOT remove any Inherited Permissions from the Parent record. To use, click the 'Permit None' button.
Note: If 'Permit None' is set on a Parent record, the Children records are similarly limited.
To remove the 'Permit None' Status, follow these steps:
Select the line in the Grid that says: "No Contacts entries may be used with this Locations entry".
Click the 'Delete Selected' button. UNKNOWN_ATTACHMENT
The Permit None restriction is removed, and it is possible to associate Billing Group Permissions with the Service/Equipment again.
Related Equipment Permissions
The 'Related Equipment Permissions' tab is specific to the Equipment Catalog. The functionality of this tab allows an Admin to limit Related Equipment that can be assigned to given piece of Equipment. An example would be limiting a desktop to only having Equipment related to the desktop, like software, as assignable to the desktop.
Related Equipment Permissions Tab
Add
Using the 'Add' functionality, a User can associate a Related Equipment Permission with a piece of Equipment. This association allows the Related Equipment to be assigned to the given Equipment and any Children records.
Click the 'Add' button. UNKNOWN_ATTACHMENT
This opens the 'Add New Equipment Permission' form.
Add New Equipment Permissions Form
Select the Related Equipment(s) that are desired to associate with the given piece of Equipment.
Click the 'Save and Close' button.
The Related Equipment(s) are associated with the given piece of Equipment and are the only Related Equipment(s) that can be assigned to the given piece of Equipment elsewhere in PCR-360.
Delete Selected
This removes a Related Equipment Permission from the Equipment record.
Select the Related Equipment Permission to remove from the Grid.
Click the 'Delete Selected' button. UNKNOWN_ATTACHMENT
The Permission on the current Equipment record is removed.
Note: Removing the Permission on a Parent record removes it on all Children records as well. If a Permission is desired on a Child record, it needs to be added manually to the desired record after removing it from the Parent.
Inherited Permissions
This functionality looks up the Tree and shows any Related Equipment Permissions that are associated with a given piece of Equipment through Inheritance.
Click the 'Inherited Permissions' button.
This opens the 'View Inherited Permissions' dialog.
Inherited Permissions Form
Click the 'OK button UNKNOWN_ATTACHMENT when finished viewing.
Permit None
This button removes any associated Related Equipment Permissions from a given piece of Equipment. This does NOT remove any Inherited Permissions from the Parent record. To use, click the 'Permit None' button.
Note: If 'Permit None' is set on a Parent record, the Children records are similarly limited.
To remove the 'Permit None' Status, follow these steps:
Select the line in the Grid that says: "No Contacts entries may be used with this Locations entry".
Click the 'Delete Selected' button. UNKNOWN_ATTACHMENT
The Permit None restriction is removed and it is possible to associate new Related Equipment Permissions with the given piece of Equipment again.
Incident Codes
The 'Incident Codes' tab appears on both the Services and Equipment Catalogs. From here, an Admin can associate Incident Codes that are made available to Users when reporting Incidents related to the Service or Equipment.
Incident Codes Tab
Add
To create a new Incident Code and place it in the Grid, use the following steps.
Click The 'Add' UNKNOWN_ATTACHMENT button.
This opens the 'Add New Incident Code' form.
Add New Incident Code Form
Select the 'Type' of the Incident Code - either 'Trouble' or 'Resolution'.
Enter a 'Code'.
If desired, enter the 'Impact' which defaulted to Medium.
Click the 'Save New' button UNKNOWN_ATTACHMENT
The Incident is in the Incident Codes Grid.
Add Existing
The 'Add Existing' button
Add New Existing Incident Code Form
All Incident Codes that the User(s) have created are displayed on this form. These Incident Codes are meant to be more specific to the Service or Equipment that they are associated with and overrides the Generic Incident Code when reporting an Incident.
Inventory Specs
The 'Inventory Specs' tab is specific to the Equipment Catalog. Sometimes a User wants to make sure Inventory still appears on the Inventory Overview or Warehouse's Inventory tab even if the quantity of the Inventory is zero. To make sure the Inventory still appears, set either a Priority or Threshold. Having either of those two items set here ensures the Inventory still appears even when there is none.
Inventory Specs Tab
The 'Inventory Specs' tab sets and shows the 'Reorder Threshold' for any given location. This number should be the minimum number of Inventory items on hand desired before ordering more is necessary. Inventory that are not necessary to have on hand do not need a Reorder Threshold and can be ordered on an as needed basis. This is the same functionality as the 'Set Threshold' button
Click the 'Add' button. UNKNOWN_ATTACHMENT
This opens the 'Add New Inventory Specification' form.
Add New Inventory Specification Form
Enter the 'Warehouse' from the picker that the Threshold should be set for.
Enter a Priority if desired.
Enter the 'Reorder Threshold'.
Priority
The Priority function is a specialized function that assigns a priority to Inventory in a Warehouse on Purchase Orders. Inventory Warehouses priority is used to default the receiving Warehouse on a Purchase Order. The HIGHER (1 being the highest) priority number Receives the Equipment before the other locations. This is specific to the sub-warehouses within a main/parent Warehouse. If Priority is used, Priority must be a unique integer value from other Priorities or left blank.
PO History
The 'PO History' tab is specific to the Equipment Catalog. All Purchase Order(PO) History for a given Equipment Catalog can now be viewed on the 'PO History' tab. All the relevant information related to the PO is displayed on this tab. Users can also select a record from this tab and open the Purchase Order form by clicking the Edit Selected button.
PO History Tab
Attachments
The 'Attachments' tab is specific to the Equipment and Services Catalog. The Attachments tab allows Users to attach file(s) (.pdf, .jpg, .doc...) of interest or relevance to the Service by uploading the file(s) into PCR-360.
Attachments Tab
Uploading a File
To attach one or more files, navigate to the 'Attachments' tab and click the Upload File(s)' button
Download File
Allows a User to download a file to their local machine. To download the file, select the file to download and click the 'Download File' button.
Open File
This opens the file, if possible, for viewing by the User. To open the file, select the file to view and click the 'Open File' button.
Edit Selected
Allows the name of the file to be modified within PCR-360. To Edit the file name, select the file to be edited and click the 'Edit Selected' button.
Manage Attachment Form
If a User modifies the name of the file, that is the new name that is used when downloading the file. To edit, modify the name in the Filename field and click the 'Save' button.
Delete Selected
The 'Delete Selected' button
User Defined Fields
The User Defined Fields tab provides access to any extra fields that are defined for the Service/Equipment. They can be defined to appear for all Services/Equipment or for specific Service/Equipment Catalogs. See Adding User Defined Fields for more information.
User Defined Fields Tab