The tabs that appear in the Workgroups form can be used to input as much contact information as the User desires.
If a tab is marked as having a Required field, open that tab enter information in the field.
Once all required fields have been filled, click the button at the bottom of the Workgroups form. The new Workgroups appears on the Workgroups Grid and elsewhere in the application when a User is prompted to define a Workgroups.
Workers & Rates tab
Of course, the key components of any Workgroup are the employees with which it is associated. To add members to the new Workgroup, use the tab labeled Workers & Rates.
To add a new Workgroup member, click the Add button immediately above the Grid displayed in the Workers & Rates tab.
In the Add New Worker form, the User is first prompted to select a Worker from the Workers/Contacts drop-down list. The User must then define the Worker's 'Hourly Rates'. Once all defined fields have been satisfied, click Save New button at the bottom of the form. The new Worker appears on the Grid displayed in the Workers & Rates tab of the Workgroup data entry form.
Note: All Contacts added as a Worker to a Workgroup are automatically given the 'Worker' contact type, assuming that the Contact does not already have the 'Worker' type.
Users can add as many Workers to a Workgroup as desired.
Once all required fields in the Workgroup data entry form have been satisfied, click the Save New button at the bottom of the form. The new Workgroup appears on the original Workgroups Grid.
Workers and Rates
The 'Workers & Rates' tab will associate a Worker with a Workgroup and define their 'Hourly Rate' for billing purposes. The 'Hourly Rate' here is what the organization will charge for the Worker's labor, not necessarily what the Worker makes. The association will also show up in the Worker Workgroup tab.
Click the button.
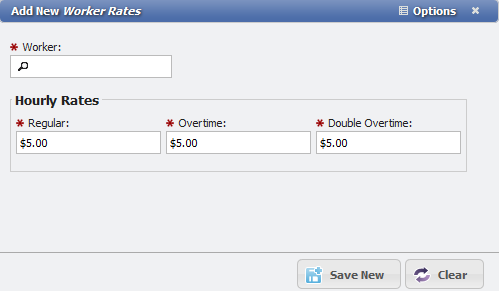
This will open the 'Add New Worker Rates' form.
Set the 'Worker' to assign to the Workgroup.
Enter values for the 'Hourly Rates'. All three fields, 'Regular', 'Overtime', and 'Double Overtime' are required fields.
Click the button.
The Worker will now be associated with the defined Workgroup.
Location Permissions tab
Location Permissions
Locations Permissions tab
The 'Location Permissions' tab is on the Workgroups grid. The functionality of this tab allows an Admin to limit what Workgroup(s) can be assigned to a given Location.
Add
Using the 'Add' functionality a User can associate a Location Permission with a given Workgroup. This association will allow the Workgroup to be assigned tasks at a given Location.
Click the button.
This will open the 'Add New Workgroup Locations' form.
Add New Workgroup Locations form
Select the Location(s) that are desired to associate with the given Workgroup.
Click the button.
The Workgroup will now be associated with the given Location and be the only Location(s) that can be assigned to the given Workgroup elsewhere in PCR-360.
Delete Selected
This will remove a Location Permission from the given Workgroup record.
Select the Location Permission to remove from the grid.
Click the button.
The Permission on the current given Workgroup record will have been removed.
Permit None
This button disallows any associated Location Permissions from a given Workgroup. To use, simply click the
button. Any Location(s) that were associated with the given Workgroup will have that Permission deleted. The grid will display:
To remove the 'Permit None' status follow these steps:
Select the line in the grid that says:
No Contacts entries may be used with this Locations entry message
Click the button.
The Permit None restriction will have been removed and it will be possible to associate Location(s) with the given Workgroup again.
Escalations Sequence tab
Escalation Sequence
Escalation Sequence tab
The 'Escalation Sequence' tab will set a list of people to be notified via ''Escalations and Notifications'' in the event a given Escalation is not completed in the time frame specified on the Escalation/Notification by member Workers of the Workgroup. The Contact with the lowest 'Sequence #' will be notified first, progressing sequentially to the Contact with the highest Sequence #.
PCR recommends spacing Sequence # by tens (10, 20, 30) to make it easy to add Contacts to the Sequence in the future should that be desired. Any Contacts with an identical Sequence # would be notified at the same time. A good example would be to make the Workers of the Workgroup the first people notified of incomplete tasks by the Workgroup as a reminder. The next person(s) in the sequence might be a supervisor or manager. These rules would be set by the organizations desired business practices.
Click the button.
The 'Add New Worker Escalation Sequence' form will open.
Add New Worker Escalation Sequence form
Select a Contact from the 'Contact' picker, and set a 'Sequence #'.
The User Defined Fields tab provides access to any extra fields that have been defined for the given grid. See Adding User Defined Fields for more information.


 button.
 button.
 button.


 button.
button.
