For the two recommended ways of setting up the Notifications, if the Workgroup is updated within Service Desk to a different Workgroup, the new Workgroup will not be sent a message alerting them of the assignment. PCR presently does not support the ability to notify based on when a Workgroup Assignment change event occurs. We welcome a feature request to examine adding this functionality in the future.
Using Notifications, regardless of the Workgroup, for Alerts
Navigate to "Admin > Escalations/Notifications > Notifications".
Click on the 'Notifications Grid'.
Setup the Notification with the following criteria:
Event: Service Desk Workflow Start Date
Title: PCR-360 Workflow Assignment
Subject: PCR-360 Assignment to ##SDWF_WORKGROUP##
To: ##SDWF_WORKGROUP_WORKERS_EMAIL##
A different variable can be used to set who should be notified, if only the Manager (##SDWF_WORKGROUP_MANAGER##) or other individual needs to be notified instead of all Workgroup members.
Personalize the Notification in the Body
sample of completed Notification
Click to save the Notification.
Whenever a Workgroup is Assigned to a Service Desk Item, all members of that Workgroup will be sent a message informing them of that fact.
Note:If the Workgroup is updated within Service Desk to a different Workgroup, the new Workgroup will not be sent a message alerting them of the assignment.
When changing the Workgroup on a Workflow, it is recommended to deleted the current Workflow, and add a new one for the newly desired Workgroup, so that the new Workgroup can be alerted to the assignment.
Using Notifications and Escalations to Target Workgroups for Alerts
Navigate to "Admin > Escalations/Notifications > Notifications".
Click on the 'Notifications Grid'.
Setup the Notification with the following criteria:
Check the box for: For Escalation
Event: Service Desk Workflow Added
Title: PCR-360 Workflow Assignment (Escalation)
Subject: PCR-360 Assignment to ##SDWF_WORKGROUP##
To: ##SDWF_WORKGROUP_WORKERS_EMAIL##
A different variable can be use to set who should be notified, if only the Manager (##SDWF_WORKGROUP_MANAGER##) or other individual needs to be notified instead of all Workgroup members.
Personalize the Notification in the Body
Click to save the Notification.
Navigate to "Admin > Escalations/Notifications > Escalations".
Click on the 'Sequence Grid'.
Add New Escalation Form example
Setup the Escalation with the following criteria:
Start Event: Service Desk Workflow Added (per the Notification setup previously)
Escalation Name: Workflow Added
Click to save the Escalation.
Set the Status to .
Add a 'Sequence' to the Escalation by clicking on the 'Sequence Grid'.
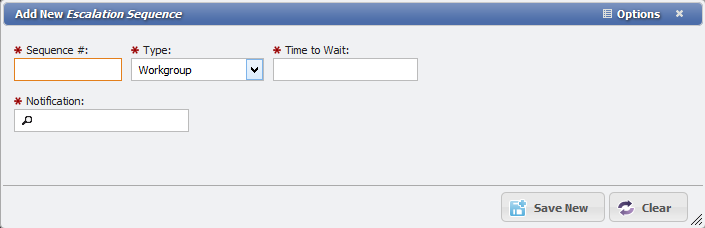
Escalation Sequence form example
Setup the Escalation Sequence with the following criteria:
Type: Workgroup
Time to Wait: desired delay before the Notification is sent
Sequence #: desired sequence number
Notification: PCR-360 Workflow Assignment (Escalation) (per the Notification setup previously)
Click to save the Escalation Sequence.
Go to the 'Criteria' tab on the Escalation form.
Click on the 'Criteria Grid'.
Escalation Criteria form example
Define Criteria for what Workgroups should receive the message.
Setup the Escalation Criteria with the following values:
Description: detail of what the criteria is doing
Data: SDWF_WORKGROUP
Comparison: Equals
Sdwf Workgroup Value: Select the desired Workgroup
Click to save the Escalation Criteria.
The Escalation should look as follows:
Whenever a Workgroup that matches the Criteria is Assigned to a Service Desk Item, all members of that Workgroup will be sent a message informing them of that fact.
Note:If the Workgroup is updated within Service Desk to a different Workgroup, the new Workgroup will not be sent a message alerting them of the assignment.
When changing the Workgroup on a Workflow, it is recommended to deleted the current Workflow, and add a new one for the newly desired Workgroup, so that the new Workgroup can be alerted to the assignment.
JavaScript errors detected
Please note, these errors can depend on your browser setup.
If this problem persists, please contact our support.
 on the 'Notifications Grid'.