Permissions Builder
User Management in Admin Navigation Menu
Summary
Permission Builders location in Options Menu
Permission Builders provide a quick and easy way to define who has what level of access to the specific elements of Grids, maintenance forms, and tabs.
Grid Usage
Navigate to the Grid for which Permissions specification is desired. In the lower left-hand corner of the Grid, click the yellow lock.
Note: The lock only shows up for Users whose role has been toggled as Admin.
Add New Grid Permissions form example
On the 'Add New Grid Permissions' form, choose the Permission Set desired. This Permission set is the default for the next element selected (but can be changed at any time). The Grid and Scenario values are auto filled in, and the User will need to choose which Grid Element desired and set the Permissions drop-down.
For Grid Permissions:
Read & Write - The button is clickable.
Deny - The button cannot be clicked.
Once this is done click the
Form Usage
Navigate to the Form desired to specify permissions for. Click the Options menu and choose Permission Builders (Note: This entry only shows up for Admin Users).
Location of Permission Builder Icon example
A small black lock image appears next to every form, tab, and button on the form. To change the permissions for a specific element, click the lock next to that element (for example the Requester field or the Contacts tab). On the Add New Form Element Permissions form, choose the Permission Set desired. This Permission set is the default for the next element chosen (and can be changed at any time). The Form and Element values are auto-populated, and the User will need to set the Permissions drop-down.
For field Permissions:
Read - The field, its label, and its data show up but the data is read-only.
Read & Write - The data shows up and is changeable by the User.
Deny - The field and its label show up but no data is visible (or changeable).
Once this is done, click the
Click Options > Permissions Builders again to exit from Builder mode.
Permission Builders
Permission Builders
Permission Builders allow the user to enter Form/Element Permissions without knowing the internal name of each form and element. Refer to the Best Practices for Permissions Sets for more examples.
To use the Permission Builder:
Open the data-entry form whose Permissions are desired to be impacted. In this example, the Contacts form is used. Click the Options Menu.
Example of Options Menu Location
Click on Permission Builders in the menu.
Options Menu Options
This hides/shows the Permission Builder lock icons. Click one of the lock icons.
Example of Permission Builders
This opens an Add New Form/Element Permissions data-entry form with the values filled in for that form and element. Select the Permission Set to modify, and click Save.
To set permissions on the entire form, clear the Element field before saving.
Set a form to Read-Only
There are two quick methods to set a form to read-only. On method simply makes the elements read-only. The second method will remove the Form's buttons. Either of these methods can prevent changing individual fields, however, both should be used together to truly lock a field down so it cannot be modified in any way.
Set all elements to Read-Only
Open the form that needs Read-Only Permissions
Navigate to Options > Permissions Builders in the form header.
Click any of the
icons on the form.
This will open the Add New Form Element Permissions form.
Select the Permission desired in the Permission Set drop-down.
Select the Element text field and delete whatever is in that field.
Add an asterisk "*" to the Element field.
Element field example
Set the Permission drop-down to Read.
Click the
The Permission is set as read-only for every Element on the form.
Set form to Read-Only to remove buttons
Open the form that needs Read-Only Permissions
Navigate to Options > Permissions Builders in the form header.
Click any of the
This will open the Add New Form Element Permissions form.
Select the Permission desired in the Permission Set drop-down.
Select the Element text field and delete whatever is in that field.
Leave the element text blank in the field.
Element field example
Set the Permission drop-down to Read.
Click the
The buttons will be removed from the bottom of the form.
How to Set Permissions for View Cable Path, History Report, and 360 Search Results
Overview
If when attempting to view a Cable Path, view the History Report, or perform a 360 Search, and the User receives a Permissions Error instead of the desired results, there is an easy way to fix this.
Note: The User will have to log out and log back in to receive the updated Permissions once they have been corrected.
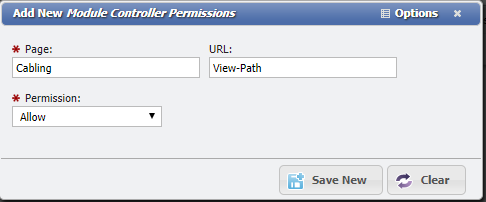
Granting Permissions for View Cable Path
Open the Permission Set used by that User, click on the Pages/URLs tab and click the
 button.
Pages/URL Tab example
The Page should be Cabling and the URL should be View-Path
Leave the Permission dropdown at Allow.
Permission Set Up Example
Click the
 button to save the Permission change.
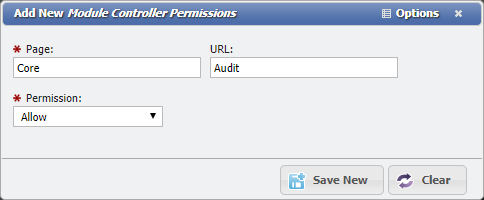
Granting Permissions for History Report
Open the Permission Set used by that User, click on the Pages/URLs tab and click the
button.Pages/URL Tab example
The Page should be Core and the URL should be Audit
Leave the Permission dropdown at Allow.
Permission Set Up Example
Click the
 button to save the Permission change.
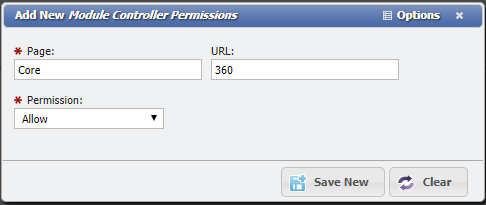
Granting Permissions for 360 Search Results
Open the Permission Set used by that User, click on the Pages/URLs tab and click the
button.Pages/URL Tab example
The Page should be Core and the URL should be 360
Leave the Permission dropdown at Allow.
Permission Set Up Example
Click the
button to save the Permission change.
Privileges blocked to the Wiki?
Help Pop Out Menu example
When a Permission Set is set to "Deny" by default for "Menus & Pages / Urls", any User who uses that Permission Set will be denied access to search the Wiki. This can be easily corrected by adding Permissions to the Wiki Specific URLs.
Add the following Permission to the impacted Permission Sets:
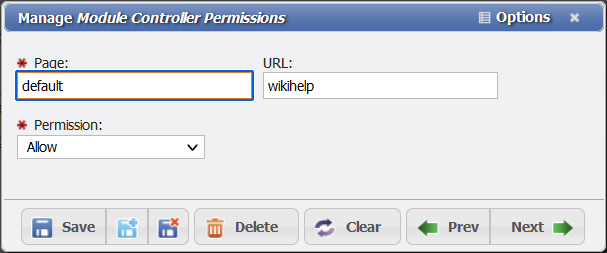
Page: Default
URL: wikihelp
Allow: yes
Privileges blocked to the Wiki?

Help Pop Out Menu example
When a Permission Set is set to "Deny" by default for "Menus & Pages / Urls", any User who uses that Permission Set will be denied access to search the Wiki. This can be easily corrected by adding Permissions to the Wiki Specific URLs.
Add the following Permission to the impacted Permission Sets:
Granting Permissions to the Wiki example
Page: Default
URL: wikihelp
Allow: yes
Once applied, these Users will be able to access the Wiki.
Privileges blocked to viewing AdHoc Queries?
When a Permission Set is set to "Deny" by default for "Menus & Pages / Urls", any User who uses that Permission Set will be denied access to viewing AdHoc Queries. This can be easily corrected by adding Permissions to the SQL Query Specific URL.
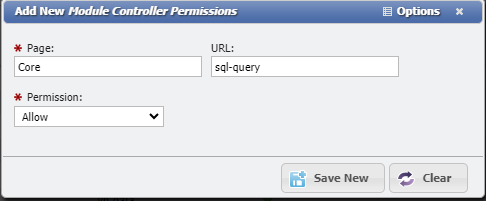
Add the following Permission to the impacted Permission Sets:
example of allowing SQl Query permission for AdHocs
Page: Core
URL: sql-query
Allow: yes
Once applied, these Users will be able to access the Wiki.