Path Legs
Navigate to the Path Legs grid. Main > Cable > Path Legs
On the Path Legs grid, Users can edit and delete path legs along with viewing a visual representation of the desired path.
Cable Path Legs grid
Adding Path Legs
The critical step in the establishment of a visual representation of a new Path is to add 'Path Legs'. Path Legs are a way to further define the path and establish physical parameters.
Consider the Path data entry form. Below the required data fields, there is a grid entitled 'Path Legs'. To add a Path Leg to the new Path, click the 'Add' button on the Grid Toolbar on the data entry form.
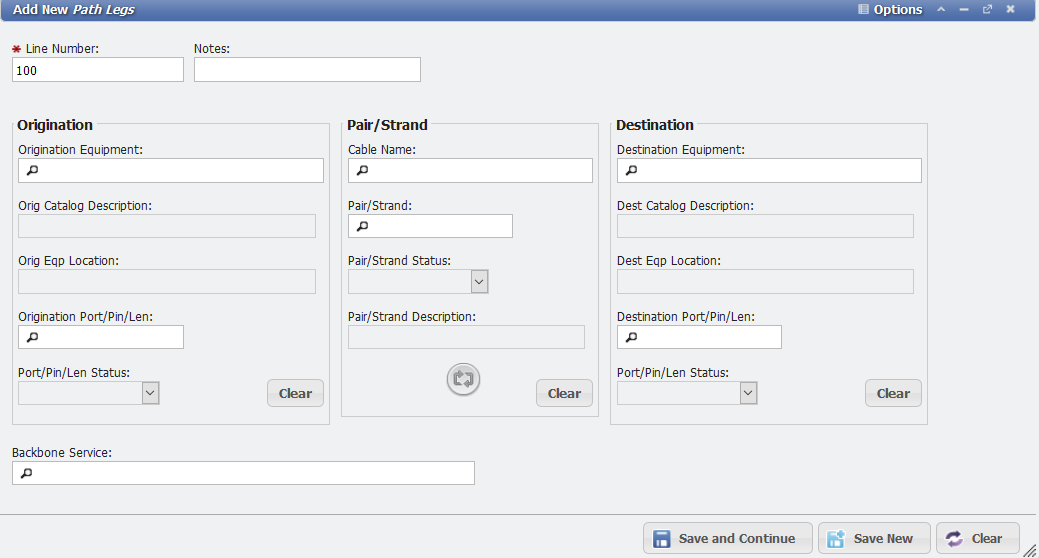
Add New Path Legs form
Line Number
In the Path Leg form, Users can input data into the fields to define the components of the Path Legs. Keep in mind that Line Number and Origination Equipment are both required fields.
The Line Number identifies the Path Leg and differentiates one Leg from another. Accordingly, PCR suggests that Users input Line Numbers in multiples of 100, thereby enabling Users to add supplemental Legs (at 99, 98, etc.) to the Path in the future.
Multiple Locations on a Single Path
Cable Paths, by design, do not allow duplicate Path Leg numbers. They do however allow multiple Locations on a single path. Each Path Leg is part of a single Path regardless of the Path Legs Location and each Path Leg must have a unique instance number. The Cabling diagrams depend on this uniqueness to display multi-location paths in the correct order.
Notes
As of version 2.1.4.6 'Notes' is a new field that is on the Path legs form. This field serves as a brief description of the Path Leg and will appear in the View Path report. The Notes field is limited to 30 Characters.
Origination Equipment
To select a piece of Origination Equipment, click the Search Icon in the appropriate data field and choose a piece of equipment from the Equipment Catalog. Once an Origination Equipment has been selected, the Orig Catalog Description and Orig Eqp Location auto-fills as read-only items for ease of Identification of the piece of equipment in question.
At any point, the User can click the 
Origination Ports/Pins/Lens
If there is a Port/Pin/Len to be associated with the piece of origination equipment, it can be selected here.
Pair/Strand
If there is a Pair/Strand associated with the Equipment, its 'Cable Name' can be selected here.
Below this selector, there is also the option to swap the Origination and Destination Equipment. All information in each respective field transfers to its counterpart once the User clicks the 'Swap Equipment' button 
Note: 'Swap Equipment' text only appears Users hover over the button.
Destination
To select a piece of Destination Equipment, click the Search Icon in the appropriate data field and choose a piece of equipment from the Equipment Catalog. Once a Destination Equipment has been selected, the Dest Catalog Description and Dest Eqp Location auto-fills as read-only items for ease of identification of the piece of equipment in question.
Destination Ports/Pins/Lens
If there is a Port/Pin/Len associated with the piece of equipment, it can be selected here.
Backbone Service
Users can select a backbone service in this field associated with the Path Leg.
Finishing the Path Leg
Once the required fields have been fulfilled and the new Path Leg saved, the new Path Leg appears on the grid in the Path data entry form.
At this point, the PCR-360 application can generate a visual representation of the new Path. However, keep in mind that the more components the User defines in Path Legs, the more comprehensive the visual representation (View Path ) is.
Users can continue this process to add as many Path Legs as desired.
Editing Path Legs
Manage Path Legs form
In the Path Legs form, Users can manipulate the existing data of the path leg. Keep in mind that Line Number and Origination Equipment are both required fields.