Configuring the MS Office 365 Graph API with PCR-360
IMPORTANT
The Office 365 OAuth2 API Requires a dedicated user account or mailbox with a login for authorization via the MS Graph API.
PCR-360 cannot use a “delegate” mailbox, it must use the mailbox it is logged in as. The “Delegated Permissions” mentioned in the setup are not enabling mailbox delegation, but assigning permissions to access certain aspects of the API when a user or mailbox signs in (such as sending and receiving email from the signed in account).
The implementation of the MS Graph Office 365 API does not support Service Accounts.
-
Open a browser and navigate to the Azure Active Directory admin center.
-
Login with an account capable of administrating Active Directory
-
Select Azure Active Directory in the left-hand navigation, then select App registrations under Manage.

-
Select New registration. On the Register an application page, set the values as follows.
-
Set Name to "PCR360 Production" (or "PCR360 Test" depending on the environment being set up).
-
Set Supported account types to Accounts in any organizational directory and personal Microsoft accounts.
-
Under Redirect URI, set the first drop-down to
Weband set the value to
-
This must be altered to reflect the URL of the PCR-360 Application
-
Appending /core/oauth2/validated to the end of the URL is required
-
https://<pcr360.customerUrl.edu>/core/oauth2/validated
-
-
-
Select Register. Copy the value of the Application (client) ID and save it, you will need it later.
-
Select Endpoints, then copy the Tenant ID as highlighted in the screenshot below. Save this as you will need it later.

-
Select Certificates & secrets under Manage. Select the New client secret button. Enter a value in Description and select one of the options for Expires and select Add.
-
Copy the client secret value before you leave this page. You will need it later.
Important
This client secret is never shown again, so make sure you copy it now.

-
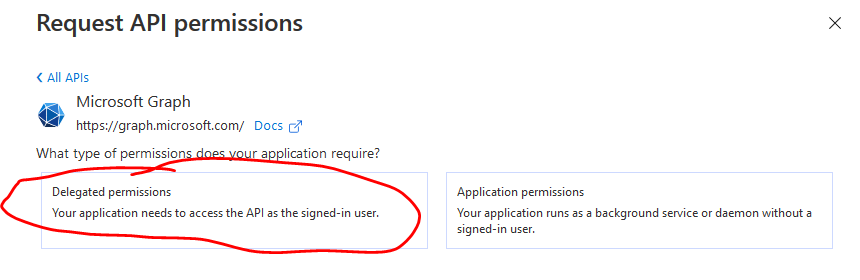
Select API permissions in the side bar

-
Add the permission as shown
-
Click Add a permission and select Microsoft Graph

-
Select Delegated Permissions
-
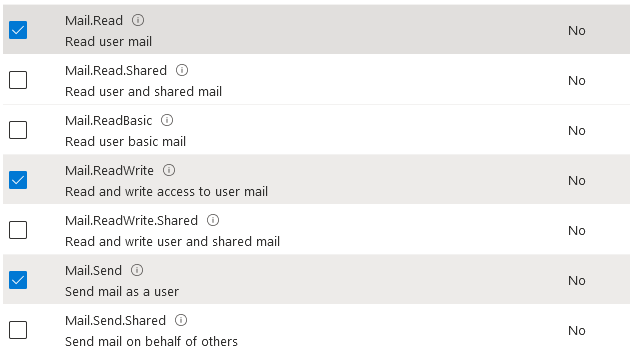
Select the Mail.Read, Mail.Send, and Mail.ReadWrite permissions
-
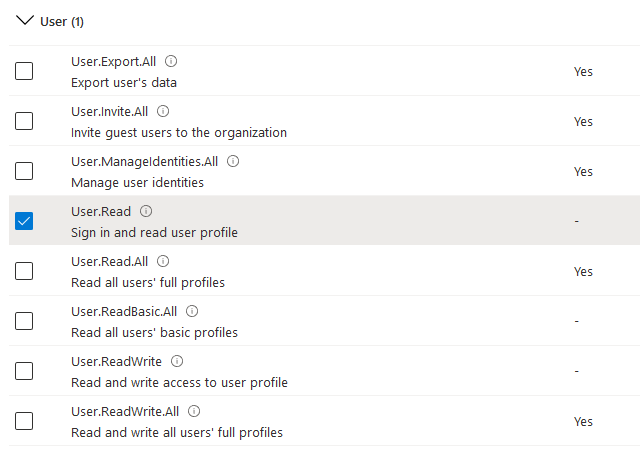
Select the User.Read permission
-
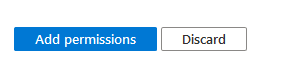
Click the Add permissions button to add the selected permissions
Setting up the PCR-360 Tenant Email
Configuration:
-
In the PCR-360 Application, navigate to Admin → Tenant Management.
-
Double click the proper tenant. There is usually only one.
-
Select the Tenant Emails Tab
-
Click the Add button
-
Select the appropriate Account Type. Configuring Email#AccountTypes:
-
MAKE SURE TO USE THE EMAIL ADDRESS YOU WANT PCR-360 TO USE
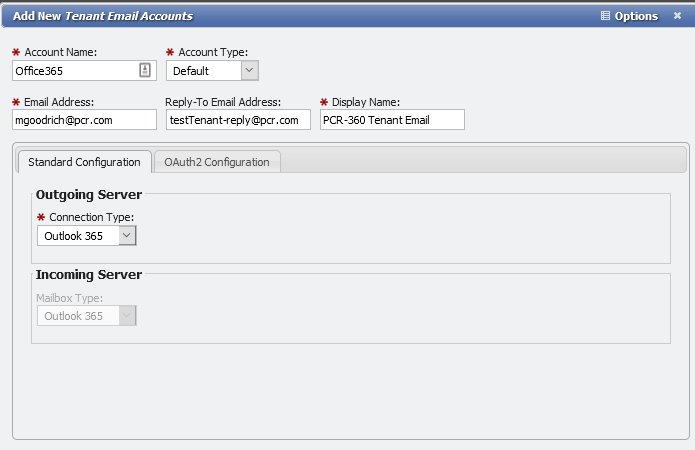
-
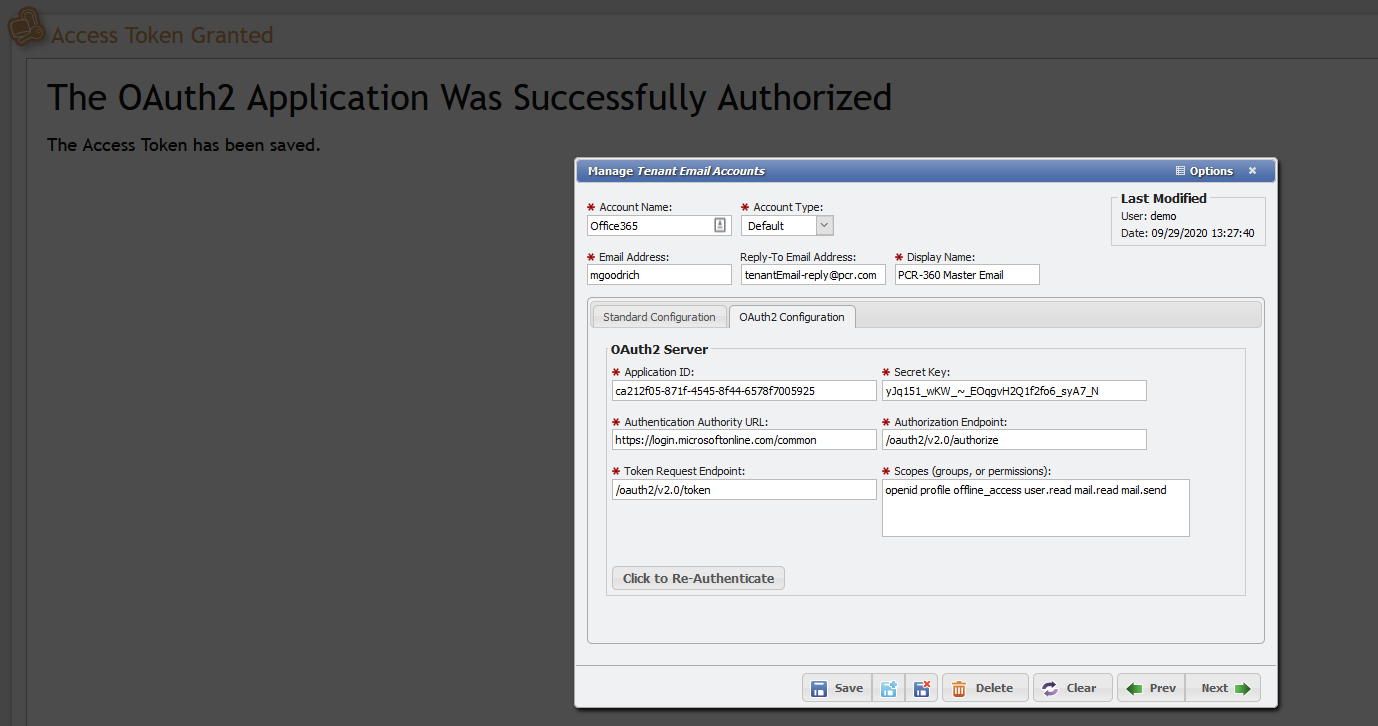
On the OAuth2 Configuration tab enter Application ID and Secret KEY copied down from the earlier steps:
-
Also enter in the following values:
-
Authentication Authority URL: https://login.microsoftonline.com/TENANT_ID
-
The TENANT_ ID value should be replaced with the Tenant ID copied in earlier steps from the Endpoints page in Azure
-
Example Tenant ID: 79c6ff55-b7e0-4517-bfd7-b4fffb6fee40
-
Example Authentication Authority URL: https://login.microsoftonline.com/79c6ff55-b7e0-4517-bfd7-b4fffb6fee40
-
Example Tenant ID: common
-
Example Authentication Authority URL: https://login.microsoftonline.com/common
-
-
-
Authorization Endpoint: /oauth2/v2.0/authorize
-
Token Request Endpoint: /oauth2/v2.0/token
-
Scopes (groups, or permissions): openid profile offline_access user.read mail.read mail.send mail.readwrite

-
Using these values exactly as shown is very important for authentication.
-
All values must be on a single line with a single space in between each.
-
No line break character should be used, but the line may wrap
-
A line break in this field will break authentication on Microsoft's side.
-
-
-
Save the Tenant Email Address
-
NOTE: Before you authenticate the new account, you MUST sign out of ALL Microsoft Accounts you used in your browser. If you do not log out of those accounts, the new Email connection will authenticate with your personal account, and all outgoing emails will appear to be sent from your account.
-
Click the "Click to Authenticate" button.
-
-
Follow the prompts to authorize PCR-360 with your Microsoft Email.
-
Once completed, the portal will redirect back to the application with a success message.
-
The button on the OAuth2 Configuration tab should now say, "Click to RE Authenticate"
-
The application is now configured to send (and/or receive) emails using the email address that was authenticated