Service Desk - Cabling
Cabling
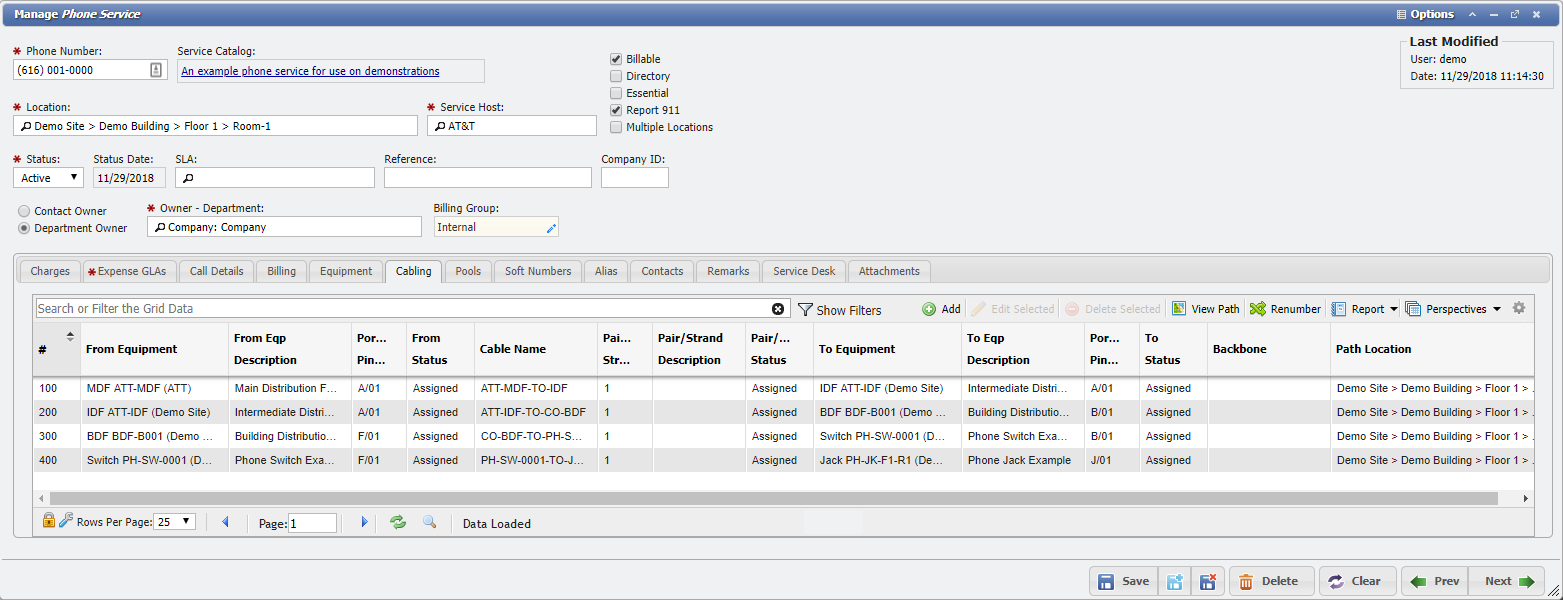
The 'Cabling' tab allows Users to Add, Change, Remove, or view Cable Paths. This screen can only be edited on Service Order: Actions. Certain actions do not allow the 'Cabling' tab to be modified. The 'Cabling' tab is still visible, but it is read-only and will be missing all the grid buttons. The following actions will not allow the 'Cabling' tab to be modified: Service ID, Swap, and Remove.
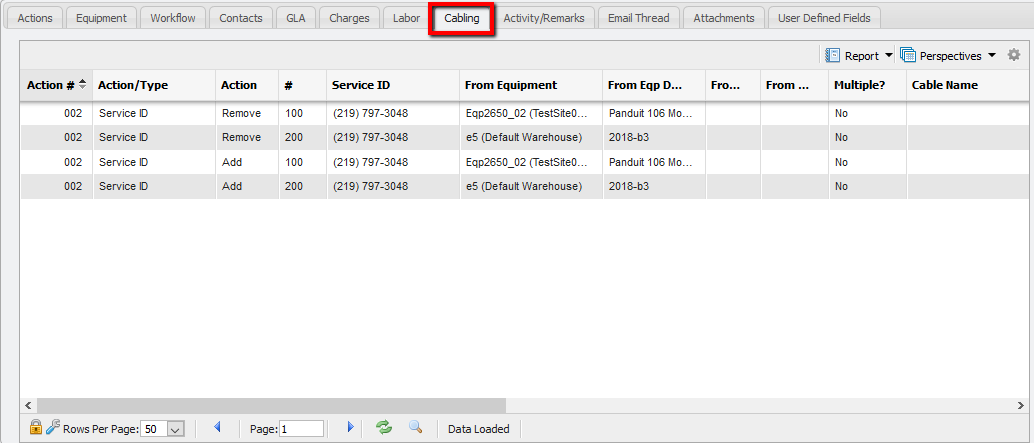
The Cabling tab
Adding a Cable Path
To add a Cable Path to a Service, the User creates an Add Action from the Service Order form. Be sure that the Service Desk 'Action' field is set to 'Add'. Then the User should add the Path Legs to be assigned to the Service into the Cabling Grid.
Once added to the Order, the Pairs/Strands, and Ports/Pins/Len become 'Pending Connect'. Then, when the Order is completed, the Pairs/Strands and Ports/Pins/Len become 'Assigned', and the Cable Path is attached to the Service.
Editing a Cable Path
To change a Cable Path for a Service, the User should make sure that the Service Desk 'Action' field is set to 'Change'. Once this is set, any current Cable Path built on the Service is automatically be marked as 'Pending Disconnect'. The User should then add the new Path Legs to be assigned to the Service into the Cabling Grid.
The Pairs/Strands and Ports/Pins/Lens for these new Path Legs are marked as 'Pending Connect'. When these Orders are "Completed", the records for the old Cable Path become 'Spare', and the old Cable Path is removed from the Service. At the same time, the records for the new Cable Path become 'Assigned', and the new Cable Path is attached to the Service.
Removing a Cable Path
To remove a Cable Path from a Service, the User should make sure that the Service Desk 'Action' field is set to 'Remove'. The records from the Cable Path that is on the Service is automatically be marked as 'Pending Disconnect'. Once the Order is completed, the records from the Cable Path is marked as 'Spare', and the Cable Path is removed from the Service.
Viewing the Path
The 'View Path' button displays the visual Cable Path report of the Cable Path that is currently on the Service.
More Cabling Options
The 'Auto Assign' button can be used to automatically find a Cable Path leading to a piece of Equipment. Auto Assign requires the Users to define the Origination and Destination for each Pair/Strand record in the system. When a User clicks the
The 'Left In' button is used when there are Cables that are pre-wired. If there is a Cable Path built to a Location in the Cable: Paths Grid , then the User can click on the 'Left In' button. This populates the Grid with any Cable Path that is built to the Order's Location.
The 'SD Path' button displays the visual Cable Path report of those items on the Cabling Grid. This is useful for 'Add' and 'Change' Actions only.
The 'Current Path' button displays the visual Cable Path report of the Cable Path that is currently on the Service. This is useful for 'Change' and 'Remove' Actions only.
Backbone
When a Service is riding on a Backbone, the Backbone Service will add an Add Backbone, or Remove Backbone Action so that the User can better visualize the Cable's Path. These Backbone Actions cannot be edited or modified in any way and are for informational purposes only.
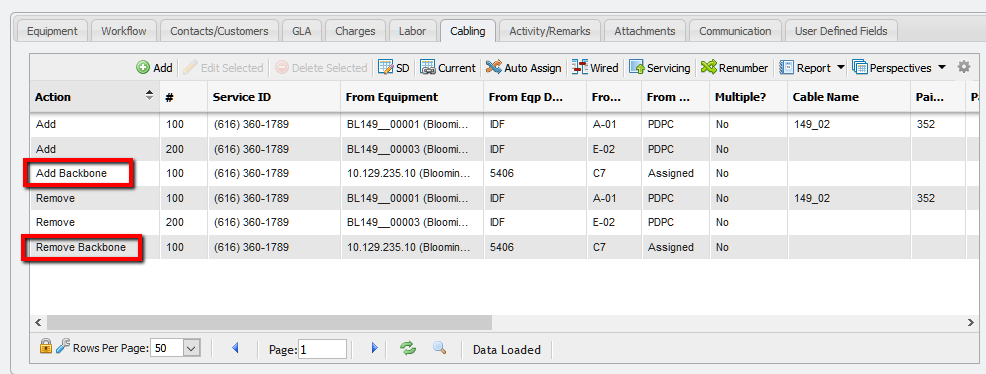
Cabling with Add Backbone / Remove Backbone
Service Desk Cabling Form
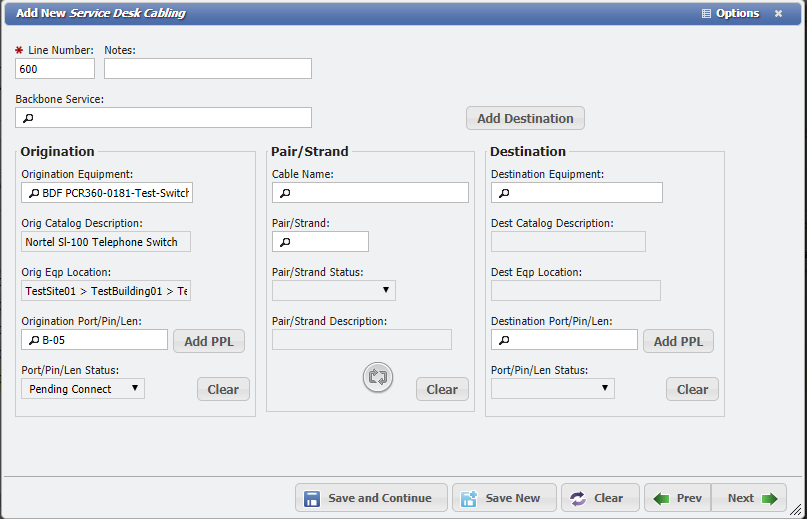
The data on the 'Add New Service Desk Cabling' form represents on Path Leg that will be added, or altered once the Service Desk Action is completed.
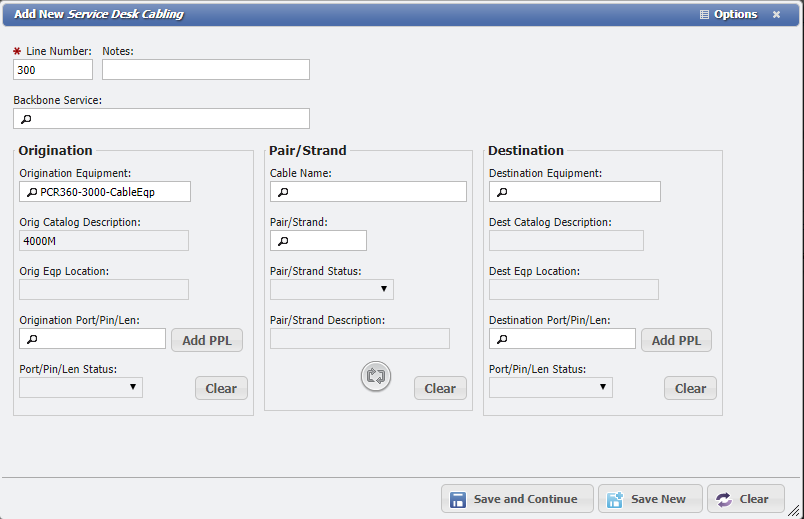
Add New Service Desk Cabling Form example
Form Fields
Line Number: The Line Number identifies the Path Leg and differentiates one Leg from another. Accordingly, PCR suggests that Users input Line Numbers in multiples of 100, thereby enabling Users to add supplemental Legs (at 99, 98, etc.) to the Path in the future.
Notes: Will appear on the Path Leg on the Cabling Data of the Service once the Action is completed. The Notes will also appear on the View Path Report (Cabling Diagram)
Origination Equipment: To select a piece of Origination Equipment, click the Search Icon in the appropriate data field and choose a piece of equipment from the Equipment Catalog. Once an Origination Equipment has been selected, the Orig Catalog Description and Orig Eqp Location auto-fills as read-only items for ease of Identification of the piece of Equipment in question. At any point, the User can click the 
Origination Port/Pin/Len: If there is a Port/Pin/Len to be associated with the piece of origination equipment, it can be selected here.
Cable Name: If there is a Cable Name associated with the Equipment, its can be selected here.
Pair/Strand: If there is a Pair/Strand associated with the Equipment, its can be selected here once the Cable Name is selected.
Swap Equipment: Below this selector, there is also the option to swap the Origination and Destination Equipment. All information in each respective field transfers to its counterpart once the User clicks the 
Note: 'Swap Equipment' text only appears when Users hover over the button.
Destination Equipment: To select a piece of Destination Equipment, click the Search Icon in the appropriate data field and choose a piece of Equipment from the Equipment Catalog. Once a Destination Equipment has been selected, the Dest Catalog Description and Dest Eqp Location auto-fills as read-only items for ease of identification of the piece of Equipment in question.
Destination Port/Pin/Len: If there is a Port/Pin/Len associated with the piece of Equipment, it can be selected here.
Backbone Service: Users can select a Backbone Service in this field associated with the Path Leg.
Add New Ports/Pins/Lens Range: For both Origination and Destination Ports/Pins/Lens the User can click the
Service Desk Cabling Actions
Service Desk Cabling allows the User to make changes to Cabling data on a Service from a Service Order or an Incident. Cabling data, as defined in the Cabling Module is both a textual and visual representation of the User organization's data and voice network to provide users with a virtual roadmap of the many wires, cables, switches, and servers that support the User's organization. For more information about Cabling, its purpose, and how it works, please see the documentation on the Cabling Module.
Service Orders
Add Actions
When creating a new Service via a Service Desk Add Action, new Cabling data can also be created.
To create new Cabling data on an Add Service Desk Action:
Open the 'Cabling' tab and click the Add button.
Fill in the desired Cabling data and save the form to create a new Path Leg.
The Save button will save the Cabling data and leave the form open.
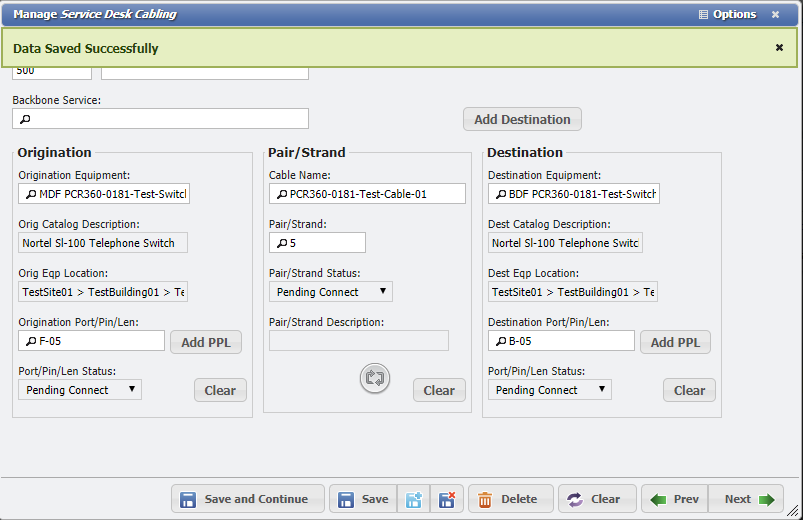
Manage Service Desk Cabling Form example
After saving, the Save and Continue button will open a new empty form and the Delete button will remove the Path Leg.
The
 will save the form, open a new form, and move the Destination Equipment over to the Origination Equipment.
Add New Service Desk Cabling Form example
Continue adding Path Legs until the Cable Path is done.
All Ports/Pins/Lens and Pairs/Strands will be set to a Pending Connect Status until the Order/Action is Completed.

An Example of an Add Action with multiple Cable Path Legs that are Pending Connect
The Service and Cable Path will not be created until the Order/Action completed.
Now that the Cable Path is built, the View Path (Cabling diagram) for the pending Order will be available. To view it, click the "SD” button at the top of the Cabling grid.

The SD button on the Cabling tab
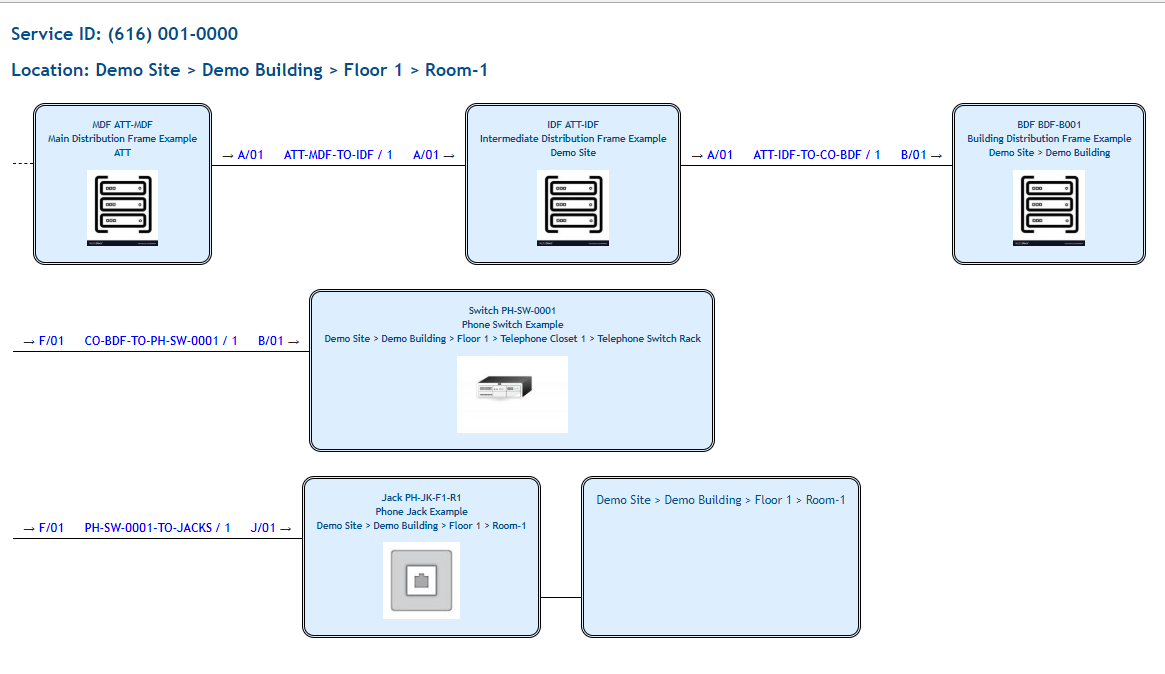
The View Path report
For more information on reading Cabling Diagrams, please see the Cable Paths wiki page.
When the Action is completed, The new Service will be created with the new Cabling data and all Pending Connect Ports and Pairs will be set to Assigned.
Move Actions
When completing a Move Action the Cabling data on the Service will have its Path Location updated to the new Location.
The Cabling Data may also be edited. In the case of a Phone Service:
This may involve altering the entire Path.
Or simply switching the Jack the Phone service is connected to.
While a Move Action is Pending the Ports and Pairs may be in one of the following Pending statuses.
PDPC: (Pending Connect Pending Disconnect) The Port or Pair will be disconnected, moved and reconnected.
Pending Disconnect: The Port or Pair will be disconnected on move completion.
Pending Connect: The Port or Pair will be connected on move completion.
When the Action is completed:
The Pending Connect and PDPC Ports and Pairs will be set to Assigned.
The Pending Disconnect and PDPC Ports and Pairs will be set to Spare.
Add Location Actions
When adding a new Location to a Service, new Cabling data may also be added.
The Cabling process, for Add Location Actions, is identical to an Add Action.
Swap Actions
When completing a Swap Action the Cabling data on the Services will be swapped as well.
While a Swap Action is Pending the Ports and/or Pairs on each Service will have the status PDPC (Pending Connect Pending Disconnect).
When the Action is completed, the PDPC Ports and Pairs will be set to Assigned.
Miscellaneous Actions
Most other Actions types allow editing of the Cabling Data.
While a Miscellaneous Action is Pending the Ports and Pairs may be in one of the following Pending statuses.
PDPC: (Pending Connect Pending Disconnect) The Port or Pair will be disconnected and reconnected.
Pending Disconnect: The Port or Pair will be disconnected on Action completion.
Pending Connect: The Port or Pair will be connected on Action completion.
When the Action is Completed:
The Pending Connect and PDPC Ports and Pairs will be set to Assigned.
The Pending Disconnect and PDPC Ports and Pairs will be set to Spare.
In the example below:
Path Leg 400 is being moved from Jack 1 (J/01) to Jack 2 (J/02) on the Phone Jack Outlet.
This will also affect the Port/Pin/Len (F/01) on the Phone Switch and the Pair/Strand (1).
The Port/Pin/Len (F/01) on the Phone Switch, the Pair/Strand (1) on the Cable, and the Port (J/01) on the Jack are all being disconnected as shown by the Pending Disconnect on the Out action for Path Leg 400.
The new Port/Pin/Len (F/02) on the Phone Switch, the new Pair/Strand (2) on the Cable, and the new Port (*J/02) on the Jack are all being connected as shown by the Pending Connect on the In action for Path Leg 400.

Example of Pending Connect
When the Action is completed:
The Pending Connect and PDPC Ports and Pairs will be set to Assigned.
The Pending Disconnect and PDPC Ports and Pairs will be set to Spare.
