Bulk Update on Inventory

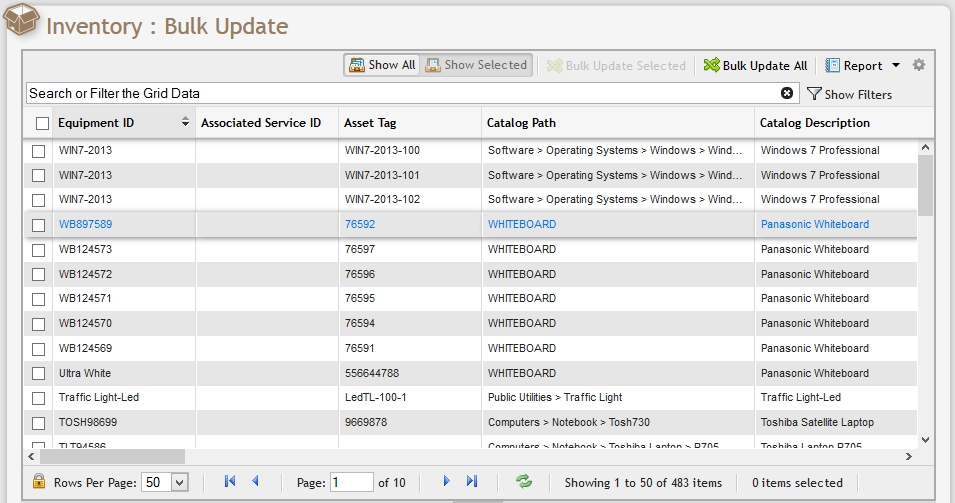
Inventory Bulk Update Grid example
The Inventory Bulk Update screen allows updating multiple pieces of Equipment at once. Existing User Defined Field values will be deleted and the process will run in the background, you will receive a message when it finishes updating the Equipment. You may update Equipment by selecting them in the grid and clicking the "Bulk Update Selected" button or if you want to Bulk Update all Equipment in the grid click the "Bulk Update All" button. This will process an update for every piece of Equipment in the grid.
Bulk Update video

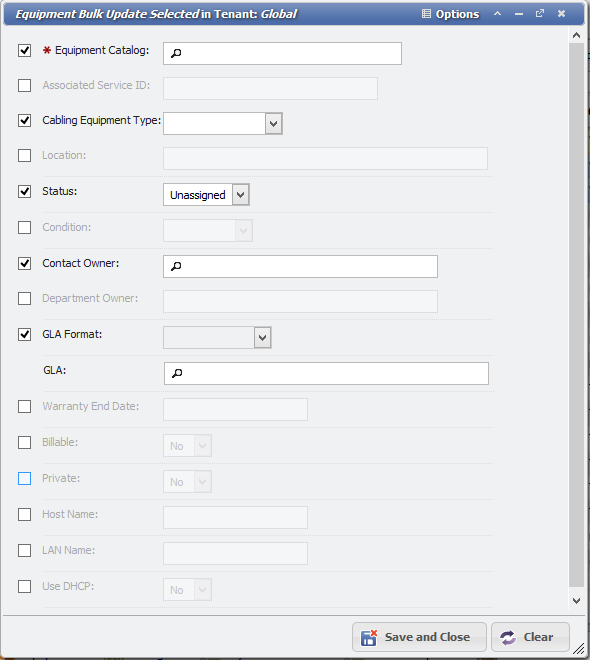
Bulk Update Form
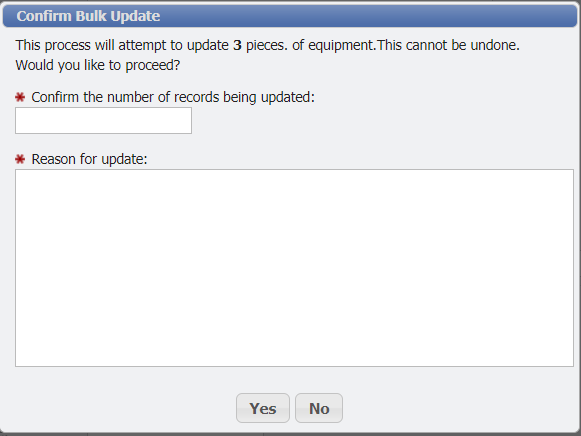
When a User attempts to perform a Bulk Update, PCR-360 will prompt the User to confirm the number of records they are going to update. PCR-360 will not complete the Bulk Update until the number entered by the User matches the number of records that will be updated.
Bulk Updates using "Bulk Update Selected" are limited to 400 records, even though more records can be displayed on the screen. This is an unfortunate technical limitation within PCR-360. "Bulk Update All" does not suffer from this limitation. "Bulk Update All" will allow Users to update all records currently displayed in the grid and does not suffer from this limitation.

Bulk Update Confirmation Dialogue Example
Note: Bulk Updates are limited to 400 records, even though more records can be displayed on the screen. This is an unfortunate technical limitation within PCR-360.
Fields Available
Equipment Catalog: Change the Equipment Catalog. If a Location is required for this new Catalog type the Location field will also need to be Bulk Updated.
Associated Service ID: Change the Service ID associated with the Equipment.
Cabling Equipment Type: Change the cabling equipment type for the Equipment.
Location: Change the Location where the Equipment is located.
Status: Change the status of the Equipment.
Condition: Change the condition of the Equipment.
Contact Owner: Change the Contact Owner. If the previous Owner was a Department it will be changed to this Contact Owner.
OR (Equipment can only be assigned to a Contact Owner or a Department Owner it cannot be set to both )
Department Owner: Change the Department Owner. If the previous Owner was a Contact it will be changed to this Department Owner.
GLA Format: Set the format for the GLA. If you are updating the Owner as well this field will be read-only and set to the GLA Format of the Owner. You may set the format to delimit the GLA field by. The format must match the format on the Equipment, otherwise, it won't be able to update the GLA.
GLA: Update the GLA for the Equipment. This field is delimited by the GLA Format, the default GLA format is used if the format field is blank.
When a GLA is edited, the User is prompted to select when that change should apply. Selecting "Effective Today" will apply the change immediately, while selecting "Date to Last Billed" will begin as of the date of the last Bill Run. An example of the prompt is displayed below.

Effective Date Prompt
Warranty End Date: Set the Warranty End Date for the Equipment.
Billable: Change whether the Equipment is Billable or not.
Private: Change whether the Equipment contains sensitive, private or confidential information.
Host Name: Change the host name on the network for this Equipment.
LAN Name: Change the LAN Name for this Equipment on the network.
Use DHCP: Change whether the Equipment uses DHCP to obtain its network information.
