Generic Incident Codes
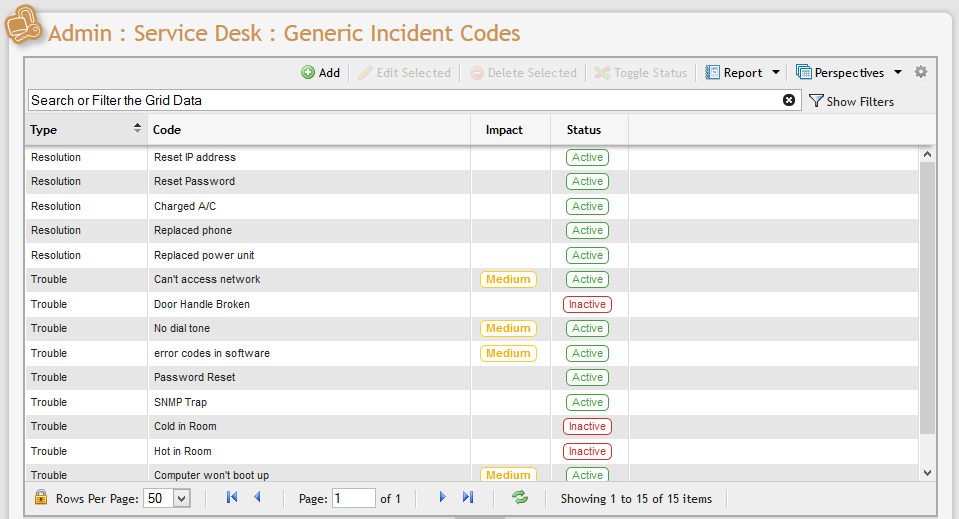
When a User or Customer submits an Incident, they are required to post an Incident Code to the item. For example, if the complaint relates to a broken door handle in an office, the User or Customer can select from a drop-down list of default Incident Codes to see if one might apply.
An Incident Code might enact a series of defaults (as implemented in the SDC section) or simply make it easier for the User's organization to identify the nature of the complaint. Currently there are two types of Incident Codes. The 'Trouble' type defines what the issue is to aid in correcting a given Incident. A 'Resolution' type is assigned when an Incident has been resolved.
In any case, the contents of the Generic Incident Codes grid populate the drop-down menus that are encountered during the submission of an Incident only if no Incident Codes are populated on the Incident’s service or equipment. Admin Users can add any number of Generic Incident Codes to make the Incident process more streamlined and effective.
Adding an Incident Code
Navigate to the Generic Incident Codes grid by opening Admin > Service Desk > Generic Incident Codes.
This action opens the Generic Incident Codes grid.
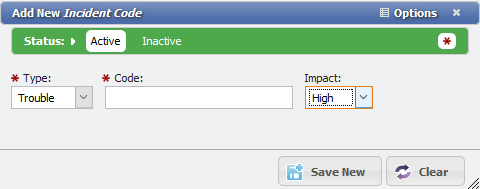
To add a new incident code, click the 'Add' button located immediately above the grid.
In the Incident Code data entry form, Users are prompted to define several required fields.
Users can define the 'Type' as either 'Trouble' or 'Resolution'. This indicates that the code populates the Trouble Code or Resolution Code selectors on Service Desk Incidents.
Next, Users can manually input a Code. This is typically a brief description of the Incident such as "Door Handle Broken" for a 'Trouble' code or "Replaced Bulb" for a 'Resolution' code.
Finally, the User must define the Impact of the Incident as 'High', 'Medium', or 'Low' based on the seriousness of the complaint. When a specific code is selected from Service Desk Incidents, this Impact specification is also populated onto the Incident.
Saving New Incident Codes
Once all required fields have been satisfied, click the 'Save New' button
Editing Existing Incident Codes
Admin Users can edit existing Incident Codes by double-clicking on any item on the Generic Incident Codes grid or by selecting an item and clicking the 'Edit Selected' button located immediately above the Grid.
This action opens the item's Incident Code data entry form. The User can define the item's inputs by following the protocol established earlier in this section. Once all required fields have been satisfied, click the Save button 
Admin Users can delete existing Incident Codes by selecting the appropriate item on the Generic Incident Codes grid and clicking the Delete Selected button 