Bills
Generate a New Bill
The Generate Bill function makes it easy for Admin Users to generate organization-wide billing reports by month.
To generate a Bill, navigate to Admin > Billing > Bills.
Click the
Generate Bill form
In the Generate Bill form, input a Start Date manually or select the appropriate date from the calendar if it is different than the default Start Date Displayed. Since billing in PCR-360 is always for full month periods, the End Date is calculated by the application. If a Date is chosen that overlaps with a previously Generated Bill, an error will be displayed.
Next, click the Generate Bill button located at the bottom of the form. Because of the large volume of data associated with this task, the PCR-360 application takes some time to generate the bill.
Once the bill generation process has finished, the User receives an application message indicating its completion. When the message has been received, the User is notified with the following alert displayed at the lower-right corner of the User's browser:
Application message
The User can read the message in the 'Messages' section of the Landing Page.
When a Bill is run, Service Desk Finalized Items with Non-Recuring Charges, will be set to the Billed Status. For Service Desk Items without Non-Recuring Charges, the Status will remain as Finalized.
Generate Test Bill
Test Bills allow Users to review the charges that will be present on the Bill. If the Bill does not come out as expected then changes/updates can be made. Any Test Bill can be Regenerated, so Test Bills can be run months in advance without causing interference to normal Billing activity. Another difference between a Test Bill and an Actual Bill is that Test Bills are not assigned Invoice Numbers.
Scheduling a Bill
To schedule a Bill, click the 
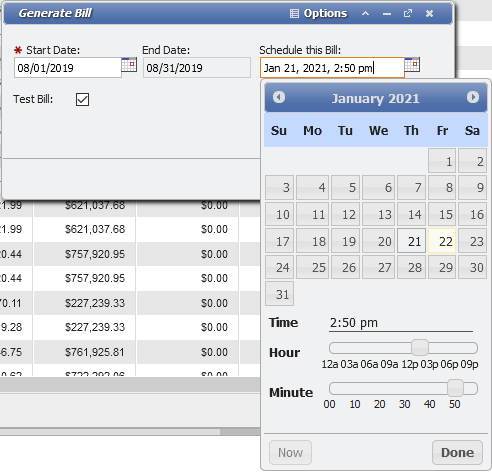
Schedule this Bill example
Because this schedules an Event, even though the Event is visible in the Events grid, there is no way for a User to directly cancel the Event. If you need to remove the scheduled bill generation or alter it, you can contact PCR and we will take care of it for you.
Viewing the New Bill
Now that the Bill has been generated, the Admin User can view Bill Details or the new Bill by navigating to Admin > Billing > View / Report > Bill Details or View Bill.
Reporting Bill Details form
The Bill Details Grid can be used to generate reports and explore the billed data. This Grid displays each item billed and can be filtered and sorted as needed.
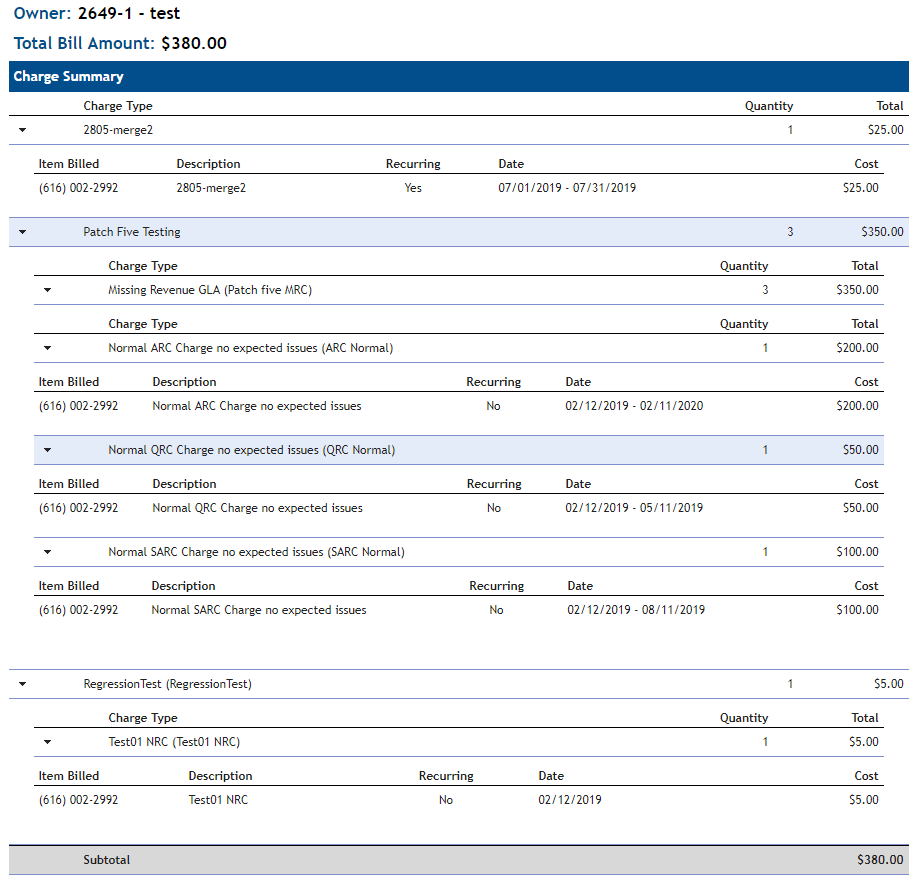
Viewing the bill allows the User to view and print formatted Bill, edit the Bill details (Date Range, Charge Account, and Bill View), and download as a PDF or CSV file.
Bill Details form
Approve/Unapprove a Bill
After a Bill is generated, it has a status of Complete. It can be Approved by clicking the 'Approve/Unapprove' button on the Bills grid. Approving the Bill allows it to be seen on CustomerCenter. Additionally, the Approval process updates all the Invoices generated on that Bill from status Pending to Billed. Once Approved, the Bill can be Unapproved to remove it from CustomerCenter. However, this DOES NOT change the Billed Invoices back to Pending.

In addition to setting the Billed status on all the Invoices, the Approval process sets the specified date as Invoice Date on every Invoice. The Due Date is also set using the BILL_INVOICE_DUEDAYS config option. This option specifies the number of days after the Invoice Date that each Invoice is Due. The default setting for this config option is 30 days.
Email a Bill
When the Bill is approved, the User can click on the
Before an email is generated all of the following things must be true:
The Contact must have the 'Coordinator' Type set for that Contact.
The 'Allow Coordinator Bill Email' flag on the Contact's 'Customer' tab must be True.
The Coordinator must have GLA Permissions to see the GLA that is being Billed.
To determine if a Contact has GLA Permissions, first, the Contact record GLA Permissions are used.
These are added to the GLA Permissions of the Department that the Coordinator belongs to on the Contact record.
Finally the GLA Permissions of all the Departments the Contact is a Coordinator for are added as well. All three sets of GLA Permissions are combined to determine if the Contact has GLA Permissions.
The GLA must appear on the Bill in order to be seen; GLAs that do not appear in the Bill will not be sent for that month.
If a Coordinator does not have GLA Permissions, then the email will not send for that person. This means that there MUST be GLA Permissions set before the Coordinator will get an email. Using the generic options of 'Permit All' or 'Permit None' will result in no emails being sent when using the email coordinators button from the Bills grid. A coordinator must be explicitly assigned to a GLA to see permissions and receive the coordinator email.
Clicking the 
Send Bill E-mail to Coordinators form
The email can include the Bill as a CSV or PDF attachment as well as the GLA totals. This goes out in the email to the Coordinators. Select the Role(s) that are desired for the Bill Permissions. There is a standard set of text that the User can then customize in the 'Email Body' field. The default 'Subject' field for the email can be customized by the BILL_COORDINATORS_SUBJECT parameter.
When finished, click the
Regenerate
Users can re-run the Bill if needed.
Select the Bill Date Range entry in the Bill Generation Grid.
Click Regenerate button located directly above the
button and click the Regenerate button on the confirmation dialog.
Confirm Regenerate button
A message is received on the homepage when the process is completed. Note: Users can only Regenerate the most recent Bill that is NOT a test bill.
Application message
Delete Selected
The 'Delete Selected' button allows the user to remove a Bill completely. Only the most recent Bill or a Test Bill can be deleted. Once Approved, a Bill can still be deleted which removes all Invoices associated with the Bill. However, only Pending or Billed Invoices can be deleted. Once any Invoice associated with a Bill has been Paid (Paid in Full or Partially Paid), they cannot be deleted, and the Bill that generated them cannot be deleted.
Clear Cache
Users can clear the cache for a given Bill manually whenever desired. The cache allows large Bills to be viewed quickly. Bill information is read into the cache and is tied to the User's session data. Every time the User logs out their bill cache information will be cleared until the next attempt to view the Bill. For manually clearing the cache, first select the Bill that has been generated previously. Click the
This brings up the 'Clear Bill Cache' form.
Clear Bill Cache form
The cache can be cleared for All users or for an individual user. Select the User option that is desired to clear the cache for and click the
The Clear Cache process runs and returns the User to the Manage Clear Bill Cache form and the cache is cleared.
Notes
If multiple Users attempt to manually clear the cache at different times, it is possible for Bills to look different based on the version of the Bill each generated.
Clearing the cache within PCR360 has no effect on the Browser Cache.
It is recommended to clear the cache before viewing a Bill.
The Date/Time that appears on a Bill is not the current Date/Time, it is the Cache's Date/Time.
Bill Details form
Trigger Exports
From the Bill Generation Grid, select Desired Bill. Click the
Check Progress
This provides the User with three progress bars. One for 'Processing Bill Calls', one for 'Processing Bill Usage', and one for 'Bill Charges'. This shows the progress for any bill that is selected.
Process Report
After running a Bill, the Process Report shows details about the Billing process. There are sections for Calls, Usage, and Charges displaying counts and total cost respectively. Additionally, if the process encounters a problem when processing any of these sections, the problems are listed with links to the specific records involved.
Common Problems with Running the Bill
Missing Revenue GLAs: check the Charge Catalog. All Charge Catalogs used on the Bill MUST have a Revenue GLA
Missing Records: if the process encounters an orphaned Charge record, it reports
Unbillable: Service Desk, Services, Equipment, and GLA Charges show as unbillable if the Service/Equipment or GLAs involved are not flagged as billable
Charge Behaviours
PCR-360 contains two different types of Charges.
Recurring: Charges that recur over time for continued usage of a piece of Equipment or Service. There are four types of Recurring Charges for Organizations to base their Billing practices on.
Monthly: This is the default for a Charge's Charge type. The Charge will be applied every month until it is stopped.
These Charges can be set to "Bill Forward", thus Bill one month ahead of the Billing Cycle.
These Charges can also be set to 'Bill Backward' in order to catch up on past Billing Cycles.
When the GLA for this Charge is updated, the Charge is Stopped and Restarted.
If Selective Billing was used in the Charge Catalog, some of the Months may not be billed. Also, if Selective Billing is used, "Bill Forward" and "Bill Backward" will be disabled.
Quarterly: The Charge will be applied every three months until it is stopped.
These Charges are always treated as being set for "Bill Forward".
Back Dated Charges will Bill for one cycle only, before continuing on the current cycle.
Example, a Charge backdated six months ago, will Bill for only the last three months.
When the GLA for this Charge is updated, the Charge is Stopped and a new Charge is Started.
The Effective Date for updates to this type of Charges can only be set for the date of the Last Billed.
Semi-Annual: The Charge will be applied every six months until it is stopped.
These Charges are always treated as being set for "Bill Forward".
Back Dated Charges will Bill for one cycle only, before continuing on the current cycle.
Example, a Charge backdated twelve months ago, will Bill for only the last six months.
When the GLA for this Charge is updated, the Charge is Stopped and a new Charge is Started.
The Effective Date for updates to this type of Charges can only be set for the date of the Last Billed.
Annual: The Charge will be applied every twelve months until it is stopped.
These Charges are always treated as being set for "Bill Forward".
Back Dated Charges will Bill for one cycle only, before continuing on the current cycle.
Example, a Charge backdated three years ago, will Bill for only the last year.
When the GLA for this Charge is updated, the Charge is Stopped and a new Charge is Started.
The Effective Date for updates to this type of Charges can only be set for the date of the Last Billed.
Non-Recurring: One-Time Only Charges.
Bill Archiving
When the Bill process runs, it inserts all the data into the BILL_DETAILS and BILL_TYPE_* tables. After a specific amount of time elapses, the data is "archived" into a new dated version of those tables. BILL_DETAILS_1701 for January 2017 or BILL_DETAILS_1702T for the Test Bill in February 2017. The User can set the Archive timeout under Admin > Tenant Management. There is a "Bill Archiving" field that specifies the number of days to wait before running the archive. A zero in this field indicates that the Bill archives the night after it was generated. Most of our customers have found that a value of 10 or 15 days allows them to run reports and pull any other data before the bill "archives".
The View Bill feature functions on archived or unarchived bill data.